计算机科学与技术 系统开发实训笔记 Skyforever 2025-05-12 2025-06-05 系统开发实训笔记 笔记按照前后端的实现时间编写
代码开源地址 前端 :客户管理系统前端
后端: 客户管理系统后端
Day1 环境初始化 后端搭建 1.项目环境搭建 1)idea初始化
类型选择Maven,jdk选17
idea可以自动安装Java包,不要去手动下载
下面这个Springboot要求选择3.0.2 !!!
2)依赖下载
下载太慢了?看这个配置阿里云镜像的教程,不要像老师一样手动安装配置maven
IDEA自带Maven添加阿里镜像
3)配置工程
application.properties文件配置如下
1
2
3
4
5
6
7
8
9
10
11
12
13
14
15
16
17
spring.application.name=demo server.port=8080 spring.datasource.url=jdbc:mysql://localhost:3306/erp?useUnicode=true&characterEncoding=utf8&serverTimezone=UTC spring.datasource.username=root spring.datasource.password=134679 spring.datasource.driver-class-name=com.mysql.cj.jdbc.Driver mybatis.mapper-locations=classpath*:mapper/**/*Mapper.xml mybatis.configuration.log-impl=org.apache.ibatis.logging.stdout.StdOutImpl
4)配置Maven
确保pom.xml有以下依赖:
1 2 3 4 5 6 7 8 9 10 11 12 13 14 15 16 17 18 19 20 21 22 23 24 25 26 27 28 29 30 31 32 33 34 35 36 37 38 39 40 41 42 43 44 45 46 47 48 49 50 51 52 <dependencies > <dependency > <groupId > org.springframework.boot</groupId > <artifactId > spring-boot-starter-web</artifactId > </dependency > <dependency > <groupId > org.mybatis.spring.boot</groupId > <artifactId > mybatis-spring-boot-starter</artifactId > <version > 3.0.4</version > </dependency > <dependency > <groupId > com.mysql</groupId > <artifactId > mysql-connector-j</artifactId > <scope > runtime</scope > </dependency > <dependency > <groupId > org.projectlombok</groupId > <artifactId > lombok</artifactId > <optional > true</optional > </dependency > <dependency > <groupId > org.springframework.boot</groupId > <artifactId > spring-boot-starter-test</artifactId > <scope > test</scope > </dependency > <dependency > <groupId > org.mybatis.spring.boot</groupId > <artifactId > mybatis-spring-boot-starter-test</artifactId > <version > 3.0.4</version > <scope > test</scope > </dependency > <dependency > <groupId > mysql</groupId > <artifactId > mysql-connector-java</artifactId > <version > 8.0.33</version > </dependency > <dependency > <groupId > com.baomidou</groupId > <artifactId > mybatis-plus-boot-starter</artifactId > <version > 3.5.5</version > </dependency > </dependencies >
5)安装插件
IDEA插件之mybatisx插件使用教程
如何在 IntelliJ IDEA 中安装通义灵码 - AI编程助手提升开发效率
6)中文乱码问题
直接在文件-设置里搜索utf-8,把文件编码的三个位置都调成utf-8就行
2.配置数据库 先使用navicat创建数据库
往数据库里新建以下表,这些表是需求分析后分析出来的
1
2
3
4
5
6
7
8
9
10
11
12
13
14
15
16
17
18
19
20
21
22
23
24
25
26
27
28
29
30
31
32
33
34
35
36
37
38
39
40
41
42
43
44
45
46
47
48
49
50
51
52
53
54
55
56
57
58
59
60
61
62
63
64
65
CREATE TABLE `t_after_sales` ( `id` int NOT NULL AUTO_INCREMENT COMMENT '服务单号 (主键)' , `cust_id` int DEFAULT NULL COMMENT '关联的客户ID (关联t_customer.id)' , `question` varchar (50 ) DEFAULT NULL COMMENT '售后问题类型或简述' , `state` varchar (50 ) DEFAULT NULL COMMENT '售后处理状态 (如:待处理、处理中、已解决)' , `record` varchar (200 ) DEFAULT NULL COMMENT '售后处理过程或回访记录详情' , `level` int DEFAULT NULL COMMENT '问题严重性或优先级 (可用于内部评估)' , PRIMARY KEY (`id`) ) ENGINE= InnoDB DEFAULT CHARSET= utf8mb4 COLLATE = utf8mb4_0900_ai_ci COMMENT= '售后服务记录表 (客户服务)' ; CREATE TABLE `t_customer` ( `id` int NOT NULL AUTO_INCREMENT COMMENT '客户ID (主键)' , `cust_name` varchar (50 ) DEFAULT NULL COMMENT '客户名称或公司名称' , `address` varchar (100 ) DEFAULT NULL COMMENT '客户联系地址' , `phone` varchar (11 ) DEFAULT NULL COMMENT '客户联系电话' , `cust_type` varchar (50 ) DEFAULT NULL COMMENT '客户类型或分组 (如:所属行业、区域)' , `grade` int DEFAULT NULL COMMENT '客户等级 (评估客户价值)' , `his_total` double DEFAULT NULL COMMENT '历史交易总额 (用于客户价值分析)' , PRIMARY KEY (`id`) ) ENGINE= InnoDB AUTO_INCREMENT= 6 DEFAULT CHARSET= utf8mb4 COLLATE = utf8mb4_0900_ai_ci COMMENT= '客户信息表 (客户档案)' ; CREATE TABLE `t_item` ( `id` int NOT NULL AUTO_INCREMENT COMMENT '商品ID (主键)' , `item_name` varchar (50 ) DEFAULT NULL COMMENT '商品名称' , `price` double DEFAULT NULL COMMENT '商品单价' , `item_date` date DEFAULT NULL COMMENT '商品生产日期或上架日期' , `hot_title` varchar (100 ) DEFAULT NULL COMMENT '促销活动标题或描述' , `facturer` varchar (100 ) DEFAULT NULL COMMENT '生产厂家或品牌商' , `store` int DEFAULT NULL COMMENT '商品当前库存数量' , PRIMARY KEY (`id`) ) ENGINE= InnoDB DEFAULT CHARSET= utf8mb4 COLLATE = utf8mb4_0900_ai_ci COMMENT= '商品信息表 (产品库)' ; CREATE TABLE `t_menu` ( `id` int NOT NULL AUTO_INCREMENT COMMENT 'ID (主键)' , `label` varchar (50 ) DEFAULT NULL COMMENT '导航名称' , `component` int DEFAULT NULL COMMENT '子id' , `pid` int DEFAULT NULL COMMENT '父id' , PRIMARY KEY (`id`) ) ENGINE= InnoDB AUTO_INCREMENT= 10 DEFAULT CHARSET= utf8mb4 COLLATE = utf8mb4_0900_ai_ci COMMENT= '前端菜单表' ; CREATE TABLE `t_order` ( `id` int NOT NULL AUTO_INCREMENT COMMENT '订单ID (主键)' , `cust_id` int DEFAULT NULL COMMENT '下单客户ID (关联t_customer.id)' , `item_id` int DEFAULT NULL COMMENT '购买的商品ID (关联t_item.id)' , `order_date` datetime DEFAULT NULL COMMENT '订单创建日期和时间' , `state` varchar (50 ) DEFAULT NULL COMMENT '订单状态 (如:待付款、待发货、已完成)' , `pay` varchar (50 ) DEFAULT NULL COMMENT '支付方式 (如:支付宝、微信、银行卡)' , `pay_money` double DEFAULT NULL COMMENT '订单实际支付金额' , PRIMARY KEY (`id`) ) ENGINE= InnoDB DEFAULT CHARSET= utf8mb4 COLLATE = utf8mb4_0900_ai_ci COMMENT= '订单信息表 (交易记录)' ; CREATE TABLE `t_sell_jh` ( `id` int NOT NULL AUTO_INCREMENT COMMENT '机会或计划ID (主键)' , `custid` int DEFAULT NULL COMMENT '关联的客户ID' , `channel_id` int DEFAULT NULL COMMENT '销售机会来源渠道ID (可关联渠道表)' , `money` double DEFAULT NULL COMMENT '预计成交金额' , `now_step` varchar (50 ) DEFAULT NULL COMMENT '当前销售阶段 (如:初步接触、报价、签约)' , `emp_id` int DEFAULT NULL COMMENT '负责该机会的销售员工ID' , PRIMARY KEY (`id`) ) ENGINE= InnoDB AUTO_INCREMENT= 14 DEFAULT CHARSET= utf8mb4 COLLATE = utf8mb4_0900_ai_ci COMMENT= '销售机会/计划表 (销售过程管理)' ;
然后在idea里新加一个数据源
填写用户名,密码,数据库名
3.用mybatiesx生成三个层级代码 使用步骤:
1、安装MybatisX插件;IDEA插件之mybatisx插件使用教程
2、idea的database连接数据库;
3、数据库表上右键,点击MybatisX-Generator;
4、 进行生成代码的配置,按自己的项目项目修改如图三个位置的路径,配置完成后点击Next
下面是老师的截图:
5.按照下面的截图调整
6.运行代码,看有什么问题
注意启动类要添加扫描mapper的代码
1
2
3
4
5
6
7
@SpringBootApplication @MapperScan("com.example.demo.mapper") public class DemoApplication { public static void main (String[] args) { SpringApplication.run(DemoApplication.class, args); } }
4.写测试代码测试增删改查是否正常 1)mapper测试
右键括号内->生成->测试
就会生成对应测试,修改对应测试方法即可
1
2
3
4
5
6
7
8
9
10
11
12
13
14
15
16
17
18
19
20
21
22
23
24
25
26
27
28
29
30
31
32
33
34
35
36
37
38
39
40
41
42
43
44
45
46
47
48
49
50
51
52
53
54
55
56
57
58
59
60
61
62
63
64
65
66
67
68
package com.example.demo.mapper;import com.baomidou.mybatisplus.core.conditions.update.UpdateWrapper;import com.example.demo.pojo.User;import org.junit.jupiter.api.Test;import org.springframework.beans.factory.annotation.Autowired;import org.springframework.boot.test.context.SpringBootTest;import java.util.List;@SpringBootTest class UserMapperTest { @Autowired private UserMapper userMapper; private Integer userId; @Test void contextLoads () { } @Test void saveUser () { User user = new User (); user.setUsername("testUser" ); user.setEmail("[email protected] " ); user.setPhone("1234567890" ); user.setPassword("password123" ); userMapper.insert(user); userId = user.getId(); } @Test void getOne () { User user = userMapper.selectById(userId); System.out.println(user); } @Test void getList () { UpdateWrapper<User> wrapper = new UpdateWrapper <>(); wrapper.eq("username" , "testUser" ); List<User> users = userMapper.selectList(wrapper); for (User u : users) { System.out.println(u); } } @Test void updateUser () { User user = new User (); user.setId(userId); user.setUsername("updatedUser" ); user.setEmail("[email protected] " ); userMapper.updateById(user); } @Test void deleteUser () { userMapper.deleteById(userId); } }
2)service测试
1
2
3
4
5
6
7
8
9
10
11
12
13
14
15
16
17
18
19
20
21
22
23
24
25
26
27
28
29
30
31
32
33
34
35
36
37
38
39
40
41
42
43
44
45
46
47
48
49
50
51
52
53
54
55
56
57
58
59
60
61
62
63
64
65
66
67
68
package com.example.demo.service;import com.baomidou.mybatisplus.core.conditions.query.QueryWrapper;import com.example.demo.pojo.User;import org.junit.jupiter.api.Test;import org.springframework.beans.factory.annotation.Autowired;import org.springframework.boot.test.context.SpringBootTest;import java.util.List;@SpringBootTest class UserServiceTest { @Autowired private UserService userService; private Integer userId; @Test void contextLoads () { } @Test void saveUserService () { User user = new User (); user.setUsername("testUser" ); user.setEmail("[email protected] " ); user.setPhone("1234567890" ); user.setPassword("password123" ); userService.saveOrUpdate(user); userId = user.getId(); } @Test void getOneService () { User user = userService.getById(userId); System.out.println("user=" + user); } @Test void getListService () { QueryWrapper<User> wrapper = new QueryWrapper <>(); wrapper.eq("username" , "testUser" ); List<User> list = userService.list(wrapper); for (User u : list) { System.out.println(u); } } @Test void updateUserService () { User user = new User (); user.setId(userId); user.setUsername("updatedUser" ); user.setEmail("[email protected] " ); userService.updateById(user); } @Test void deleteUserService () { userService.removeById(userId); } }
5.实现基本代码 1)对客户管理系统做需求分析,写出以下表
1
2
3
4
5
6
7
8
9
10
11
12
13
14
15
16
17
18
19
20
21
22
23
24
25
26
27
28
29
30
31
32
33
34
35
36
37
38
39
40
41
42
43
44
45
46
47
48
49
50
51
52
53
54
CREATE TABLE `t_after_sales` ( `id` int NOT NULL AUTO_INCREMENT COMMENT '服务单号 (主键)' , `cust_id` int DEFAULT NULL COMMENT '关联的客户ID (关联t_customer.id)' , `question` varchar (50 ) DEFAULT NULL COMMENT '售后问题类型或简述' , `state` varchar (50 ) DEFAULT NULL COMMENT '售后处理状态 (如:待处理、处理中、已解决)' , `record` varchar (200 ) DEFAULT NULL COMMENT '售后处理过程或回访记录详情' , `level` int DEFAULT NULL COMMENT '问题严重性或优先级 (可用于内部评估)' , PRIMARY KEY (`id`) ) ENGINE= InnoDB DEFAULT CHARSET= utf8mb4 COLLATE = utf8mb4_0900_ai_ci COMMENT= '售后服务记录表 (客户服务)' ; CREATE TABLE `t_customer` ( `id` int NOT NULL AUTO_INCREMENT COMMENT '客户ID (主键)' , `cust_name` varchar (50 ) DEFAULT NULL COMMENT '客户名称或公司名称' , `address` varchar (100 ) DEFAULT NULL COMMENT '客户联系地址' , `phone` varchar (11 ) DEFAULT NULL COMMENT '客户联系电话' , `cust_type` varchar (50 ) DEFAULT NULL COMMENT '客户类型或分组 (如:所属行业、区域)' , `grade` int DEFAULT NULL COMMENT '客户等级 (评估客户价值)' , `his_total` double DEFAULT NULL COMMENT '历史交易总额 (用于客户价值分析)' , PRIMARY KEY (`id`) ) ENGINE= InnoDB DEFAULT CHARSET= utf8mb4 COLLATE = utf8mb4_0900_ai_ci COMMENT= '客户信息表 (客户档案)' ; CREATE TABLE `t_item` ( `id` int NOT NULL AUTO_INCREMENT COMMENT '商品ID (主键)' , `item_name` varchar (50 ) DEFAULT NULL COMMENT '商品名称' , `price` double DEFAULT NULL COMMENT '商品单价' , `item_date` date DEFAULT NULL COMMENT '商品生产日期或上架日期' , `hot_title` varchar (100 ) DEFAULT NULL COMMENT '促销活动标题或描述' , `facturer` varchar (100 ) DEFAULT NULL COMMENT '生产厂家或品牌商' , `store` int DEFAULT NULL COMMENT '商品当前库存数量' , PRIMARY KEY (`id`) ) ENGINE= InnoDB DEFAULT CHARSET= utf8mb4 COLLATE = utf8mb4_0900_ai_ci COMMENT= '商品信息表 (产品库)' ; CREATE TABLE `t_order` ( `id` int NOT NULL AUTO_INCREMENT COMMENT '订单ID (主键)' , `cust_id` int DEFAULT NULL COMMENT '下单客户ID (关联t_customer.id)' , `item_id` int DEFAULT NULL COMMENT '购买的商品ID (关联t_item.id)' , `order_date` datetime DEFAULT NULL COMMENT '订单创建日期和时间' , `state` varchar (50 ) DEFAULT NULL COMMENT '订单状态 (如:待付款、待发货、已完成)' , `pay` varchar (50 ) DEFAULT NULL COMMENT '支付方式 (如:支付宝、微信、银行卡)' , `pay_money` double DEFAULT NULL COMMENT '订单实际支付金额' , PRIMARY KEY (`id`) ) ENGINE= InnoDB DEFAULT CHARSET= utf8mb4 COLLATE = utf8mb4_0900_ai_ci COMMENT= '订单信息表 (交易记录)' ; CREATE TABLE `t_sell_jh` ( `id` int NOT NULL AUTO_INCREMENT COMMENT '机会或计划ID (主键)' , `custid` int DEFAULT NULL COMMENT '关联的客户ID' , `channel_id` int DEFAULT NULL COMMENT '销售机会来源渠道ID (可关联渠道表)' , `money` double DEFAULT NULL COMMENT '预计成交金额' , `now_step` varchar (50 ) DEFAULT NULL COMMENT '当前销售阶段 (如:初步接触、报价、签约)' , `emp_id` int DEFAULT NULL COMMENT '负责该机会的销售员工ID' , PRIMARY KEY (`id`) ) ENGINE= InnoDB DEFAULT CHARSET= utf8mb4 COLLATE = utf8mb4_0900_ai_ci COMMENT= '销售机会/计划表 (销售过程管理)' ;
2)在数据库里创建以上表后,再去idea里通过mybatiesx生成表格对应的增删改查代码
上面学了什么内容? 指导你如何从零开始搭建一个基于 Spring Boot 框架的后端 Java 项目,并使用 MyBatis-Plus 作为数据访问层框架,连接 MySQL 数据库
MyBatis-Plus 代码用法 Mapper 层 (UserMapper):
MyBatis-Plus 会为你的每个数据库表生成一个对应的 Mapper 接口(例如 UserMapper 对应 t_user 表,尽管 t_user 表的创建 SQL 未在文档中给出,但测试代码中使用了 User 类和 UserMapper,可以推断)。 这个 Mapper 接口通常会继承 MyBatis-Plus 提供的 BaseMapper<Entity> 接口,这里的 Entity 就是对应数据库表的 Java 类(例如 User)。 通过继承 BaseMapper,你的 Mapper 接口会自动拥有 许多常用的 CRUD 方法,你无需自己编写这些方法的 SQL。 文档中 UserMapperTest 测试代码展示了如何使用这些自动拥有的方法:userMapper.insert(user): 插入 一条数据到数据库。userMapper.selectById(userId): 根据主键 ID 查询 单条数据。userMapper.selectList(wrapper): 根据条件 查询 多条数据。这里的 wrapper (如 UpdateWrapper 或 QueryWrapper) 是 MyBatis-Plus 提供的用于构建查询条件的工具。userMapper.updateById(user): 根据 Entity 对象的主键 ID 更新 数据。userMapper.deleteById(userId): 根据主键 ID 删除 数据。 核心用法: 你不再需要写 XML 文件或注解来定义基本的 CRUD SQL,直接调用继承自 BaseMapper 的方法即可完成数据库操作。Service 层 (UserService):
MyBatis-Plus 同样提供了一个 IService<Entity> 接口。MyBatisX 插件通常会生成一个对应的 Service 接口(例如 UserService)和其实现类(例如 UserServiceImpl),Service 接口通常会继承 IService<Entity>。 Service 层封装了更高级的业务逻辑,它可能会调用一个或多个 Mapper 方法来完成一个更复杂的业务操作。 继承 IService 后,你的 Service 接口会自动拥有 许多常用的 Service 层方法,它们底层调用了对应的 Mapper 方法,并可能包含事务管理等功能。 文档中 UserServiceTest 测试代码展示了如何使用这些方法:userService.saveOrUpdate(user): 保存或更新数据。如果 user 对象有 ID 则更新,没有 ID 则插入。userService.getById(userId): 根据 ID 查询单条数据。userService.list(wrapper): 根据条件查询多条数据。userService.updateById(user): 根据 ID 更新数据。userService.removeById(userId): 根据 ID 删除数据。 核心用法: Service 层提供了比 Mapper 层更高层级的操作方法,通常用于处理业务逻辑,MyBatis-Plus 也为 Service 层提供了很多基础方法,进一步简化了开发。后端代码分层解释 Entity 层 (也被称为 POJO 层 或 Domain 层) 功能: 这一层包含对应数据库表的 Java 类(例如文档中测试代码里的 User 类)。每个类的属性对应数据库表的字段。这些类主要用于封装数据 ,在不同的层之间传递数据。它们通常是简单的 Java Bean,包含私有属性和公有的 getter/setter 方法(使用 Lombok 注解的**@Data**可以进一步简化这些)。文档中的体现: 测试代码中出现了 com.example.demo.pojo.User 类,这就是 Entity 层的一个例子。Mapper 层 (也被称为 DAO 层 - Data Access Object) 功能: 这一层是数据访问层 ,直接负责与数据库进行交互。它定义了对数据库执行各种操作的方法(如插入、删除、更新、查询)。MyBatis-Plus 的 Mapper 接口通常继承 BaseMapper,从而自动获得基础的 CRUD 能力。这个层只关注如何存取数据 ,不包含业务逻辑。文档中的体现: UserMapperTest 使用了 UserMapper 接口,并调用了它的方法。 @MapperScan("com.example.demo.mapper") 也表明存在一个 mapper 包存放 Mapper 接口。Service 层 功能: 这一层是业务逻辑层 。它封装了具体的业务处理流程。Service 层的方法会调用一个或多个 Mapper 层的方法来完成一个完整的业务功能。例如,“注册用户”这个业务可能需要先调用 Mapper 插入用户数据,然后调用另一个 Mapper 插入用户的默认设置。Service 层是协调数据访问和实现业务规则的地方。它不直接与数据库交互,而是通过调用 Mapper 来实现。MyBatis-Plus 的 Service 接口通常继承 IService,提供了一些常用的业务方法。文档中的体现: UserServiceTest 使用了 UserService 接口,并调用了它的方法。这表明存在一个 Service 层来处理用户相关的业务操作。4. Controller 层 (也被称为 Web 层)
功能: 这一层是应用程序的入口点 ,直接处理来自客户端(比如浏览器、手机 App、其他服务)的 HTTP 请求。它负责接收请求参数。 它根据请求的 URL 找到对应的处理方法。 它调用 Service 层 的方法来执行具体的业务逻辑。 它处理 Service 层返回的结果。 它准备并返回响应给客户端(通常是 JSON 格式的数据,或者是一个网页)。 重要的原则是: Controller 层应该尽可能“薄”,它只负责接收请求、调用 Service、返回响应,不应该包含复杂的业务逻辑 。业务逻辑应该全部放在 Service 层。前端搭建 1.安装Node.js 下载地址:下载 Node.js-Node.js中文网
1)配置镜像
参考:npm 最新国内镜像源设置 2025
以管理员身份进入命令窗口。
执行以下命令为 npm 配置国内镜像:
1 npm config set registry https://registry.npmmirror.com
命令执行完毕后,可用以下命令检测配置:
2)安装 Vue 脚手架
执行以下命令全局安装 Vue CLI:
[!CAUTION]
如果安装失败,需要关掉终端再进入,才能让镜像配置生效
3)创建 Vue 工程
进入到工程所在的目录。
执行以下命令创建 Vue 项目,注意projectName改为你的前端项目名:
选择第三个手动配置
按下空格 选择router,取消选择liner,按enter进行下一步
版本选择3.x,询问y/n全部填n
这个位置选择最后一个
2.根据工程下面的readme文档启动项目 运行这两个命令
1)安装依赖
2)编译并启动开发服务器
3.配置需要的包 1)安装element-plus
官方文档-安装教程
1 npm install element-plus --save
2)安装axios
axios官方文档
上面学了什么内容? 前端项目主要代码在 src 文件夹里。 在 src 里面,main.js 是程序的启动点,App.vue 是最外层的页面框架。 src 下面还有几个子文件夹:assets 放图片等资源。 components 放页面里重复使用的小模块。 router 放页面跳转(路由)的设置。 views 放组成整个页面的大模块。 node_modules 放项目用到的各种第三方库。 public 放一些直接复制到最终项目里的文件。 其他文件是项目配置和依赖管理文件。 1 2 3 4 5 6 7 8 9 10 11 12 13 14 15 16 17 18 19 20 21 22 23 24 25 26 📦 project-root (项目根目录 - 截图中最顶层) ├─ 📂 node_modules (存放项目依赖库的文件夹) ├─ 📂 public (存放不需要打包处理的静态资源的文件夹) ├─ 📂 src (存放项目核心源代码的文件夹,这是重点) │ ├─ 📂 assets (放在 src/ 下面的一个子文件夹,存放需要打包的静态资源,如图片、字体等) │ ├─ 📂 components (放在 src/ 下面的一个子文件夹,存放可复用的、小的 Vue 组件) │ │ └─ 📄 HelloWorld.vue (一个示例组件文件) │ ├─ 📂 router (放在 src/ 下面的一个子文件夹,存放前端路由配置相关的文件) │ │ └─ 📄 index.js (通常是路由定义文件) │ ├─ 📂 views (放在 src/ 下面的一个子文件夹,存放页面级别的 Vue 组件) │ │ ├─ 📄 AddCustomer.vue (添加客户页面) │ │ ├─ 📄 AddSellJh.vue (添加销售机会页面) │ │ ├─ 📄 ListAfterSale.vue (售后列表页面) │ │ ├─ 📄 ListCustomer.vue (客户列表页面) │ │ ├─ 📄 ListCustOrder.vue (客户订单列表页面) │ │ └─ 📄 ListSellJh.vue (销售机会列表页面) │ ├─ 📄 App.vue (直接放在 src/ 下面的文件,整个应用的根组件) │ └─ 📄 main.js (直接放在 src/ 下面的文件,整个应用的入口文件,负责初始化 Vue) ├─ 📄 .gitignore (Git 版本控制忽略文件) ├─ 📄 babel.config.js (Babel 配置文件,用于 JavaScript 编译) ├─ 📄 jsconfig.json (JavaScript 项目配置) ├─ 📄 package -lock.json (记录安装依赖时的精确版本信息) ├─ 📄 package .json (项目信息和依赖列表文件) ├─ 📄 README.md (项目说明文件) ├─ 📄 vue.config.js (Vue CLI 项目自定义配置文件) └─ 📄 yarn.lock (Yarn 依赖管理器的锁文件)
Day2 菜单功能 后端实现 1)新建menu表
1 2 3 4 5 6 7 CREATE TABLE `t_menu` ( `id` int NOT NULL AUTO_INCREMENT COMMENT 'ID (主键)' , `label` varchar (50 ) DEFAULT NULL COMMENT '导航名称' , `component` int DEFAULT NULL COMMENT '子id' , `pid` int DEFAULT NULL COMMENT '父id' , PRIMARY KEY (`id`) ) ENGINE= InnoDB AUTO_INCREMENT= 10 DEFAULT CHARSET= utf8mb4 COLLATE = utf8mb4_0900_ai_ci COMMENT= '前端菜单表' ;
2)对表插入数据
1 insert into `t_menus`(`id`,`label`,`component`,`pid`) values (1 ,'客户管理' ,NULL ,0 ),(2 ,'添加客户' ,0 ,1 ),(3 ,'查询客户' ,1 ,1 ),(4 ,'售后服务' ,2 ,1 ),(5 ,'客户订单' ,3 ,1 ),(6 ,'客户跟踪' ,4 ,1 ),(7 ,'数据统计' ,NULL ,0 ),(8 ,'客户统计' ,5 ,7 ),(9 ,'库存统计' ,6 ,7 );
3)生成代码
在数据库里创建menu表后,再去idea里通过mybatiesx生成表格对应的增删改查代码
4)定义vo类
定义一个vo类,方便把数据打包发给前端
为什么这样定义:阿里巴巴Java开发手册中的DO、DTO、BO、AO、VO、POJO定义
更深层次的意义在于数据模型在不同层之间传递时可能需要转换**。**
t_menu 表的数据对应一个简单的 Menu POJO,它只有 id, label, component, pid 字段。但为了前端的菜单树结构,你需要把它转换成 MenuVo,增加了一个 subMenu 列表字段。并且通过 BeanUtils.copyProperties 实现了基础字段的复制。
这种从数据库模型 (POJO) 到视图展示模型 (VO) 的转换,是后端开发中处理数据流时的一个常见且必要的逻辑。
1 2 3 4 5 6 7 8 9 10 11 12 package com.example.demo.vo;import lombok.Data;import java.util.List;@Data public class MenuVo { private Integer id; private String label; private Integer component; private List<MenuVo> subMenu; }
5)修改服务层代码
实现将菜单返回给前端的功能
服务接口代码: 1 2 3 4 5 6 7 8 9 10 11 12 13 public interface MenuService extends IService <Menu> { List<MenuVo> queryMenuListService () ; }
服务实现代码: 下面的buildSubmenu 方法是一个典型的递归 函数的应用。它通过不断调用自身来处理树形结构(子菜单)。
1 2 3 4 5 6 7 8 9 10 11 12 13 14 15 16 17 18 19 20 21 22 23 24 25 26 27 28 29 30 31 32 33 34 35 36 37 38 39 @Service public class MenuServiceImpl extends ServiceImpl< MenuMapper, Menu> implements MenuService { @Override public List< MenuVo> queryMenuListService() { / / 1. 查询所有菜单数据 List< Menu> allMenu = this.list(); return buildSubmenu(allMenu, 0 ); } private List< MenuVo> buildSubmenu(List< Menu> allMenu, Integer parentId) { List< MenuVo> submenuTree = new ArrayList<> (); for (Menu menu : allMenu) { / / 检查当前菜单的父ID是否与传入的parentId匹配 if (menu.getPid() != null && menu.getPid().equals (parentId)) { MenuVo menuVo = new MenuVo(); BeanUtils.copyProperties(menu, menuVo); / / 将 POJO属性 复制到 VO / / 递归查找当前菜单的子菜单 menuVo.setSubMenu(buildSubmenu(allMenu, menu.getId())); submenuTree.add(menuVo); } } return submenuTree; } }
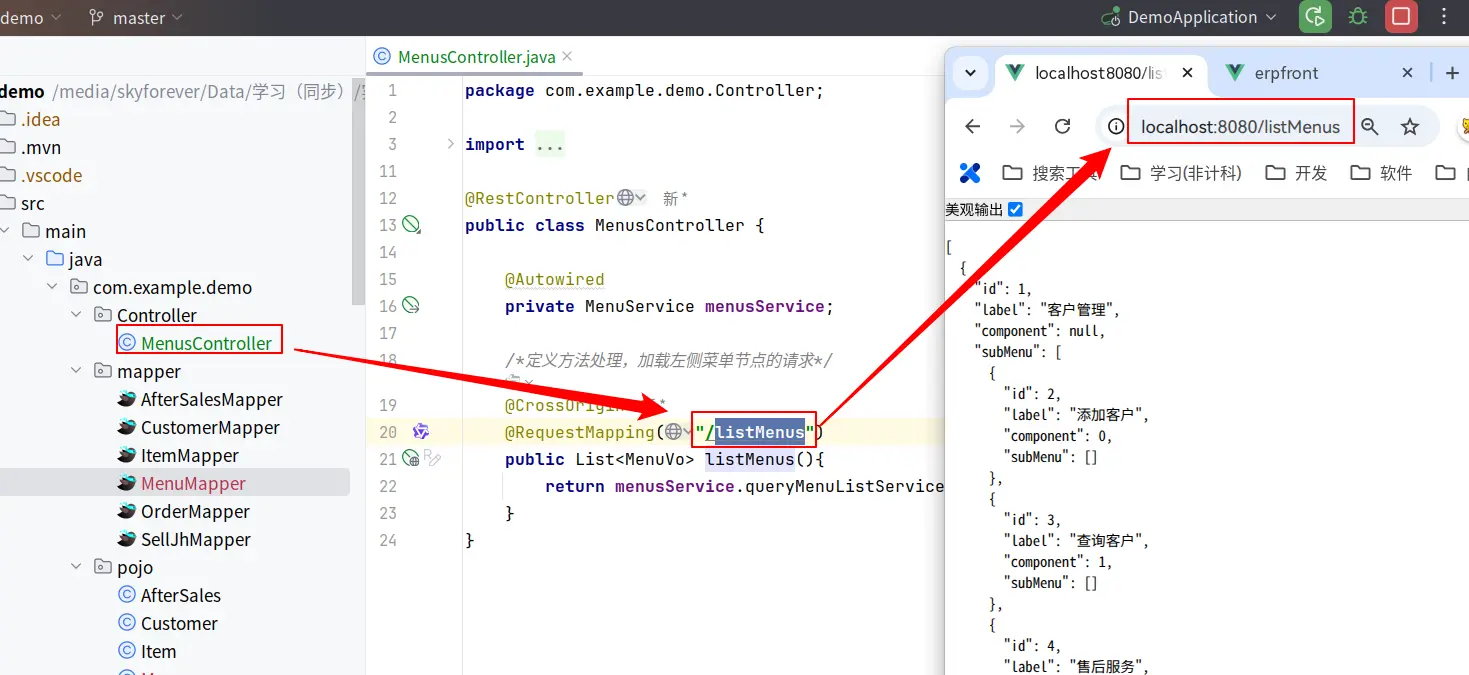
6)控制层代码
@Autowired 注解被用在了 UserMapper 和 UserService 上,但没有用老式Java代码手动写代码去 new 出一个 UserMapper 或 UserService 对象。
这是 Spring 框架依赖注入 (Dependency Injection - DI) 的体现。Spring Boot 会自动扫描并创建这些类的实例(称为 Bean),并在需要的地方自动把它们“装配”进去。
1 2 3 4 5 6 7 8 9 10 11 12 13 @RestController public class MenusController { @Autowired private MenuService menusService; @CrossOrigin @RequestMapping("/listMenus") public List<MenuVo> listMenus () { return menusService.queryMenuListService(); } }
7)修改启动类
添加对mapper的扫描注解
8)启动并测试
成功启动后,检验后端是否能返回预期数据
9)配合前端调试
实现前端控制台输出菜单id
只需要在控制层(MenusController)里加一个函数获取菜单id
1 2 3 4 5 6 7 @CrossOrigin @RequestMapping("/compIndex") public Integer compIndex (Integer id) { Menu menus = menusService.getById(id); return menus.getComponent(); }
上面学了什么内容? 上面的过程清晰地展示了Controller、Service、Mapper 和 VO 这几个层级如何协作:
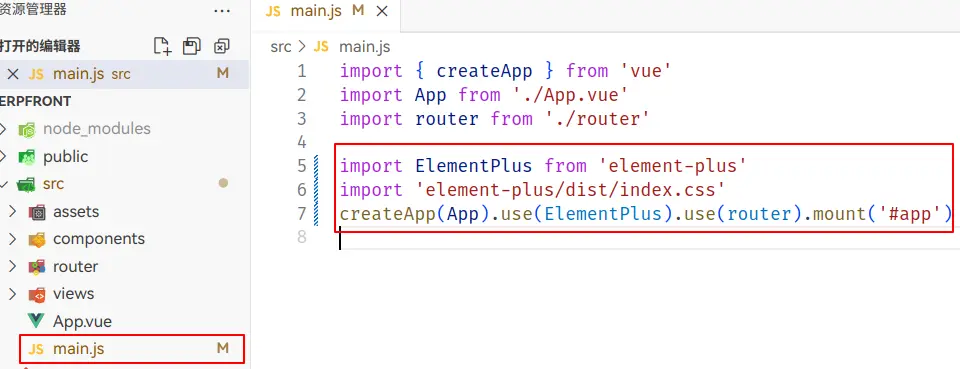
Controller (MenusController) :接收前端请求 (/listMenus),调用 Service 层方法。Service (MenuServiceImpl) :调用 Mapper 获取所有原始数据,执行业务逻辑(将平铺数据构建成树状),准备好适合前端的 VO 数据。Mapper (MenuMapper) :通过 MyBatis-Plus 的 list() 方法从数据库获取原始 Menu (POJO) 数据。VO (MenuVo) :作为 Service 层处理后、Controller 层返回给前端的最终数据格式。前端实现 1)修改main.js
添加对饿了么ui的引用
1 2 3 4 5 6 import ElementPlus from 'element-plus' ;import 'element-plus/dist/index.css' ;createApp (App ).use (ElementPlus ).use (router).mount ('#app' );
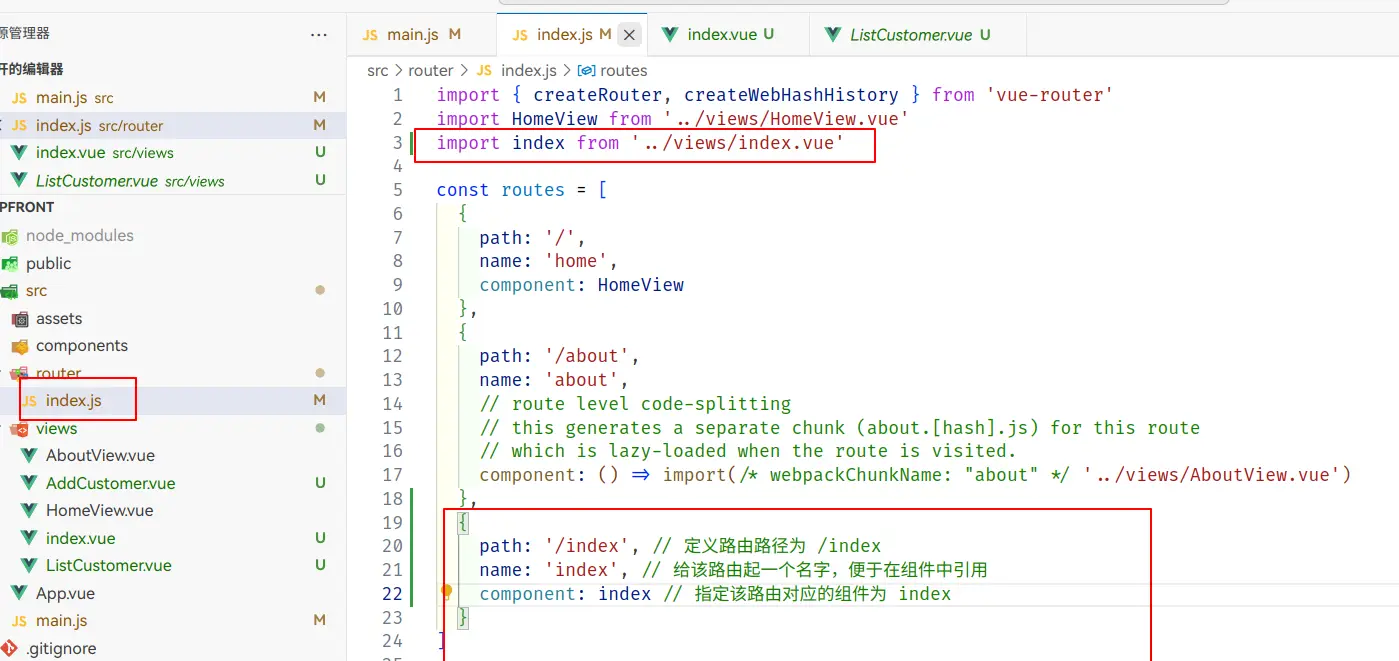
2)修改index.js
把index.vue页面文件加入页面路由中
1 2 3 4 5 6 7 import index from '../views/index.vue' , { path : '/index' , name : 'index' , component : index }
3)实现index.vue
实现之前,需要设置两个没有设置逻辑的页面AddCustomer.vue和ListCustomer.vue
1 2 3 4 5 6 7 8 9 10 11 <script setup lang ="ts" > </script > <template > </template > <style scoped > </style >
index.vue的具体实现
响应式系统 (ref, shallowRef): 使用 ref 来创建响应式数据(menus),当这些数据变化时,UI会自动更新。
shallowRef 和 markRaw 让你初步了解了 Vue 3 针对复杂对象或组件引用的性能优化和更细粒度的响应式控制。
生命周期钩子 (onMounted): 学会了在组件的特定阶段(DOM 挂载后)执行代码,比如在这里用于在页面加载完成后立即发起数据请求。
客户端路由 (vue-router): 通过修改 router/index.js 和使用(虽然代码中没直接展示,但动态组件承担了类似角色),学到了如何在前端实现页面间的无刷新跳转和导航 ,以及如何将 URL 路径映射到特定的 Vue 组件(页面)
1 2 3 4 5 6 7 8 9 10 11 12 13 14 15 16 17 18 19 20 21 22 23 24 25 26 27 28 29 30 31 32 33 34 35 36 37 38 39 40 41 42 43 44 45 46 47 48 49 50 51 52 53 54 55 56 57 58 59 60 61 62 63 64 65 66 67 68 69 70 71 72 73 74 75 76 77 78 79 80 81 82 83 <script setup > import AddCustomer from "@/views/AddCustomer.vue" ;import ListCustomer from "@/views/ListCustomer.vue" ;import { onMounted, ref } from "vue" ;import axios from "axios" ;import { markRaw, shallowRef } from "vue" ;const views = [ markRaw (AddCustomer ), markRaw (ListCustomer ), ]; const currentComponent = shallowRef (views[0 ]);const menus = ref ([]);const handlerSelect = function (index ) { let componentIndex = 0 ; menus.value .forEach ((menu ) => { menu.subMenu .forEach ((subMenu ) => { if (subMenu.id === parseInt (index)) { componentIndex = subMenu.component ; } }); }); currentComponent.value = views[componentIndex]; }; onMounted (() => { axios .get ("http://localhost:8080/listMenus" ) .then ((response ) => { menus.value = response.data ; }) .catch ((error ) => { console .log (error); }); }); </script > <template > <div class ="common-layout" > <el-container > <el-header class ="top" > ERP-ikun小组</el-header > <el-container > <el-aside width ="240px" class ="left" > 系统菜单 <el-menu class ="el-menu-vertical-demo" @select ="handlerSelect" > //绑定事件 <el-sub-menu v-for ="menu in menus" :index ="menu.id.toString()" > <template #title > <span > {{ menu.label }}</span > </template > <el-menu-item v-for ="subMenu in menu.subMenu" :index ="subMenu.id.toString()" > {{ subMenu.label }} </el-menu-item > </el-sub-menu > </el-menu > </el-aside > <el-main class ="right" > <component :is ="currentComponent" > </component > </el-main > </el-container > </el-container > </div > </template > <style scoped > .top { background-color : azure; } .left { background-color : blanchedalmond; height : 600px ; } .right { background-color : cornsilk; } </style >
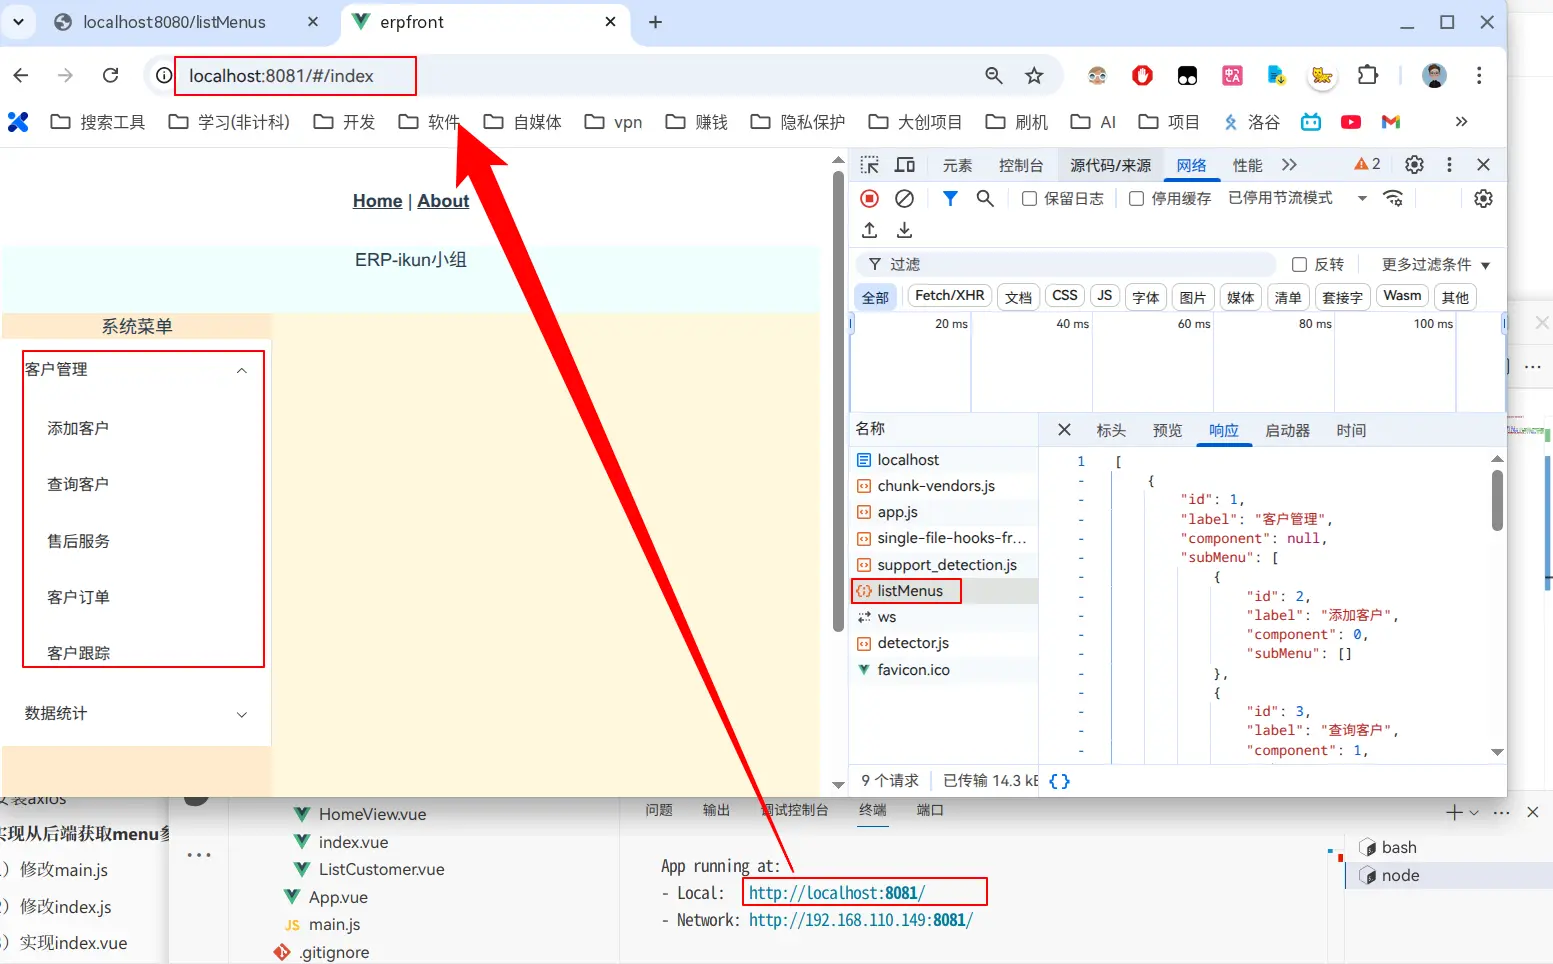
4)启动项目
看看能不能实现从后端获取菜单并加载
5)配合后端
实现获取当前菜单选项id
需要在后端菜单控制层代码加方法
然后,前端代码修改handlerSelect方法即可:
1 2 3 4 5 6 7 8 9 10 11 12 13 14 const handlerSelect = function (index ) { console .log ("选择的页面id:" , index); axios .get ("http://localhost:8080/compIndex?id=" + index) .then ((response ) => { console .log ("后端返回的id值:" , response.data ); const componentIndex = response.data ; currentComponent.value = views[componentIndex]; }) .catch ((error ) => { console .log ("Error:" , error); }); };
上面学了什么内容? 从这份前端代码学到了如何从“静态网页”转向“动态、交互式、模块化”的现代前端开发,了解了 Vue.js 框架、路由、组件化、状态管理(简单响应式)、数据请求与处理、UI库使用以及事件响应等核心技能,这是构建一个功能性 Web 应用前端的重要基础。
Day3 1 增删改查客户信息 后端实现 1. 添加Mybatis配置
在后端实现客户列表的查询时,为了避免一次性加载所有数据导致性能问题,我们通常需要进行分页。MyBatis-Plus 的分页拦截器 (PaginationInnerInterceptor) 就是用来自动化 实现这个功能的。
它的核心作用是拦截 你使用 MyBatis-Plus 标准方法(如 selectList(page, ...))执行的 SQL 查询。在执行数据库查询之前,这个拦截器会检查你是否传入了一个 Page 对象。如果传入了,它就会自动修改 你原始的 SQL 语句,在后面添加 LIMIT 子句 。
例如,如果你原始的查询是 SELECT * FROM t_customer WHERE ...,分页拦截器可能会根据你传入的页码和每页大小,将其改写为 SELECT * FROM t_customer WHERE ... LIMIT offset, pageSize。
这样就无需手动编写分页的 SQL 逻辑 。你只需要配置好分页拦截器,并在 Service 层调用 Mapper 方法时传入 Page 对象,MyBatis-Plus 就会自动帮你处理底层数据库的分页细节,大大简化了分页功能的开发。
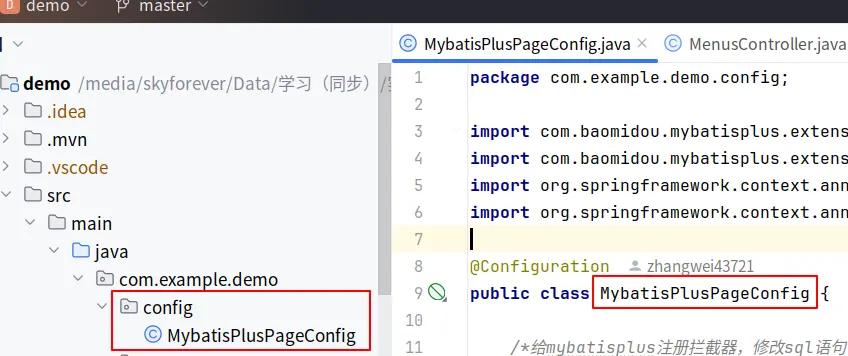
配置它的方式就是创建一个 @Configuration 类 (MybatisPlusPageConfig),定义一个 @Bean 方法返回 MybatisPlusInterceptor,并在其中添加 PaginationInnerInterceptor。
1 2 3 4 5 6 7 8 9 10 11 12 13 14 15 16 17 import com.baomidou.mybatisplus.extension.plugins.MybatisPlusInterceptor;import com.baomidou.mybatisplus.extension.plugins.inner.PaginationInnerInterceptor;import org.springframework.context.annotation.Bean;import org.springframework.context.annotation.Configuration;@Configuration public class MybatisPlusPageConfig { @Bean public MybatisPlusInterceptor mybatisPlusInterceptor () { MybatisPlusInterceptor mybatisPlusInterceptor = new MybatisPlusInterceptor (); mybatisPlusInterceptor.addInnerInterceptor(new PaginationInnerInterceptor ()); return mybatisPlusInterceptor; } }
2. 实现增删改查
对前端提供客户列表的增删改查方法
Controller层
1 2 3 4 5 6 7 8 9 10 11 12 13 14 15 16 17 18 19 20 21 22 23 24 25 26 27 28 29 30 31 32 33 34 35 36 37 38 39 40 41 42 43 44 45 46 47 48 49 50 51 52 53 54 55 56 57 @RestController @CrossOrigin public class CustomerController { @Autowired private CustomerService customerService; @PostMapping("/saveCust") public Map<String, Object> saveCustomer (@RequestBody Customer customer) { System.out.println(customer); Map<String, Object> result = new HashMap <>(); result.put("code" , 400 ); customerService.save(customer); result.put("code" , 200 ); return result; } @GetMapping("/listCust") public Map<String, Object> queryCustList ( @RequestParam(defaultValue = "1") Integer pageNum, @RequestParam(defaultValue = "10") Integer pageSize) { return customerService.queryCustListService(pageNum, pageSize); } @DeleteMapping("/deleteCust/{id}") public Map<String, Object> deleteCustomer (@PathVariable Integer id) { Map<String, Object> result = new HashMap <>(); try { customerService.removeById(id); result.put("code" , 200 ); result.put("message" , "删除成功" ); } catch (Exception e) { result.put("code" , 400 ); result.put("message" , "删除失败" ); } return result; } @PutMapping("/updateCust") public Map<String, Object> updateCustomer (@RequestBody Customer customer) { Map<String, Object> result = new HashMap <>(); try { customerService.updateById(customer); result.put("code" , 200 ); result.put("message" , "修改成功" ); } catch (Exception e) { result.put("code" , 400 ); result.put("message" , "修改失败" ); } return result; } }
Service层实现分页查询
1 2 3 4 5 6 7 8 9 10 11 12 13 14 15 16 17 18 19 20 21 22 23 24 25 26 @Service public class CustomerServiceImpl extends ServiceImpl <CustomerMapper, Customer> implements CustomerService { @Autowired private CustomerMapper customerMapper; @Override public Map<String, Object> queryCustListService (Integer pageNum, Integer pageSize) { Map<String, Object> result = new HashMap <>(); Page page = new Page <>(pageNum, pageSize); System.out.println(page.getTotal()); List list = customerMapper.selectList(page, null ); System.out.println(page.getTotal()); result.put("custlist" , list); result.put("total" , page.getTotal()); return result; } }
对应服务添加接口
1 2 3 4 5 6 7 8 9 10 public interface CustomerService extends IService <Customer> { Map<String, Object> queryCustListService (Integer pageNum, Integer pageSize) ; }
前端实现 写两个页面,分别实现查和增删改
昨天在index.vue添加了AddCustomer页面和ListCustomer页面,这里不重复
1. 客户信息页实现
AddCustomer.vue
1 2 3 4 5 6 7 8 9 10 11 12 13 14 15 16 17 18 19 20 21 22 23 24 25 26 27 28 29 30 31 32 33 34 35 36 37 38 39 40 41 42 43 44 45 46 47 48 49 50 51 52 53 54 55 56 57 58 59 60 61 62 63 64 65 66 67 68 69 70 71 72 73 74 75 76 77 78 79 80 81 82 83 84 85 86 87 88 89 90 91 92 93 94 95 96 97 98 99 100 101 102 103 104 <script setup > import { reactive } from 'vue' ; import axios from 'axios' ; const custForm = reactive ({ custName : '' , address : '' , phone : '' , custType : '' , grade : '' }); function subCustForm ( axios.post ("http://localhost:8080/saveCust" , custForm) .then ((response ) => { console .log (response.data ); Object .assign (custForm, { custName : '' , address : '' , phone : '' , custType : '' , grade : '' }); }) .catch ((error ) => { console .error ('提交失败:' , error); }); } function resetForm ( Object .assign (custForm, { custName : '' , address : '' , phone : '' , custType : '' , grade : '' }); } </script > <template > <h2 > 添加客户信息</h2 > <el-form :model ="custForm" label-width ="120px" > <el-form-item label ="客户名称" > <el-input v-model ="custForm.custName" style ="width: 80%" /> </el-form-item > <el-form-item label ="联系地址" > <el-input v-model ="custForm.address" style ="width: 80%" /> </el-form-item > <el-form-item label ="联系电话" > <el-input v-model ="custForm.phone" style ="width: 80%" /> </el-form-item > <el-form-item label ="客户职业" > <el-select v-model ="custForm.custType" placeholder ="请选择职业……" style ="width: 80%" > <el-option label ="保密" value ="保密" /> <el-option label ="金融" value ="金融" /> <el-option label ="互联网" value ="互联网" /> <el-option label ="IT" value ="IT" /> <el-option label ="能源" value ="能源" /> </el-select > </el-form-item > <el-form-item label ="客户等级" > <el-input v-model ="custForm.grade" style ="width: 80%" /> </el-form-item > <el-form-item > <el-button type ="primary" @click ="subCustForm" > 保存</el-button > <el-button @click ="resetForm" > 取消</el-button > </el-form-item > </el-form > </template > <style scoped > .el-form { max-width : 600px ; margin : 20px auto; } </style >
2.删改查客户页实现
ListCustomer.vue
1 2 3 4 5 6 7 8 9 10 11 12 13 14 15 16 17 18 19 20 21 22 23 24 25 26 27 28 29 30 31 32 33 34 35 36 37 38 39 40 41 42 43 44 45 46 47 48 49 50 51 52 53 54 55 56 57 58 59 60 61 62 63 64 65 66 67 68 69 70 71 72 73 74 75 76 77 78 79 80 81 82 83 84 85 86 87 88 89 90 91 92 93 94 95 96 97 98 99 100 101 102 103 104 105 106 107 108 109 110 111 112 113 114 115 116 117 118 119 120 121 122 123 124 125 126 127 128 129 130 131 132 133 134 135 136 137 138 139 140 141 142 143 144 145 146 147 148 149 150 151 152 153 154 155 156 157 158 159 160 161 162 163 164 165 166 167 168 169 170 171 172 173 174 175 176 177 178 179 180 181 182 183 184 185 186 187 188 189 190 191 192 193 194 195 196 197 198 199 200 201 <template > <h2 > 客户列表</h2 > <el-table :data ="custList" stripe style ="width: 100%" > <el-table-column prop ="id" label ="客户编号" /> <el-table-column prop ="custName" label ="客户姓名" /> <el-table-column prop ="address" label ="客户地址" /> <el-table-column prop ="phone" label ="客户电话" /> <el-table-column prop ="custType" label ="客户职业" /> <el-table-column prop ="grade" label ="客户等级" /> <el-table-column prop ="hisTotal" label ="消费总额" /> <el-table-column fixed ="right" label ="操作" width ="120" > <template #default ="{ row }" > <el-button link type ="primary" size ="small" @click ="deleteCustomer(row.id)" > 删除</el-button > <el-button link type ="primary" size ="small" @click ="openCustDialog(row)" > 修改</el-button > </template > </el-table-column > </el-table > <hr /> <el-pagination size ="small" background :page-size ="10" :pager-count ="5" layout ="prev, pager, next" :total ="total" class ="mt-4" @current-change ="handlerPageChange" /> <el-dialog v-model ="dialogCustVisible" width ="80%" title ="修改客户信息" > <el-form :model ="custForm" label-width ="120px" :rules ="rules" ref ="custFormRef" > <el-form-item label ="客户名称" prop ="custName" > <el-input v-model ="custForm.custName" style ="width: 80%" /> </el-form-item > <el-form-item label ="联系地址" prop ="address" > <el-input v-model ="custForm.address" style ="width: 80%" /> </el-form-item > <el-form-item label ="联系电话" prop ="phone" > <el-input v-model ="custForm.phone" style ="width: 80%" /> </el-form-item > <el-form-item label ="客户职业" prop ="custType" > <el-select v-model ="custForm.custType" placeholder ="请选择职业...." style ="width: 80%" > <el-option label ="保密" value ="保密" /> <el-option label ="金融" value ="金融" /> <el-option label ="互联网" value ="互联网" /> <el-option label ="IT" value ="IT" /> <el-option label ="能源" value ="能源" /> </el-select > </el-form-item > <el-form-item label ="客户等级" prop ="grade" > <el-input v-model.number ="custForm.grade" style ="width: 80%" /> </el-form-item > </el-form > <template #footer > <el-button @click ="cancelForm" > 取消</el-button > <el-button type ="primary" @click ="subCustForm" > 保存</el-button > </template > </el-dialog > </template > <script setup > import { onMounted, ref, reactive } from "vue" ;import axios from "axios" ;import { ElMessage , ElMessageBox } from "element-plus" ;const custList = ref ([]); const total = ref (0 ); const dialogCustVisible = ref (false ); const custFormRef = ref (null ); const custForm = reactive ({ id : null , custName : '' , address : '' , phone : '' , custType : '' , grade : 1 , hisTotal : 0 }); const rules = { custName : [{ required : true , message : '请输入客户名称' , trigger : 'blur' }], address : [{ required : true , message : '请输入联系地址' , trigger : 'blur' }], phone : [ { required : true , message : '请输入联系电话' , trigger : 'blur' }, { pattern : /^\d{11}$/ , message : '请输入11位数字电话' , trigger : 'blur' } ], custType : [{ required : true , message : '请选择客户职业' , trigger : 'change' }], grade : [ { required : true , message : '请输入客户等级' , trigger : 'blur' }, { type : 'number' , message : '等级必须为数字' , trigger : 'blur' } ] }; function custListQeury (pageNum ) { axios.get (`http://localhost:8080/listCust?pageNum=${pageNum} ` ) .then ((response ) => { custList.value = response.data .custlist ; total.value = response.data .total ; }) .catch ((error ) => { ElMessage .error ("查询失败" ); console .log (error); }); } function deleteCustomer (id ) { ElMessageBox .confirm ("确定删除该客户吗?" , "提示" , { confirmButtonText : "确定" , cancelButtonText : "取消" , type : "warning" , }) .then (() => { axios.delete (`http://localhost:8080/deleteCust/${id} ` ) .then (() => { ElMessage .success ("删除成功" ); custListQeury (1 ); }) .catch ((error ) => { ElMessage .error ("删除失败" ); console .log (error); }); }) .catch (() => { ElMessage .info ("取消删除" ); }); } function openCustDialog (row ) { dialogCustVisible.value = true ; Object .assign (custForm, { id : row.id , custName : row.custName || '' , address : row.address || '' , phone : row.phone || '' , custType : row.custType || '' , grade : row.grade || 1 , hisTotal : row.hisTotal || 0 }); } function subCustForm ( custFormRef.value .validate (valid => if (valid) { axios.put ("http://localhost:8080/updateCust" , custForm) .then (() => { ElMessage .success ("修改成功" ); dialogCustVisible.value = false ; custListQeury (1 ); }) .catch ((error ) => { ElMessage .error ("修改失败" ); console .log (error); }); } else { ElMessage .error ("请填写完整信息" ); } }); } function cancelForm ( dialogCustVisible.value = false ; custFormRef.value .resetFields (); } onMounted (() => { custListQeury (1 ); }); function handlerPageChange (value ) { custListQeury (value); } </script > <style scoped > </style >
2 增删改查销售过程信息 实现销售机会过程数据维护,销售过程数据和客户信息表存在主外键关系。
后端实现 1.为销售机会页面提供下拉列表内容查询
Customer添加相关方法
服务层接口
1 2 public List<Customer> queryCustIdNameListService () ;
服务层实现
1 2 3 4 5 6 7 8 @Override public List<Customer> queryCustIdNameListService () { QueryWrapper<Customer> wrapper=new QueryWrapper <>(); wrapper.select("id" ,"cust_name" ); List<Customer> customerList = customerMapper.selectList(wrapper); return customerList; }
控制层实现
1 2 3 4 5 @GetMapping("/listAllCust") public List<Customer> listAllCust () { return customerService.queryCustIdNameListService(); }
2.为销售机会页面实现保存功能
新增SellJhController
1 2 3 4 5 6 7 8 9 10 11 12 13 14 15 16 17 18 19 20 21 22 @RestController @CrossOrigin public class SellJhController { @Autowired private SellJhService sellJhService; @PostMapping("/saveSellJh") public Map<String, Object> saveSellJh (@RequestBody SellJh sellJh) { Map<String, Object> result = new HashMap <>(); try { sellJhService.save(sellJh); result.put("code" , 200 ); result.put("message" , "添加成功" ); } catch (Exception e) { result.put("code" , 400 ); result.put("message" , "添加失败" ); } return result; } }
前端实现 1. 添加销售机会页面
AddSellJh.vue代码:
1 2 3 4 5 6 7 8 9 10 11 12 13 14 15 16 17 18 19 20 21 22 23 24 25 26 27 28 29 30 31 32 33 34 35 36 37 38 39 40 41 42 43 44 45 46 47 48 49 50 51 52 53 54 55 56 57 58 59 60 61 62 63 64 65 66 67 68 69 70 71 72 73 74 75 76 77 78 79 80 81 82 83 84 85 86 87 88 89 90 91 92 93 94 95 96 97 98 99 100 101 102 103 104 105 <template > <h2 > 销售开发</h2 > <el-form :model ="sellForm" label-width ="120px" > <el-form-item label ="客户名称" > <el-select v-model ="sellForm.custid" class ="m-2" placeholder ="请选择客户" size ="large" style ="width: 80%" > <el-option v-for ="item in custList" :key ="item.id" :label ="item.custName" :value ="item.id" /> </el-select > </el-form-item > <el-form-item label ="销售渠道" > <el-select v-model ="sellForm.channelId" placeholder ="请选择渠道...." style ="width: 80%" > <el-option label ="自媒体" value ="0" /> <el-option label ="网络推广" value ="1" /> <el-option label ="老客户介绍" value ="2" /> <el-option label ="陌拜" value ="3" /> <el-option label ="二次客户" value ="4" /> </el-select > </el-form-item > <el-form-item label ="销售金额" > <el-input v-model ="sellForm.money" style ="width: 80%" /> </el-form-item > <el-form-item label ="开发阶段" > <el-select v-model ="sellForm.nowStep" placeholder ="请选择...." style ="width: 80%" > <el-option label ="解除" value ="解除" /> <el-option label ="报价" value ="报价" /> <el-option label ="签约" value ="签约" /> </el-select > </el-form-item > <el-form-item label ="业务员" > <el-input v-model ="sellForm.empId" style ="width: 80%" /> </el-form-item > <el-form-item > <el-button type ="primary" @click ="subSellForm" > 保存</el-button > <el-button > 取消</el-button > </el-form-item > </el-form > </template > <script setup > import {onMounted, reactive, ref} from "vue" ;import axios from "axios" ;const sellForm=reactive ({ custid :'' , channelId :'' , money :0.0 , nowStep :'' , empId :100 }); const custList=ref ([]);onMounted (function ( axios.get ("http://localhost:8080/listAllCust" ) .then ((response )=> { custList.value =response.data ; }) .catch ((error )=> { console .log (error); }); }); function subSellForm ( axios.post ("http://localhost:8080/saveSellJh" , sellForm) .then ((response ) => { if (response.data .code === 200 ) { console .log (response.data ); Object .assign (sellForm, { custid : null , channelId : '' , money : 0.0 , nowStep : '' , empId : 100 }); } }) .catch ((error ) => { console .error ('提交失败:' , error); }); } </script > <style scoped > </style >
2.注册销售机会页面
修改index.vue,将上面的AddSellJh.vue页面加入进去
1 2 3 4 5 6 7 8 9 10 11 12 13 14 15 16 import AddSellJh from "@/views/AddSellJh" ; const views=[AddCustomer ,ListCustomer ,,,AddSellJh ] import axios from "axios" ;import { markRaw, shallowRef } from "vue" ;const views = [ markRaw (AddCustomer ), markRaw (ListCustomer ), markRaw (AddSellJh ), markRaw (AddSellJh ), markRaw (AddSellJh ), ];
Day3学了什么 从基础的项目搭建和 Mybatis-Plus 的基本增删改查使用,进步到了实现完整的、带有实际业务功能的客户信息管理 。
学会了如何在后端实现客户信息的增、删、改、查 API,并在前端构建了对应的页面,利用 Vue.js 和 Element Plus UI 组件库 实现了数据的展示(表格)、表单的提交、修改对话框和删除确认,以及前后端通过 HTTP 请求 进行数据交互来完成这些操作。
特别是学会了处理数据分页 和动态加载下拉列表 数据,让应用更能应对实际数据量。
Day4 1.统计每个客户历史消费总额 通过订单表统计每个客户历史消费总额,更新到客户信息表
以下全部针对后端 操作
创建 HisData 实体类
1 2 3 4 5 6 7 8 9 10 package com.example.demo.dto;import lombok.Data;@Data public class HisData { private Long custId; private Double hisTotal; }
OrderMapper 接口添加方法
1 2 3 4 public interface OrderMapper extends BaseMapper <Order> { List<HisData> queryCountHisDataMapper () ; }
OrderMapper.xml 定义 SQL
写出带有 GROUP BY 和 SUM() 聚合函数的 SQL 语句。
这是 MyBatis-Plus 自动生成的简单 CRUD 无法覆盖的,需要你根据业务需求手写 SQL 来实现更复杂的数据库查询。
1 2 3 4 <select id ="queryCountHisDataMapper" resultType ="com.example.demo.dto.HisData" > select cust_id custId, sum(pay_money) hisTotal from t_order group by cust_id </select >
实现客户信息表更新
修改 CustomerServiceImpl 中分页查询方法:
在 CustomerServiceImpl 的 queryCustListService 方法中,先调用了 OrderMapper 的方法查询统计数据,然后遍历这个结果,再逐条针对每个客户调用 CustomerMapper 的 updateById 方法来更新客户表中的历史消费总额。这展示了在一个业务流程中,如何协调不同表(通过不同 Mapper)的数据操作。
事务管理 (@Transactional): 在这个更新操作的方法上添加了 @Transactional 注解。这是一个非常重要的进步,它保证了在更新客户历史消费总额这一系列数据库操作中,要么所有更新都成功,要么如果中途发生任何错误,所有已做的更新都会回滚。
这确保了数据的一致性 和完整性 。
1 2 3 4 5 6 7 8 9 10 11 12 13 14 15 16 17 18 19 20 21 22 23 24 25 26 27 28 29 30 31 @Autowired private CustomerMapper customerMapper;@Autowired private OrderMapper orderMapper;@Transactional @Override public Map<String, Object> queryCustListService (Integer pageNum, Integer pageSize) { Map<String, Object> result = new HashMap <>(); System.out.println("==================" ); List<HisData> hisDatas = orderMapper.queryCountHisDataMapper(); for (HisData hisData : hisDatas) { Customer cust = new Customer (); cust.setId(hisData.getCustId()); cust.setHisTotal(hisData.getHisTotal()); customerMapper.updateById(cust); } Page page = new Page (pageNum, pageSize); System.out.println(page.getTotal()); List list = customerMapper.selectList(page, null ); System.out.println(page.getTotal()); result.put("custList" , list); result.put("total" , page.getTotal()); return result; }
2.实现销售过程表的增删改查 后端实现 在服务层添加分页方法接口
1 2 3 4 5 6 public interface SellJhService extends IService <SellJh> { public Map<String,Object> querySellJhListService (Integer pageNum, Integer pageSize) ; }
实现此接口
1 2 3 4 5 6 7 8 9 10 11 12 13 14 15 16 17 @Autowired private SellJhMapper sellJhMapper;@Override public Map<String, Object> querySellJhListService (Integer pageNum, Integer pageSize) { Map<String, Object> result=new HashMap <>(); Page<SellJh> page=new Page <>(pageNum,pageSize); System.out.println("1---------" +page.getTotal()); List<SellJh> sellJhs = sellJhMapper.selectList(page, null ); System.out.println("2---------" +page.getTotal()); result.put("sellJhList" ,sellJhs); result.put("total" ,page.getTotal()); return result; }
添加控制层接口相关方法
1 2 3 4 5 6 7 @GetMapping("/sellJhList") public Map<String, Object> querySellJhList ( @RequestParam(defaultValue = "1") Integer pageNum, @RequestParam(defaultValue = "10") Integer pageSize) { return sellJhService.querySellJhListService(pageNum, pageSize); }
前端实现 添加销售计划列表页面
在以下页面中,对于销售渠道 (channelId),没有直接显示数据库中存储的数字 ID,而是通过一个 getChannelName(channelId) 方法将其转换为用户友好的文本描述(如 “自媒体”, “网络推广”)。这是一种常见的前端数据格式化或转换 技巧,用于提升用户体验。 ListSellJh.vue
1 2 3 4 5 6 7 8 9 10 11 12 13 14 15 16 17 18 19 20 21 22 23 24 25 26 27 28 29 30 31 32 33 34 35 36 37 38 39 40 41 42 43 44 45 46 47 48 49 50 51 52 53 54 55 56 57 58 59 60 61 62 63 64 65 66 67 68 69 70 71 72 73 74 75 76 77 78 79 80 81 82 83 84 85 86 87 88 89 90 91 92 93 94 95 96 97 98 99 100 101 102 103 104 105 106 107 108 109 110 111 112 113 114 115 116 117 118 119 120 121 122 123 124 125 126 127 128 129 130 131 132 133 134 135 136 137 138 139 140 141 142 143 144 145 146 147 148 149 150 151 152 153 154 155 156 157 158 159 160 161 162 163 164 165 166 167 168 169 170 171 172 173 174 175 176 177 178 179 180 181 182 183 184 185 186 187 188 189 190 191 192 193 194 195 196 197 198 199 200 201 202 203 204 205 206 207 208 209 210 211 212 213 214 215 216 217 218 219 220 221 222 223 224 225 226 227 228 229 230 231 232 233 234 235 236 237 <template > <h2 > 销售计划列表</h2 > <el-table :data ="sellJHList" stripe style ="width: 100%" > <el-table-column prop ="id" label ="计划编号" width ="180" /> <el-table-column prop ="custName" label ="客户" width ="180" /> <el-table-column prop ="channelId" label ="销售渠道" > <template #default ="scope" > {{ getChannelName(scope.row.channelId) }} </template > </el-table-column > <el-table-column prop ="money" label ="销售金额" /> <el-table-column prop ="nowStep" label ="销售阶段" /> <el-table-column prop ="empId" label ="业务员" /> <el-table-column fixed ="right" label ="操作" width ="120" > <template #default ="scope" > <el-button link type ="primary" size ="small" @click ="deleteSellJh(scope.row.id)" > 删除</el-button > <el-button link type ="primary" size ="small" @click ="openSellJhDialog(scope.row)" > 修改</el-button > </template > </el-table-column > </el-table > <hr /> <el-pagination small background :page-size ="10" :pager-count ="5" layout ="prev, pager, next" :total ="total" class ="mt-4" @current-change ="handlerPageChange" /> <el-dialog v-model ="dialogSellJhVisible" width ="80%" > <h2 > 修改销售计划</h2 > <el-form :model ="sellJhForm" label-width ="120px" :rules ="rules" ref ="sellJhFormRef" > <el-form-item label ="客户名称" > <el-select v-model ="sellJhForm.custid" class ="m-2" placeholder ="请选择客户" size ="large" style ="width: 80%" > <el-option v-for ="item in custList" :key ="item.id" :label ="item.custName" :value ="item.id" /> </el-select > </el-form-item > <el-form-item label ="销售渠道" prop ="channelId" > <el-select v-model ="sellJhForm.channelId" placeholder ="请选择渠道...." style ="width: 80%" > <el-option v-for ="opt in channelList" :key ="opt.id" :label ="opt.label" :value ="opt.id" /> </el-select > </el-form-item > <el-form-item label ="销售金额" prop ="money" > <el-input v-model.number ="sellJhForm.money" style ="width: 80%" /> </el-form-item > <el-form-item label ="开发阶段" prop ="nowStep" > <el-select v-model ="sellJhForm.nowStep" placeholder ="请选择...." style ="width: 80%" > <el-option label ="接触" value ="接触" /> <el-option label ="报价" value ="报价" /> <el-option label ="签约" value ="签约" /> </el-select > </el-form-item > <el-form-item label ="业务员" prop ="empId" > <el-input v-model.number ="sellJhForm.empId" style ="width: 80%" readonly ="readonly" /> </el-form-item > <el-form-item > <el-button type ="primary" @click ="subSellJhForm" > 保存</el-button > <el-button @click ="cancelForm" > 取消</el-button > </el-form-item > </el-form > </el-dialog > </template > <script setup > import { onMounted, ref, reactive } from "vue" ;import axios from "axios" ;import { ElMessage , ElMessageBox } from "element-plus" ;const sellJHList = ref ([]);const total = ref (0 );const dialogSellJhVisible = ref (false );const sellJhFormRef = ref (null );const custList = ref ([]);const channelList = ref ([ { id : 0 , label : "自媒体" }, { id : 1 , label : "网络推广" }, { id : 2 , label : "老客户介绍" }, { id : 3 , label : "陌拜" }, { id : 4 , label : "二次客户" }, ]); const sellJhForm = reactive ({ id : null , custid : null , channelId : null , money : 0 , nowStep : "" , empId : null , custName : "" , }); const rules = { custid : [{ required : false , message : "请选择客户" , trigger : "change" }], channelId : [{ required : true , message : "请选择渠道" , trigger : "change" }], money : [ { required : true , message : "请输入金额" , trigger : "blur" }, { type : "number" , message : "金额必须为数字" , trigger : "blur" }, ], nowStep : [{ required : true , message : "请选择开发阶段" , trigger : "change" }], empId : [ { required : true , message : "请输入业务员ID" , trigger : "blur" }, { type : "number" , message : "业务员ID必须为数字" , trigger : "blur" }, ], }; function getChannelName (channelId ) { switch (channelId) { case 0 : return "自媒体" ; case 1 : return "网络推广" ; case 2 : return "老客户介绍" ; case 3 : return "陌拜" ; case 4 : return "二次客户" ; default : return "未知" ; } } function sellJhListQuery (pageNum ) { axios .get (`http://localhost:8080/sellJhList?pageNum=${pageNum} ` ) .then ((response ) => { sellJHList.value = response.data .sellJhList ; total.value = response.data .total ; }) .catch ((error ) => { ElMessage .error ("查询失败" ); console .log (error); }); } function deleteSellJh (id ) { ElMessageBox .confirm ("确定删除该销售计划吗?" , "提示" , { confirmButtonText : "确定" , cancelButtonText : "取消" , type : "warning" , }) .then (() => { axios .delete (`http://localhost:8080/deleteSellJh/${id} ` ) .then (() => { ElMessage .success ("删除成功" ); sellJhListQuery (1 ); }) .catch ((error ) => { ElMessage .error ("删除失败" ); console .log (error); }); }) .catch (() => { ElMessage .info ("取消删除" ); }); } function openSellJhDialog (row ) { dialogSellJhVisible.value = true ; axios .get ("http://localhost:8080/listAllCust" ) .then ((response ) => { custList.value = response.data ; Object .assign (sellJhForm, { id : row.id , custid : row.custid ?? null , channelId : row.channelId ?? null , money : row.money || 0 , nowStep : row.nowStep || "" , empId : row.empId || null , custName : row.custName || "" , }); }) .catch ((error ) => { console .log (error); }); } function subSellJhForm ( sellJhFormRef.value .validate ((valid ) => { if (valid) { axios .put ("http://localhost:8080/updateSellJh" , sellJhForm) .then (() => { ElMessage .success ("修改成功" ); dialogSellJhVisible.value = false ; sellJhListQuery (1 ); }) .catch ((error ) => { ElMessage .error ("修改失败" ); console .log (error); }); } else { ElMessage .error ("请填写完整信息" ); } }); } function cancelForm ( dialogSellJhVisible.value = false ; sellJhFormRef.value .resetFields (); } onMounted (() => { sellJhListQuery (1 ); }); function handlerPageChange (pageNum ) { sellJhListQuery (pageNum); } </script > <style scoped > </style >
在数据库中加入这个页面
1 INSERT INTO `t_menu` (`label`, `component`, `pid`) VALUES ('销售过程列表' , 7 , 1 );
修改index.vue页面,将ListSellJh页面注册进来
1 2 3 4 5 6 7 8 9 10 11 12 13 14 15 import ListSellJh from "@/views/ListSellJh" ; const views=[AddCustomer ,ListCustomer ,,,AddSellJh ,,,ListSellJh ];const views = [ markRaw (AddCustomer ), markRaw (ListCustomer ), markRaw (AddSellJh ), markRaw (AddSellJh ), markRaw (AddSellJh ), markRaw (AddSellJh ), markRaw (AddSellJh ), markRaw (ListSellJh ), ];
3.销售过程页客户id和名称映射 后端实现 在pom.xml里新增PageHelper分页插件方便实现自定义sql分页查询
PageHelper 的一个重要特点是它对于手写的、非 MyBatis-Plus 自动生成的 SQL 也能很好地实现分页 。
1 2 3 4 5 6 <dependency > <groupId > com.github.pagehelper</groupId > <artifactId > pagehelper-spring-boot-starter</artifactId > <version > 1.4.7</version > </dependency >
SellJh类添加客户名字段
给 SellJh 类添加了一个非数据库表字段 的 custName 属性,并使用 @TableField(exist = false) 注解告诉 MyBatis-Plus 这个字段不参与数据库表的映射。这是处理关联查询结果的一种常见方式,将关联表的信息直接封装到主表的实体对象中。 1 2 3 4 5 6 @TableField(exist = false) private static final long serialVersionUID = 1L ;@TableField(exist = false) private String custName;
mapper接口里添加自定义查询方法
1 2 public List<SellJh> querySellJhListMapper () ;
xml里添加自定义方法的sql
这里编写了多表关联查询 INNER JOIN SQL 语句,将销售机会表 (t_sell_jh) 和客户表 (t_customer) 关联起来,以便在销售机会列表中直接显示客户名称 用到了之前在SellJh里加的非数据库表字段 属性,方便封装数据 1 2 3 4 5 <select id ="querySellJhListMapper" resultType ="com.example.demo.pojo.SellJh" > select sell.*,customer.cust_name custName from t_sell_jh sell inner join t_customer customer on sell.custid=customer.id </select >
修改serviceimpl原本的实现方法
在 新的SellJhServiceImpl 中,调用的是 sellJhMapper.querySellJhListMapper() 这个自定义的 Mapper 方法 (对应 XML 中的手写 SQL)。 通过在调用这个方法之前执行 PageHelper.startPage(pageNum, pageSize),PageHelper 就能拦截这个自定义的 SQL 并在其后添加分页逻辑。 1 2 3 4 5 6 7 8 9 10 11 12 13 14 15 16 17 @Override public Map<String, Object> querySellJhListService (Integer pageNum, Integer pageSize) { Map<String, Object> result=new HashMap <>(); Page<SellJh> page = PageHelper.startPage(pageNum, pageSize); System.out.println("1---------" +page.getTotal()); List<SellJh> sellJhs = sellJhMapper.querySellJhListMapper(); System.out.println("2---------" +page.getTotal()); result.put("sellJhList" ,sellJhs); result.put("total" ,page.getTotal()); return result; }
前端实现 将ListSellJh.vue页面里的custid改为custName即可
1 2 3 4 将下面这个 <el-table-column prop ="custid" label ="客户ID" /> 改为这个即可 <el-table-column prop ="custName" label ="客户" />
Day4学了什么 处理更复杂的业务逻辑 ,如跨表数据统计更新和事务管理。掌握手写复杂 SQL (聚合、多表连接) 并将其与 MyBatis 结合使用。理解并使用另一种流行的分页解决方案 PageHelper ,特别是在自定义 SQL 场景下的应用。如何在 POJO 中扩展属性 来封装关联查询的结果。前端如何对从后端获取的数据进行格式化展示 以优化用户体验。Day5 1.实现订单数据增删改查 后端实现 修改Order类
在 Order 类的 orderDate (订单日期) 字段上,添加了 @JsonFormat(pattern = “yyyy-MM-dd HH:mm:ss”) 注解。 作用: 这个注解(通常来自 Jackson 库,Spring Boot 默认的 JSON 处理库)指示了当这个 Order 对象被序列化为 JSON 字符串(例如,后端返回给前端时)或者从 JSON 反序列化时,日期类型的 orderDate 字段应该按照 “yyyy-MM-dd HH:mm:ss” 这种格式进行转换。这有助于确保前后端日期格式的一致性,避免因格式问题导致的解析错误或显示异常。Order 实体类中也相应地添加了 @TableField(exist = false) 注解的 custName 和 itemName 属性来承载这些关联查询的结果。这是对 Day 4 学习内容的应用和巩固。 1 2 3 4 5 6 7 8 9 10 11 12 13 14 15 16 17 @JsonFormat(pattern = "yyyy-MM-dd HH:mm:ss") private Date orderDate; @TableField(exist = false) private static final long serialVersionUID = 1L ; @TableField(exist = false) private Integer num; @TableField(exist = false) private String custName; @TableField(exist = false) private String itemName;
Ordermapper添加自定义查询方法
再次使用了 INNER JOIN 来关联客户表和商品表,以便在订单列表中显示客户名称和商品名称 1 2 3 4 5 6 < select id= "queryOrderListMapper" resultType= "com.example.demo.pojo.Order"> select ord.* ,customer.cust_name custName, item.item_name itemName from t_customer customer inner join t_order ord on customer.id= ord.cust_id inner join t_item item on item.id= ord.item_id < / select >
在对应mapper接口里添加接口
1 2 3 4 5 public List<Order> queryOrderListMapper () ;
在对应service里添加接口
1 2 public Map<String,Object> queryOrderListService (Integer pageNum, Integer pageSize) ;
在对应servicimpl里实现对应方法
1 2 3 4 5 6 7 8 9 10 11 12 13 14 15 16 17 @Autowired private OrderMapper orderMapper; @Override public Map<String, Object> queryOrderListService (Integer pageNum, Integer pageSize) { Page<Object> page = PageHelper.startPage(pageNum, pageSize); List<Order> orderList = orderMapper.queryOrderListMapper(); Map<String, Object> result=new HashMap <>(); result.put("orderList" ,orderList); result.put("total" ,page.getTotal()); return result; }
新建Controller类,实现增删改查
1 2 3 4 5 6 7 8 9 10 11 12 13 14 15 16 17 18 19 20 21 22 23 24 25 26 27 28 29 30 31 32 33 34 35 36 37 38 39 40 41 42 43 44 45 46 47 48 49 50 51 52 53 54 55 56 57 58 59 60 61 62 63 64 65 66 67 68 69 70 package com.example.demo.Controller;import com.example.demo.pojo.Order;import com.example.demo.service.OrderService;import org.springframework.beans.factory.annotation.Autowired;import org.springframework.web.bind.annotation.*;import java.util.HashMap;import java.util.Map;@RestController @CrossOrigin public class OrderController { @Autowired private OrderService orderService; @GetMapping("/listOrder") public Map<String, Object> listOrders ( @RequestParam(defaultValue = "1") Integer pageNum, @RequestParam(defaultValue = "3") Integer pageSize) { return orderService.queryOrderListService(pageNum, pageSize); } @PostMapping("/saveOrder") public Map<String, Object> saveOrder (@RequestBody Order order) { Map<String, Object> result = new HashMap <>(); try { orderService.save(order); result.put("code" , 200 ); result.put("message" , "添加成功" ); } catch (Exception e) { result.put("code" , 400 ); result.put("message" , "添加失败" ); } return result; } @DeleteMapping("/deleteOrder/{id}") public Map<String, Object> deleteOrder (@PathVariable Integer id) { Map<String, Object> result = new HashMap <>(); try { orderService.removeById(id); result.put("code" , 200 ); result.put("message" , "删除成功" ); } catch (Exception e) { result.put("code" , 400 ); result.put("message" , "删除失败" ); } return result; } @PutMapping("/updateOrder") public Map<String, Object> updateOrder (@RequestBody Order order) { Map<String, Object> result = new HashMap <>(); try { orderService.updateById(order); result.put("code" , 200 ); result.put("message" , "修改成功" ); } catch (Exception e) { result.put("code" , 400 ); result.put("message" , "修改失败" ); } return result; } }
前端实现 添加销售计划列表页面
在表格上方添加了由多个输入框 (el-input) 和下拉选择框 (el-select) 组成的查询表单 (el-form :inline=“true” 表示行内表单)。 用户可以在这些表单项中输入查询条件,点击“查询”按钮后,前端会将这些条件收集起来(绑定到 condForm 这个响应式对象),然后通过 POST 请求发送给后端。 ListCustOrder.vue
1 2 3 4 5 6 7 8 9 10 11 12 13 14 15 16 17 18 19 20 21 22 23 24 25 26 27 28 29 30 31 32 33 34 35 36 37 38 39 40 41 42 43 44 45 46 47 48 49 50 51 52 53 54 55 56 57 58 59 60 61 62 63 64 65 66 67 68 69 70 71 72 73 74 75 76 77 78 79 80 81 82 83 84 85 86 87 88 89 90 91 92 93 94 95 96 97 98 99 100 101 102 103 104 105 106 107 108 109 110 111 112 113 114 115 116 117 118 119 120 121 122 123 124 125 126 127 128 129 130 131 132 133 134 135 136 137 138 139 140 141 142 143 144 145 146 147 148 149 150 151 152 153 154 155 156 157 158 159 160 161 162 163 164 165 166 167 168 169 170 <template > <h2 > 客户订单列表</h2 > <el-table :data ="orderList" stripe style ="width: 100%" > <el-table-column prop ="id" label ="订单编号" /> <el-table-column prop ="custName" label ="客户姓名" /> <el-table-column prop ="itemName" label ="商品名称" /> <el-table-column prop ="orderDate" label ="订单日期" width ="180" /> <el-table-column prop ="state" label ="订单状态" /> <el-table-column prop ="num" label ="数量" /> <el-table-column prop ="pay" label ="支付方式" /> <el-table-column prop ="payMoney" label ="支付金额" /> <el-table-column fixed ="right" label ="操作" width ="120" > <template #default ="scope" > <el-button link type ="primary" size ="small" @click ="deleteOrder(scope.row.id)" > 删除</el-button > <el-button link type ="primary" size ="small" @click ="openOrderDialog(scope.row)" > 修改</el-button > </template > </el-table-column > </el-table > <hr /> <el-pagination small background :page-size ="3" :pager-count ="10" layout ="prev, pager, next" :total ="total" class ="mt-4" @current-change ="handlerOrderPageChange" /> <el-dialog v-model ="dialogOrderVisible" width ="80%" title ="修改订单信息" > <el-form :model ="orderForm" label-width ="120px" > <el-form-item label ="客户姓名" > <el-input v-model ="orderForm.custName" style ="width: 80%" /> </el-form-item > <el-form-item label ="商品名称" > <el-input v-model ="orderForm.itemName" style ="width: 80%" /> </el-form-item > <el-form-item label ="订单日期" > <el-input v-model ="orderForm.orderDate" style ="width: 80%" /> </el-form-item > <el-form-item label ="订单状态" > <el-input v-model ="orderForm.state" style ="width: 80%" /> </el-form-item > <el-form-item label ="数量" > <el-input v-model.number ="orderForm.num" style ="width: 80%" /> </el-form-item > <el-form-item label ="支付方式" > <el-input v-model ="orderForm.pay" style ="width: 80%" /> </el-form-item > <el-form-item label ="支付金额" > <el-input v-model.number ="orderForm.payMoney" style ="width: 80%" /> </el-form-item > <el-form-item > <el-button type ="primary" @click ="saveOrder" > 保存</el-button > <el-button @click ="cancelOrder" > 取消</el-button > </el-form-item > </el-form > </el-dialog > </template > <script setup > import { onMounted, ref, reactive } from "vue" ;import axios from "axios" ;import { ElMessage , ElMessageBox } from "element-plus" ;const orderList = ref ([]);const total = ref (0 );const dialogOrderVisible = ref (false );const orderForm = reactive ({ id : null , custName : "" , itemName : "" , orderDate : "" , state : "" , num : 0 , pay : "" , payMoney : 0 , }); function loadOrderList (pageNum ) { axios .get (`http://localhost:8080/listOrder?pageNum=${pageNum} ` ) .then ((response ) => { orderList.value = response.data .orderList ; total.value = response.data .total ; }) .catch ((error ) => { console .log (error); }); } function deleteOrder (id ) { ElMessageBox .confirm ("确定删除该订单吗?" , "提示" , { confirmButtonText : "确定" , cancelButtonText : "取消" , type : "warning" , }) .then (() => { axios .delete (`http://localhost:8080/deleteOrder/${id} ` ) .then (() => { ElMessage .success ("删除成功" ); loadOrderList (1 ); }) .catch ((error ) => { ElMessage .error ("删除失败" ); console .log (error); }); }) .catch (() => { ElMessage .info ("取消删除" ); }); } function openOrderDialog (row ) { dialogOrderVisible.value = true ; Object .assign (orderForm, { id : row.id , custName : row.custName , itemName : row.itemName , orderDate : row.orderDate , state : row.state , num : row.num , pay : row.pay , payMoney : row.payMoney , }); } function saveOrder ( axios .put ("http://localhost:8080/updateOrder" , orderForm) .then (() => { ElMessage .success ("修改成功" ); dialogOrderVisible.value = false ; loadOrderList (1 ); }) .catch ((error ) => { ElMessage .error ("修改失败" ); console .log (error); }); } function cancelOrder ( dialogOrderVisible.value = false ; } onMounted (() => { loadOrderList (1 ); }); function handlerOrderPageChange (pageNum ) { loadOrderList (pageNum); } </script > <style scoped > </style >
修改index.vue页面,将ListCustOrder页面注册进来
1 2 3 4 5 6 7 8 9 10 11 12 13 14 15 import ListCustOrder from "./views/ListCustOrder.vue" ;const views=[AddCustomer ,ListCustomer ,,ListCustOrder ,AddSellJh ,,,ListSellJh ];const views = [ markRaw (AddCustomer ), markRaw (ListCustomer ), markRaw (AddSellJh ), markRaw (ListCustOrder ), markRaw (AddSellJh ), markRaw (AddSellJh ), markRaw (AddSellJh ), markRaw (ListSellJh ), ];
2.实现订单数据多条件分页查询 后端实现 修改原本的order实体类,添加分页查询参数
1 2 3 4 5 @TableField(exist = false) private Integer pageNum=1 ;@TableField(exist = false) private Integer pageSize=3 ;
修改对应mapper接口,用order实体类封装动态where条件
1 2 3 4 public List<Order> queryOrderListMapper (Order order) ;
修改mapper对应xml,添加条件查询where-if字句
这是 Day 5 最显著的特色之一。在实现订单数据和售后数据的“多条件分页查询”时,在 Mapper XML 文件中使用了 MyBatis 的动态 SQL 功能:标签:MyBatis 会智能地处理标签内部 AND 或 OR 的前缀。如果内部有条件成立,它会自动加上 WHERE 关键字;如果内部所有条件都不成立,则标签本身不会渲染。 标签:根据传入参数对象的属性值是否满足 test 中的条件(例如 id!=null 或 state!=null and state!=‘’),来决定是否将该标签内部的 SQL 片段拼接到最终的 SQL 语句中。 将查询条件封装到实体对象中: 在 Order 和 AfterSales 实体类中添加了用于承载查询条件的属性 (如 id, state, custName, itemName 等),以及分页参数 (pageNum, pageSize)。在 Service 层和 Mapper 接口中,直接传递这个包含所有查询条件的实体对象。1 2 3 4 5 6 7 8 9 10 11 12 13 14 15 16 17 18 19 20 21 22 23 24 < ! < select id= "queryCountHisDataMapper" resultType= "com.example.demo.dto.HisData"> select cust_id custId, sum (pay_money) hisTotal from t_order group by cust_id < / select > < select id= "queryOrderListMapper" resultType= "com.example.demo.pojo.Order"> select ord.* ,customer.cust_name custName, item.item_name itemName from t_customer customer inner join t_order ord on customer.id= ord.cust_id inner join t_item item on item.id= ord.item_id < where > < if test= "id!=null"> ord.id= #{id} < / if> < if test= "state!=null and state!=''"> and state= #{state} < / if> < if test= "custName!=null and custName!=''"> and cust_name= #{custName} < / if> < if test= "itemName!=null and itemName!=''"> and item_name= #{itemName} < / if> < / where > < / select >
修改对应service接口,用order实体类封装
1 2 public Map<String,Object> queryOrderListService (Integer pageNum,Integer pageSize,Order order) ;
修改service对应实现,用order实体类封装
1 2 3 4 5 6 7 8 9 10 11 12 13 14 @Override public Map<String, Object> queryOrderListService (Integer pageNum, Integer pageSize,Order order) { Page<Object> page = PageHelper.startPage(pageNum, pageSize); List<Order> orderList = orderMapper.queryOrderListMapper(order); Map<String, Object> result=new HashMap <>(); result.put("orderList" ,orderList); result.put("total" ,page.getTotal()); return result; }
修改对应Controller,改用post请求方法,用order封装参数
引用外部资源方便理解:面试突击71:GET 和 POST 有什么区别?
节选内容:两个方法最本质的区别
GET 和 POST 最本质的区别是“约定和规范”上的区别,在规范中,定义 GET 请求是用来获取资源的,也就是进行查询操作的,而 POST 请求是用来传输实体对象的,因此会使用 POST 来进行添加、修改和删除等操作 。按照约定来说,GET 和 POST 的参数传递也是不同的,GET 请求是将参数拼加到 URL 上进行参数传递的,而 POST 是将请参数写入到请求正文中传递的 ,
虽然 GET 也可以传递复杂对象(通过序列化到 URL),但 POST 更符合将“实体对象”作为请求体传输的语义,尤其当查询条件较多或可能包含特殊字符时,POST 更为健壮和推荐。同时,这也为将来可能的更复杂查询参数(比如范围查询、排序等)留下了扩展空间。
1 2 3 4 5 6 7 8 9 10 11 @PostMapping("/listOrder") public Map<String,Object> listOrders (@RequestBody Order order) { return orderService.queryOrderListService(order.getPageNum(),order.getPageSize(),order); }
前端实现 修改对应页面代码
1 2 3 4 5 6 7 8 9 10 11 12 13 14 15 16 17 18 19 20 21 22 23 24 25 26 27 28 29 30 31 32 33 34 <template > <h2 > 客户订单列表</h2 > <el-form :inline ="true" :model ="condForm" > <el-form-item label ="订单号" > <el-input v-model ="condForm.id" /> </el-form-item > <el-form-item label ="订单状态" style ="width: 22%" > <el-select v-model ="condForm.state" placeholder ="请选择订单状态...." > <el-option label ="未出库" value ="未出库" /> <el-option label ="已出库" value ="已出库" /> <el-option label ="配送中" value ="配送中" /> <el-option label ="已收货" value ="已收货" /> </el-select > </el-form-item > <br /> <el-form-item label ="客户姓名" > <el-input v-model ="condForm.custName" /> </el-form-item > <el-form-item label ="商品名称" > <el-input v-model ="condForm.itemName" /> </el-form-item > <br /> <el-form-item > <el-button type ="primary" @click ="subQueryCond" > 查询</el-button > </el-form-item > </el-form > <hr />
修改对应方法:
1 2 3 4 5 6 7 8 9 10 11 12 13 14 function loadOrderList (pageNum ) { condForm.pageNum =pageNum; axios .post ("http://localhost:8080/listOrder" , condForm) .then ((response ) => { orderList.value = response.data .orderList ; total.value = response.data .total ; }) .catch ((error ) => { console .log (error); }); }
添加条件查询方法
1 2 3 4 5 6 7 8 9 10 11 12 13 14 15 16 17 18 19 20 const condForm=reactive ({ id :'' , state :'' , custName :'' , itemName :'' }) function subQueryCond ( condForm.pageNum =1 ; axios.post ("http://localhost:8080/listOrder" ,condForm) .then ((response )=> { orderList.value =response.data .orderList ; total.value =response.data .total ; }) .catch ((error )=> { console .log (error); }); }
3.实现客户投诉页的基本显示 后端实现 修改数据库,把record字段名改为grade
修改对应实体类的相关字段 ,添加几个字段
1 2 3 4 5 6 7 8 9 10 11 private String grade; @TableField(exist = false) private String custName; @TableField(exist = false) private Integer pageNum=1 ; @TableField(exist = false) private Integer pageSize=3 ;
在对应mapper接口里新增方法
1 2 public List<AfterSales> queryAfterSaleMapper (AfterSales afterSales) ;
在mapper.xml里实现方法
1 2 3 4 5 6 7 8 9 10 11 12 13 14 15 16 17 18 < select id= "queryAfterSaleMapper" resultType= "com.example.demo.pojo.AfterSales"> select aft.* ,customer.cust_name custName from t_customer customer inner join t_after_sales aft on customer.id= aft.cust_id < where > < if test= "id!=null"> aft.id= #{id} < / if> < if test= "question!=null and question!=''"> and question= #{question} < / if> < if test= "state!=null and state!=''"> and state= #{state} < / if> < if test= "grade!=null and grade!=''"> and aft.grade= #{grade} < / if> < / where > < / select >
在对应service接口里新增方法
1 2 public Map<String,Object> queryAfterSaleListService (AfterSales afterSales) ;
在对应impl里实现service方法
1 2 3 4 5 6 7 8 9 10 11 12 13 14 15 @Autowired private AfterSalesMapper afterSalesMapper;@Override public Map<String, Object> queryAfterSaleListService (AfterSales afterSales) { Page<Object> page = PageHelper.startPage(afterSales.getPageNum(), afterSales.getPageSize()); List<AfterSales> afterSalesList = afterSalesMapper.queryAfterSaleMapper(afterSales); Map<String, Object> result=new HashMap <>(); result.put("afterSalesList" ,afterSalesList); result.put("total" ,page.getTotal()); return result; }
添加并实现AfterSaleController
1 2 3 4 5 6 7 8 9 10 11 12 13 14 @RestController @CrossOrigin public class AfterSaleController { @Autowired private AfterSalesService afterSalesService; @PostMapping("/listAfterSale") public Map<String,Object> listAfterSales (@RequestBody AfterSales afterSales) { return afterSalesService.queryAfterSaleListService(afterSales); } }
前端实现 新增ListAfterSale.vue页面
1 2 3 4 5 6 7 8 9 10 11 12 13 14 15 16 17 18 19 20 21 22 23 24 25 26 27 28 29 30 31 32 33 34 35 36 37 38 39 40 41 42 43 44 45 46 47 48 49 50 51 52 53 54 55 56 57 58 59 60 61 62 63 64 65 66 67 68 69 70 71 72 73 74 75 76 77 78 79 80 81 82 83 84 85 86 87 88 89 90 91 92 93 94 95 96 97 98 99 100 101 102 103 104 105 106 107 108 109 110 111 112 113 114 115 116 117 118 <template> <h2>客户投诉列表</h2> <el-form :inline="true" :model="condForm" > <el-form-item label="投诉单号" > <el-input v-model="condForm.id" /> </el-form-item> <el-form-item label="问题描述" > <el-input v-model="condForm.question" /> </el-form-item> <br/> <el-form-item label="紧急程度" style="width: 22%" > <el-select v-model="condForm.grade" placeholder="请选择...." > <el-option label="普通" value="普通" /> <el-option label="加急" value="加急" /> </el-select> </el-form-item> <el-form-item label="处理状态" style="width: 22%" > <el-select v-model="condForm.state" placeholder="请选择...." > <el-option label="未处理" value="未处理" /> <el-option label="已处理" value="已处理" /> <el-option label="未回访" value="未回访" /> <el-option label="已回访" value="已回访" /> </el-select> </el-form-item> <br/> <el-form-item> <el-button type="primary" @click ="subQueryAfter" >查询</el-button> </el-form-item> </el-form> <hr/> <el-table :data="afterSaleList" stripe style="width: 100%" > <el-table-column prop="id" label="投诉编号" /> <el-table-column prop="custName" label="客户姓名" /> <el-table-column prop="question" label="问题类型" /> <el-table-column prop="state" label="处理状态" /> <el-table-column prop="grade" label="紧急程度" /> <el-table-column prop="level" label="投诉满意度" /> <el-table-column fixed="right" label="操作" width="200" > <template #default ="scope" > <el-button link type="primary" size="small" >处理 </el-button> <el-button link type="primary" size="small" >查看处理详情 </el-button> </template> </el-table-column> </el-table> <hr/> <el-pagination small background :page-size="3" :pager-count="10" layout="prev, pager, next" :total="total" class="mt-4" @current -change="handlerSalePageChange" /> </template> <script setup> import {onMounted, reactive, ref} from "vue" ;import axios from "axios" ; const total=ref(0 ) const afterSaleList=ref([]); const condForm=reactive({ id:'' , question:'' , grade:'' , level:'' }); function queryAfterSaleList (pageNum) { condForm.pageNum=pageNum; axios.post("http://localhost:8080/listAfterSale" , condForm) .then((response)=>{ afterSaleList.value=response.data.afterSalesList; total.value=response.data.total; }) .catch ((error)=>{ console.log(error); }); } onMounted(function(){ queryAfterSaleList(1 ); }); function handlerSalePageChange (pageNum) { queryAfterSaleList(pageNum); } function subQueryAfter () { queryAfterSaleList(1 ); } </script> <style scoped> </style>
在主页中注册新增页面
1 2 3 4 5 6 7 8 9 10 11 12 13 14 15 import ListAfterSale from "@/views/ListAfterSale.vue" ; const views=[AddCustomer ,ListCustomer ,ListAfterSale ,ListCustOrder ,AddSellJh ,,,ListSellJh ];const views = [ markRaw (AddCustomer ), markRaw (ListCustomer ), markRaw (ListAfterSale ), markRaw (ListCustOrder ), markRaw (AddSellJh ), markRaw (AddSellJh ), markRaw (AddSellJh ), markRaw (ListSellJh ), ];
Day5学了什么 实现更强大和灵活的后端动态条件查询 ,使用 MyBatis 的和标签,并将查询条件封装在实体对象中。 理解并实践了后端接口接收复杂查询参数的不同方式 (从 GET + @RequestParam 到 POST + @RequestBody)。前端如何构建多条件查询界面 ,并收集用户输入的条件发送给后端。初步了解了后端如何通过注解(如 @JsonFormat)控制数据(如日期)在 JSON 序列化时的格式 。进一步熟练了多表关联查询和在 POJO 中添加非数据库字段来封装结果 。Day6 1.客户投诉页添加处理操作 后端实现 新增用户反馈表
1 2 3 4 5 6 7 8 CREATE TABLE `t_replay` ( `id` int NOT NULL COMMENT '反馈/评价ID (主键)' , `content` varchar (255 ) CHARACTER SET utf8mb4 COLLATE utf8mb4_unicode_ci DEFAULT NULL COMMENT '反馈或评价内容' , `redate` datetime DEFAULT NULL COMMENT '反馈或评价日期时间' , `score` int DEFAULT NULL COMMENT '评分 (如:1-5分)' , `ques_id` int DEFAULT NULL COMMENT '问题ID,对应after_sales表' , PRIMARY KEY (`id`) ) ENGINE= InnoDB DEFAULT CHARSET= utf8mb4 COLLATE = utf8mb4_unicode_ci COMMENT= '用户反馈/评价表' ;
在idea里用mybatiesx生成此表的三个层级代码
新增对应控制层代码
1 2 3 4 5 6 7 8 9 10 11 12 13 14 15 16 17 18 19 20 21 22 23 24 25 26 @RestController @CrossOrigin public class ReplayController { @Autowired private ReplayService replayService; @PostMapping("/saveReplay") public Map<String, Object> saveReplay (@RequestBody Replay replay) { Map<String, Object> result = new HashMap <>(); result.put("code" , 400 ); result.put("msg" , "操作失败....." ); try { replay.setRedate(new Date ()); replay.setScore(ThreadLocalRandom.current().nextInt(1 ,6 )); replayService.save(replay); result.put("code" ,200 ); result.put("msg" ,"处理投诉回复成功......" ); }catch (Exception ex){ ex.printStackTrace(); } return result; } }
前端实现 添加处理按钮绑定事件
1 <el-button link type ="primary" size ="small" @click ="openReplayDialog(scope.row.id)" > 处理</el-button >
添加对话框
1 2 3 4 5 6 7 8 9 10 11 12 13 14 15 16 17 18 19 20 21 22 23 24 25 26 27 28 29 <el-pagination small background :page-size ="3" :pager-count ="10" layout ="prev, pager, next" :total ="total" class ="mt-4" @current-change ="handlerSalePageChange" /> <el-dialog v-model ="dialogReplayVisible" width ="80%" > <h2 > 恢复客户投诉</h2 > <el-form :model ="replayForm" label-width ="120px" > <el-form-item label ="回复内容" > <el-input v-model ="replayForm.content" style ="width: 80%;height: 120px" type ="textarea" /> </el-form-item > <el-form-item > <el-button type ="primary" @click ="subReplayForm" > 保存</el-button > <el-button > 取消</el-button > </el-form-item > </el-form > </el-dialog >
添加相关触发逻辑
1 2 3 4 5 6 7 8 9 10 11 const dialogReplayVisible=ref(false ); const replayForm=reactive({ content:'' }); function openReplayDialog (qid) { dialogReplayVisible.value=true ; replayForm.quesId=qid; }
添加发送请求到后端的代码
1 2 3 4 5 6 7 8 9 10 11 12 13 14 15 16 function subReplayForm ( axios.post ("http://localhost:8081/saveReplay" ,replayForm) .then ((response )=> { if (response.data .code ==200 ){ dialogReplayVisible.value =false ; ElMessage (response.data .msg ); }else { ElMessage (response.data .msg ); } }) .catch ((error )=> { console .log (error); }); }
2.加载问题回复列表 后端实现 修改Replay实体类,使前端能正确解析时间
1 2 3 4 5 @JsonFormat(pattern = "yyyy-MM-dd HH:mm:ss") private Date redate;
service接口添加
1 2 3 public Map<String,Object> queryReplayListService (Integer id , Integer pageNum, Integer pageSize) ;
实现service方法
1 2 3 4 5 6 7 8 9 10 11 12 13 14 15 16 17 18 19 20 21 @Autowired private ReplayMapper replayMapper; @Override public Map<String, Object> queryReplayListService (Integer id , Integer pageNum, Integer pageSize) { Page<Replay> page=new Page <>(pageNum,pageSize); QueryWrapper<Replay> wrapper =new QueryWrapper <>(); wrapper.eq("ques_id" ,id); List<Replay> replayList = replayMapper.selectList(page, wrapper); Map<String, Object> result=new HashMap <>(); result.put("total" ,page.getTotal()); result.put("replayList" ,replayList); return result; }
添加Controller接口
1 2 3 4 5 6 7 @GetMapping("/listReplay") public Map<String, Object> listReplay (Integer id , @RequestParam(defaultValue = "1") Integer pageNum , @RequestParam(defaultValue = "3") Integer pageSize) { return replayService.queryReplayListService(id, pageNum, pageSize); }
前端实现 添加对话框组件
1 2 3 4 5 6 7 8 9 10 11 12 13 14 15 16 17 18 19 20 21 22 23 24 25 26 27 28 29 30 31 32 33 34 35 36 37 38 39 40 41 42 43 44 45 46 <el-dialog v-model ="dialogReplayListVisible" width ="80%" > <h2 > 回复列表</h2 > <div style ="text-align: left" > <el-text > 投诉人:{{question.custName}}</el-text > <br /> <el-text > 投诉问题:{{question.quesDesc}}</el-text > <el-table :data ="replaysList" stripe style ="width: 100%" > <el-table-column prop ="id" label ="编号" /> <el-table-column prop ="redate" label ="时间" /> <el-table-column prop ="score" label ="评分" /> <el-table-column prop ="content" label ="内容" /> </el-table > <hr /> <el-pagination small background :page-size ="3" :pager-count ="10" layout ="prev, pager, next" :total ="totalReplay" class ="mt-4" @current-change ="handlerReplayPageChange" /> </div > </el-dialog >
添加对应处理方法
1 2 3 4 5 6 7 8 9 10 11 12 13 14 15 16 17 18 19 20 21 22 23 24 25 26 27 28 29 30 31 32 33 34 35 36 37 38 39 40 41 42 const dialogReplayListVisible=ref (false ); const question=reactive ({ custName :'' , quesDesc :'' }) const totalReplay=ref (0 ); const replaysList=ref ([]); let qid=0 ; function loadQuestionReplayList (row ){ dialogReplayListVisible.value =true ; question.custName =row.custName ; question.quesDesc =row.question ; qid=row.id ; axios.get ("http://localhost:8081/listReplay?id=" +row.id ) .then ((response )=> { replaysList.value =response.data .replayList ; totalReplay.value =response.data .total ; }) .catch ((error )=> { console .log (error); }) } function handlerReplayPageChange (pageNum ){ axios.get ("http://localhost:8081/listReplay?id=" +qid+"&pageNum=" +pageNum) .then ((response )=> { replaysList.value =response.data .replayList ; totalReplay.value =response.data .total ; }) .catch ((error )=> { console .log (error); }) }
3.RBAC权限控制 权限控制:
不同用户登录系统可以使用的系统资源不一样。 不同用户登录系统看到的左边菜单不一样。 建立起用户和菜单表的关系,建立用户表和菜单表的关联关系。 后端实现 添加四个表
这些表共同构建了一个基于角色的权限控制 (RBAC) 系统:
1 2 3 4 5 6 7 8 9 10 11 12 13 14 15 16 17 18 19 20 21 22 23 24 25 26 27 28 29 30 31 CREATE TABLE `t_role_menu` ( `id` int NOT NULL AUTO_INCREMENT COMMENT '关联ID (主键)' , `rid` int NULL DEFAULT NULL COMMENT '角色ID (关联t_roler.id)' , `mid` int NULL DEFAULT NULL COMMENT '菜单ID (关联t_menus.id)' , PRIMARY KEY (`id`) USING BTREE ) ENGINE = InnoDB CHARACTER SET = utf8mb4 COLLATE = utf8mb4_0900_ai_ci ROW_FORMAT = Dynamic COMMENT = '角色菜单关联表 (定义角色拥有的菜单权限)' ; CREATE TABLE `t_roler` ( `id` int NOT NULL AUTO_INCREMENT COMMENT '角色ID (主键)' , `rname` varchar (50 ) CHARACTER SET utf8mb4 COLLATE utf8mb4_0900_ai_ci NULL DEFAULT NULL COMMENT '角色名称' , `rdesc` varchar (255 ) CHARACTER SET utf8mb4 COLLATE utf8mb4_0900_ai_ci NULL DEFAULT NULL COMMENT '角色描述' , PRIMARY KEY (`id`) USING BTREE ) ENGINE = InnoDB CHARACTER SET = utf8mb4 COLLATE = utf8mb4_0900_ai_ci ROW_FORMAT = Dynamic COMMENT = '角色信息表 (权限管理)' ; CREATE TABLE `t_user` ( `id` int NOT NULL AUTO_INCREMENT COMMENT '用户ID (主键)' , `uname` varchar (255 ) CHARACTER SET utf8mb4 COLLATE utf8mb4_0900_ai_ci NULL DEFAULT NULL COMMENT '用户名' , `upwd` varchar (255 ) CHARACTER SET utf8mb4 COLLATE utf8mb4_0900_ai_ci NULL DEFAULT NULL COMMENT '用户密码' , `phone` varchar (11 ) CHARACTER SET utf8mb4 COLLATE utf8mb4_0900_ai_ci NULL DEFAULT NULL COMMENT '手机号' , `edu` varchar (100 ) CHARACTER SET utf8mb4 COLLATE utf8mb4_0900_ai_ci NULL DEFAULT NULL COMMENT '学历' , `age` int NULL DEFAULT NULL COMMENT '年龄' , `title` varchar (50 ) CHARACTER SET utf8mb4 COLLATE utf8mb4_0900_ai_ci NULL DEFAULT NULL COMMENT '职位' , PRIMARY KEY (`id`) USING BTREE ) ENGINE = InnoDB CHARACTER SET = utf8mb4 COLLATE = utf8mb4_0900_ai_ci ROW_FORMAT = Dynamic COMMENT = '用户信息表 (系统用户)' ; CREATE TABLE `t_user_role` ( `id` int NOT NULL AUTO_INCREMENT COMMENT '关联ID (主键)' , `uid` int NULL DEFAULT NULL COMMENT '用户ID (关联t_user.id)' , `rid` int NULL DEFAULT NULL COMMENT '角色ID (关联t_roler.id)' , PRIMARY KEY (`id`) USING BTREE ) ENGINE = InnoDB CHARACTER SET = utf8mb4 COLLATE = utf8mb4_0900_ai_ci ROW_FORMAT = Dynamic COMMENT = '用户角色关联表 (分配用户角色)' ;
用mybatiesx插件生成对应代码
Day7 0.美化主页 主页代码修改:
1 2 3 4 5 6 7 8 9 10 11 12 13 14 15 16 17 18 19 20 21 22 23 24 25 26 27 28 29 30 31 32 33 34 35 36 37 38 39 40 41 42 43 44 45 46 47 48 49 50 51 52 53 54 55 56 57 58 59 60 61 62 63 64 65 66 67 68 69 70 71 72 73 74 75 76 77 78 79 80 81 82 83 84 85 86 87 88 89 90 91 92 93 94 95 96 97 98 99 100 101 102 103 104 105 106 107 108 109 110 111 112 113 114 115 116 117 118 119 120 121 122 123 124 125 126 127 128 129 130 131 132 133 134 135 136 137 138 139 140 141 142 143 144 145 146 147 148 149 150 151 152 153 154 155 156 157 158 159 160 161 162 163 164 165 166 167 168 169 170 171 172 173 174 175 176 177 178 179 180 181 182 183 184 185 186 187 188 189 190 191 192 193 194 195 196 197 198 199 200 201 202 203 204 205 206 207 208 209 210 211 212 213 214 215 216 217 218 219 220 221 222 223 224 225 226 227 228 229 230 231 232 233 234 235 236 237 238 239 240 241 242 243 244 245 246 247 248 249 250 251 252 253 254 255 256 257 258 259 260 261 262 263 264 265 266 267 268 269 270 271 272 273 274 275 276 277 278 279 280 281 282 283 284 285 286 287 288 289 290 291 292 293 294 295 296 297 298 299 300 301 302 303 304 305 306 307 308 309 310 311 312 313 314 315 316 317 318 319 320 321 322 323 324 325 326 327 328 329 330 331 332 333 334 335 336 337 338 339 340 341 342 343 344 345 346 347 348 349 <script setup > import AddCustomer from "@/views/Custom_Manage/AddCustomer.vue" ;import ListCustomer from "@/views/Custom_Manage/ListCustomer.vue" ;import AddSellJh from "@/views/Custom_Manage/AddSellJh.vue" ;import ListSellJh from "@/views/Custom_Manage/ListSellJh.vue" ;import ListCustOrder from "@/views/Custom_Manage/ListCustOrder.vue" ;import ListAfterSale from "@/views/Custom_Manage/ListAfterSale.vue" ;import AddMenus from "@/views/Sys_Manage/AddMenus.vue" ;import { computed, onMounted, ref, watch } from "vue" ;import { markRaw, shallowRef } from "vue" ;import axios from "axios" ;import { Folder , Document , Menu as MenuIcon , HomeFilled , Refresh } from '@element-plus/icons-vue' ;const API_BASE_URL = 'http://localhost:8080' ;const viewComponents = { addCustomer : markRaw (AddCustomer ), listCustomer : markRaw (ListCustomer ), listAfterSale : markRaw (ListAfterSale ), listCustOrder : markRaw (ListCustOrder ), addSellJh : markRaw (AddSellJh ), addMenus : markRaw (AddMenus ), listSellJh : markRaw (ListSellJh ) }; const views = [ viewComponents.addCustomer , viewComponents.listCustomer , viewComponents.listAfterSale , viewComponents.listCustOrder , viewComponents.listSellJh , viewComponents.addSellJh , viewComponents.addSellJh , viewComponents.addSellJh , viewComponents.addMenus , viewComponents.addSellJh , ]; const currentComponent = shallowRef (views[0 ]);const currentComponentIndex = ref (0 );const menus = ref ([]);const isLoading = ref (false );const error = ref (null );const handlerSelect = async (index ) => { try { error.value = null ; const response = await axios.get (`${API_BASE_URL} /compIndex` , { params : { id : index }, timeout : 5000 }); const compIndex = response.data ; if (compIndex >= 0 && compIndex < views.length ) { currentComponentIndex.value = compIndex; currentComponent.value = views[compIndex]; } else { console .warn (`Invalid component index received: ${compIndex} ` ); error.value = '无法加载请求的组件' ; } } catch (err) { console .error ('Failed to fetch component index:' , err); error.value = '加载组件失败,请稍后再试' ; } }; const fetchMenus = async ( try { isLoading.value = true ; error.value = null ; const response = await axios.get (`${API_BASE_URL} /listMenus` , { timeout : 5000 }); menus.value = response.data ; isLoading.value = false ; } catch (err) { console .error ('Failed to fetch menus:' , err); error.value = '加载菜单失败,请刷新页面重试' ; menus.value = []; isLoading.value = false ; } }; const hasMenus = computed (() => menus.value && menus.value .length > 0 );watch (error, (newError ) => { if (newError) { setTimeout (() => { error.value = null ; }, 5000 ); } }); const defaultOpeneds = computed (() => menus.value .map (menu =>id .toString ()));onMounted (() => { fetchMenus (); }); </script > <template > <div class ="app-container" > <el-container class ="main-container" > <el-header class ="app-header" > <div class ="header-content" > <el-icon class ="header-icon" > <HomeFilled /> </el-icon > <h1 class ="app-title" > ERP管理系统</h1 > <span class ="app-subtitle" > ikun小组</span > </div > </el-header > <el-container class ="content-container" > <el-aside width ="240px" class ="app-sidebar" > <div class ="menu-header" > <el-icon > <MenuIcon /> </el-icon > 系统菜单 </div > <el-skeleton :loading ="isLoading && !hasMenus" animated :count ="3" v-if ="isLoading && !hasMenus" > <template #template > <div style ="padding: 12px" > <el-skeleton-item variant ="text" style ="width: 90%" /> <div style ="margin-left: 24px; margin-top: 12px" > <el-skeleton-item variant ="text" style ="width: 80%" /> <el-skeleton-item variant ="text" style ="width: 80%; margin-top: 8px" /> </div > </div > </template > </el-skeleton > <el-alert v-if ="error && !hasMenus" :title ="error" type ="error" show-icon @close ="error = null" /> <el-menu class ="app-menu" @select ="handlerSelect" v-if ="hasMenus" :default-active ="'1'" unique-opened :default-openeds ="defaultOpeneds" > <el-sub-menu v-for ="menu in menus" :key ="menu.id" :index ="menu.id.toString()" > <template #title > <el-icon > <Folder /> </el-icon > <span > {{ menu.label }}</span > </template > <el-menu-item v-for ="subMenu in menu.subMenu" :key ="subMenu.id" :index ="subMenu.id.toString()" > <el-icon > <Document /> </el-icon > <span > {{ subMenu.label }}</span > </el-menu-item > </el-sub-menu > </el-menu > <el-empty v-if ="!isLoading && hasMenus === false && !error" description ="暂无菜单数据" > <el-button type ="primary" :icon ="Refresh" @click ="fetchMenus" > 刷新</el-button > </el-empty > </el-aside > <el-main class ="app-main" > <div v-if ="isLoading" class ="loading-overlay" > <el-skeleton animated :rows ="8" /> </div > <el-alert v-if ="error && currentComponent.value" :title ="error" type ="error" show-icon style ="margin-bottom: 16px" @close ="error = null" /> <div class ="component-container" > <keep-alive > <component :is ="currentComponent" > </component > </keep-alive > </div > </el-main > </el-container > </el-container > </div > </template > <style scoped > .app-container { height : 100vh ; display : flex; flex-direction : column; background-color : #f0f2f5 ; } .main-container { height : 100% ; overflow : hidden; } .content-container { height : calc (100vh - 64px ); } .app-header { height : 64px ; background : linear-gradient (90deg , #2b5aff , #409eff ); color : #ffffff ; display : flex; align-items : center; padding : 0 24px ; box-shadow : 0 2px 8px rgba (0 , 0 , 0 , 0.1 ); } .header-content { display : flex; align-items : center; gap : 12px ; } .header-icon { font-size : 24px ; } .app-title { margin : 0 ; font-size : 1.6rem ; font-weight : 700 ; letter-spacing : 0.5px ; } .app-subtitle { font-size : 0.95rem ; font-weight : 400 ; opacity : 0.85 ; } .app-sidebar { background-color : #ffffff ; border-right : 1px solid #e8ecef ; overflow-y : auto; height : 100% ; transition : width 0.3s ease; box-shadow : 2px 0 8px rgba (0 , 0 , 0 , 0.05 ); scrollbar-width : none; -ms-overflow -style: none; } .app-sidebar ::-webkit-scrollbar { display : none; } .menu-header { padding : 16px 20px ; font-weight : 600 ; font-size : 1.15rem ; color : #303133 ; border-bottom : 1px solid #e8ecef ; display : flex; align-items : center; gap : 8px ; } .app-menu { border-right : none; background-color : transparent; } .app-menu :deep (.el-sub-menu__title),.app-menu :deep (.el-menu-item) { color : #303133 ; font-size : 0.95rem ; } .app-menu :deep (.el-sub-menu__title:hover),.app-menu :deep (.el-menu-item:hover) { background-color : #e6f0ff ; color : #2b5aff ; } .app-menu :deep (.el-menu-item.is-active) { background-color : #e6f0ff ; color : #2b5aff ; font-weight : 500 ; } .app-main { background-color : #ffffff ; padding : 24px ; overflow-y : auto; height : 100% ; position : relative; border-radius : 8px ; margin : 16px ; box-shadow : 0 2px 12px rgba (0 , 0 , 0 , 0.06 ); scrollbar-width : none; -ms-overflow -style: none; } .app-main ::-webkit-scrollbar { display : none; } .loading-overlay { position : absolute; top : 0 ; left : 0 ; right : 0 ; bottom : 0 ; background-color : rgba (255 , 255 , 255 , 0.95 ); z-index : 10 ; padding : 24px ; display : flex; flex-direction : column; justify-content : center; } .component-container { width : 100% ; height : 100% ; } @media (max-width : 768px ) { .app-sidebar { width : 200px !important ; } .app-header { padding : 0 16px ; } .app-title { font-size : 1.3rem ; } .app-main { margin : 8px ; padding : 16px ; } } </style >
1.接口测试工具Postman的安装和使用 API测试之Postman使用完全指南(Postman教程,这篇文章就够了)
建议使用Apifox,对中文友好
Apifox下载地址
Apifox 如何发送 json 格式的 post 请求?
什么是 RESTful API
2 实现系统菜单节点管理页面 根据教程树形结构的菜单表设计与查询 和ai辅助,修改方法如下
后端实现 数据库修改菜单表,添加几个条目
1 2 3 4 5 6 7 8 9 10 11 12 13 14 15 16 17 18 19 20 21 22 23 DROP TABLE IF EXISTS `t_menu`;CREATE TABLE `t_menu` ( `id` int NOT NULL AUTO_INCREMENT COMMENT 'ID (主键)' , `label` varchar (50 ) DEFAULT NULL COMMENT '导航名称' , `component` int DEFAULT NULL COMMENT '子id' , `pid` int DEFAULT NULL COMMENT '父id' , PRIMARY KEY (`id`) ) ENGINE= InnoDB AUTO_INCREMENT= 22 DEFAULT CHARSET= utf8mb4 COLLATE = utf8mb4_0900_ai_ci COMMENT= '前端菜单表' ; INSERT INTO `t_menu` (`id`, `label`, `component`, `pid`) VALUES (1 , '客户管理' , NULL , 0 );INSERT INTO `t_menu` (`id`, `label`, `component`, `pid`) VALUES (2 , '添加客户' , 0 , 1 );INSERT INTO `t_menu` (`id`, `label`, `component`, `pid`) VALUES (3 , '查询客户' , 1 , 1 );INSERT INTO `t_menu` (`id`, `label`, `component`, `pid`) VALUES (4 , '售后服务' , 2 , 1 );INSERT INTO `t_menu` (`id`, `label`, `component`, `pid`) VALUES (5 , '客户订单' , 3 , 1 );INSERT INTO `t_menu` (`id`, `label`, `component`, `pid`) VALUES (6 , '销售过程' , 4 , 1 );INSERT INTO `t_menu` (`id`, `label`, `component`, `pid`) VALUES (7 , '销售过程列表' , 7 , 1 );INSERT INTO `t_menu` (`id`, `label`, `component`, `pid`) VALUES (8 , '数据统计' , NULL , 0 );INSERT INTO `t_menu` (`id`, `label`, `component`, `pid`) VALUES (9 , '客户统计' , 5 , 8 );INSERT INTO `t_menu` (`id`, `label`, `component`, `pid`) VALUES (10 , '库存统计' , 6 , 8 );INSERT INTO `t_menu` (`id`, `label`, `component`, `pid`) VALUES (11 , '系统管理' , NULL , 0 );INSERT INTO `t_menu` (`id`, `label`, `component`, `pid`) VALUES (12 , '添加菜单' , 8 , 11 );INSERT INTO `t_menu` (`id`, `label`, `component`, `pid`) VALUES (13 , '用户管理' , 9 , 11 );INSERT INTO `t_menu` (`id`, `label`, `component`, `pid`) VALUES (14 , '角色管理' , 10 , 11 );
MenuService添加接口
1 2 public void saveMenusService (Menu menu) ;
MenuServiceImpl实现接口
1 2 3 4 5 6 7 8 9 10 @Override public void saveMenusService (Menu menu) { QueryWrapper<Menu> wrapper=new QueryWrapper <>(); wrapper.select("max(component) maxv" ); Menu ms = MenuMapper.selectOne(wrapper); menu.setComponent(ms.getMaxv()+1 ); MenuMapper.insert(menu); }
MenusController添加增删改方法
1 2 3 4 5 6 7 8 9 10 11 12 13 14 15 16 17 18 19 20 21 22 23 24 25 26 27 28 29 30 31 32 33 34 35 36 37 38 39 40 41 42 43 44 45 46 47 48 49 50 51 @Autowired private MenuService menusService; @CrossOrigin @PostMapping("/saveMenus") public Map<String,Object> saveMenus (@RequestBody Menu menu) { Map<String,Object> result=new HashMap <>(); result.put("code" ,400 ); result.put("msg" ,"操作失败......" ); try { menusService.saveMenusService(menu); result.put("code" ,200 ); result.put("msg" ,"添加菜单节点成功......." ); }catch (Exception ex){ ex.printStackTrace(); } return result; } @CrossOrigin @PutMapping("/updateMenus") public Map<String,Object> updateMenus (@RequestBody Menu menu) { Map<String,Object> result=new HashMap <>(); result.put("code" ,400 ); result.put("msg" ,"操作失败......" ); try { menusService.updateById(menu); result.put("code" ,200 ); result.put("msg" ,"修改菜单节点成功......." ); }catch (Exception ex){ ex.printStackTrace(); } return result; } @CrossOrigin @DeleteMapping("/deleteMenus") public Map<String,Object> deleteMenus (Integer id) { Map<String,Object> result=new HashMap <>(); result.put("code" ,400 ); result.put("msg" ,"操作失败......" ); try { menusService.removeById(id); result.put("code" ,200 ); result.put("msg" ,"删除菜单节点成功......." ); }catch (Exception ex){ ex.printStackTrace(); } return result; }
前端实现 实现AddMenus.vue页面
1 2 3 4 5 6 7 8 9 10 11 12 13 14 15 16 17 18 19 20 21 22 23 24 25 26 27 28 29 30 31 32 33 34 35 36 37 38 39 40 41 42 43 44 45 46 47 48 49 50 51 52 53 54 55 56 57 58 59 60 61 62 63 64 65 66 67 68 69 70 71 72 73 74 75 76 77 78 79 80 81 82 83 84 85 86 87 88 89 90 91 92 93 94 95 96 97 98 99 100 101 102 103 104 105 106 107 108 109 110 111 112 113 114 115 116 117 118 119 120 121 122 123 124 125 126 127 128 129 130 131 132 133 134 135 136 137 138 139 140 141 142 143 144 145 146 147 148 149 150 151 152 153 154 155 156 157 158 159 160 161 162 163 164 165 166 167 168 169 170 171 172 173 174 175 176 177 178 179 180 181 182 183 184 185 186 187 188 189 190 191 192 193 194 195 196 197 198 199 200 201 202 203 204 205 206 <template > <h2 > 管理菜单</h2 > <div style ="text-align: left" > <h4 > 选择新增节点的父节点:</h4 > <el-tree :props ="props" :data ="treeNodeList" node-key ="id" default-expand-all :expand-on-click-node ="false" ref ="treeRef" @node-click ="hanldNodeClick" highlight-current ="true" > <template #default ="{ node, data }" > <span class ="custom-tree-node" > <span > {{ node.label }}</span > <span > <a @click.stop ="openEditDialog(data)" style ="color: var(--el-color-primary)" > 修改 </a > <a style ="margin-left: 8px; color: var(--el-color-danger)" @click.stop ="delMenus(node, data)" > 删除 </a > </span > </span > </template > </el-tree > </div > <hr /> <el-form :model ="menuForm" label-width ="120px" > <el-form-item label ="新增菜单名称" > <el-input v-model ="menuForm.label" style ="width: 50%" /> </el-form-item > <el-form-item > <el-button type ="primary" @click ="subMenuForm" > 保存</el-button > <el-button @click ="resetForm" > 取消</el-button > </el-form-item > </el-form > <el-dialog title ="修改菜单" v-model ="dialogVisible" width ="30%" > <el-form :model ="editForm" label-width ="120px" > <el-form-item label ="菜单名称" > <el-input v-model ="editForm.label" style ="width: 50%" /> </el-form-item > </el-form > <template #footer > <el-button @click ="dialogVisible = false" > 取消</el-button > <el-button type ="primary" @click ="updateMenu" > 更新</el-button > </template > </el-dialog > </template > <script setup > import { onMounted, reactive, ref } from "vue" ; import axios from "axios" ; import { ElMessage } from "element-plus" ; const props = { id : 'id' , label : 'label' , children : 'subMenu' }; const treeNodeList = ref ([]); const menuForm = reactive ({ id : null , label : '' , component : null }); const dialogVisible = ref (false ); const editForm = reactive ({ id : null , label : '' , component : null }); function loadMenuTree ( axios.get ("http://localhost:8080/listMenus" ) .then ((response ) => { treeNodeList.value = response.data ; }) .catch ((error ) => { console .log (error); }); } onMounted (() => { loadMenuTree (); }); let id = 0 ; function hanldNodeClick (node ) { id = node.id ; } function openEditDialog (data ) { editForm.id = data.id ; editForm.label = data.label ; editForm.component = data.component ; dialogVisible.value = true ; } function updateMenu ( axios.put ("http://localhost:8080/updateMenus" , editForm) .then ((response ) => { if (response.data .code === 200 ) { loadMenuTree (); dialogVisible.value = false ; } ElMessage ({ type : response.data .code === 200 ? 'success' : 'error' , message : response.data .msg || '更新成功' }); }) .catch ((error ) => { console .log (error); ElMessage .error ('修改失败,请稍后重试' ); }); } function resetForm ( menuForm.id = null ; menuForm.label = '' ; menuForm.component = null ; id = 0 ; } function subMenuForm ( if (id === 0 ) { ElMessage ("请选择当前新增菜单节点的父节点......" ); return ; } menuForm.pid = id; axios.post ("http://localhost:8080/saveMenus" , menuForm) .then ((response ) => { if (response.data .code === 200 ) { loadMenuTree (); resetForm (); } ElMessage ({ type : response.data .code === 200 ? 'success' : 'error' , message : response.data .msg || '添加成功' }); }) .catch ((error ) => { console .log (error); ElMessage .error ('添加失败,请稍后重试' ); }); } function delMenus (node, data ) { if (data.subMenu && data.subMenu .length > 0 ) { ElMessage (data.label + ",节点存在子节点不能删除......." ); return ; } axios.delete ("http://localhost:8080/deleteMenus?id=" + data.id ) .then ((response ) => { if (response.data .code === 200 ) { loadMenuTree (); } ElMessage ({ type : response.data .code === 200 ? 'success' : 'error' , message : response.data .msg }); }); } </script > <style scoped > ::v-deep .el-tree-node.is-current > .el-tree-node__content { background-color : var (--el-color-primary-light-9 ); color : var (--el-color-primary); } ::v-deep .el-tree-node__content:hover { background-color : var (--el-fill-color-light); } ::v-deep .el-tree { --el-tree-node-hover-bg-color : var (--el-fill-color-light); --el-tree-text-color : var (--el-text-color-regular); --el-tree-expand-icon-color : var (--el-text-color-placeholder); } .custom-tree-node { flex : 1 ; display : flex; align-items : center; justify-content : space-between; font-size : 14px ; padding-right : 8px ; } </style >
在主页中注册新增页面
1 2 3 4 5 6 7 8 9 10 11 12 13 14 15 16 import ListAfterSale from "@/views/AddMenus.vue" ; const views=[AddCustomer ,ListCustomer ,ListAfterSale ,ListCustOrder ,AddSellJh ,,,ListSellJh ,AddMenus ];const views = [ markRaw (AddCustomer ), markRaw (ListCustomer ), markRaw (ListAfterSale ), markRaw (ListCustOrder ), markRaw (AddSellJh ), markRaw (AddSellJh ), markRaw (AddSellJh ), markRaw (ListSellJh ), markRaw (AddMenus ), ];
3.实现菜单拖拽改变顺序和父子关系 后端实现 表格添加顺序列
1 2 ALTER TABLE `t_menu`ADD COLUMN `sort_order` INT DEFAULT 0 COMMENT '同一父节点下的排序字段,值越小越靠前' ;
修改对应pojo,添加排序字段
1 2 3 4 private Integer sortOrder;
修改对应vo,添加父节点字段和排序字段,方便前端修改
1 2 3 4 5 6 7 8 9 @Data public class MenuVo { private Integer id; private Integer pid; private String label; private Integer component; private List<MenuVo> subMenu; private Integer sortOrder; }
service添加接口
1 2 void updateMenusOrder (List<MenuVo> menuUpdates) ;
实现该方法,修改之前的排序等方法
1 2 3 4 5 6 7 8 9 10 11 12 13 14 15 16 17 18 19 20 21 22 23 24 25 26 27 28 29 30 31 32 33 34 35 36 37 38 39 40 41 42 43 44 45 46 47 48 49 50 51 52 53 54 55 56 57 58 59 60 61 62 63 64 @Service public class MenuServiceImpl extends ServiceImpl <MenuMapper, Menu> implements MenuService { @Autowired private MenuMapper menuMapper; @Override public List<MenuVo> queryMenuListService () { QueryWrapper<Menu> queryWrapper = new QueryWrapper <>(); queryWrapper.orderByAsc("pid" , "sort_order" ); List<Menu> allMenu = this .list(queryWrapper); return buildSubmenu(allMenu, 0 ); } private List<MenuVo> buildSubmenu (List<Menu> allMenu, Integer parentId) { List<MenuVo> submenuTree = new ArrayList <>(); for (Menu menu : allMenu) { if (menu.getPid() != null && menu.getPid().equals(parentId)) { MenuVo menuVo = new MenuVo (); BeanUtils.copyProperties(menu, menuVo); menuVo.setSubMenu(buildSubmenu(allMenu, menu.getId())); submenuTree.add(menuVo); } } return submenuTree; } @Override public void saveMenusService (Menu menu) { QueryWrapper<Menu> wrapper = new QueryWrapper <>(); wrapper.select("max(component) maxv" ); Menu ms = menuMapper.selectOne(wrapper); menu.setComponent(ms == null || ms.getMaxv() == null ? 0 : ms.getMaxv() + 1 ); QueryWrapper<Menu> countWrapper = new QueryWrapper <>(); countWrapper.eq("pid" , menu.getPid()); long count = this .count(countWrapper); menu.setSortOrder((int ) count); menuMapper.insert(menu); } @Transactional @Override public void updateMenusOrder (List<MenuVo> menuUpdates) { if (menuUpdates == null || menuUpdates.isEmpty()) { return ; } for (MenuVo menuUpdate : menuUpdates) { if (menuUpdate.getId() == null ) continue ; UpdateWrapper<Menu> updateWrapper = new UpdateWrapper <>(); updateWrapper.eq("id" , menuUpdate.getId()) .set("pid" , menuUpdate.getPid()) .set("sort_order" , menuUpdate.getSortOrder()); this .update(null , updateWrapper); } } }
添加Controller方法
1 2 3 4 5 6 7 8 9 10 11 12 13 14 15 16 @CrossOrigin @PostMapping("/updateMenusOrder") public Map<String,Object> updateMenusOrder (@RequestBody List<MenuVo> menuUpdates) { Map<String,Object> result=new HashMap <>(); result.put("code" ,400 ); result.put("msg" ,"菜单顺序更新失败!" ); try { menuService.updateMenusOrder(menuUpdates); result.put("code" ,200 ); result.put("msg" ,"菜单顺序更新成功!" ); }catch (Exception ex){ ex.printStackTrace(); } return result; }
前端实现 修改Vue页面,使其能把调整的顺序和父子关系传到后端
拖拽功能 (draggable, allow-drop, allow-drag, @node-drop): allowDrag: 控制哪些节点可以被拖拽。 allowDrop: 定义复杂的拖拽放置规则(例如,限制层级深度,判断是否允许成为子节点等)。这部分的逻辑 (getNodeLevel, isPidOfLevelOneNode 等辅助函数以及 allowDrop 内部的规则判断) 体现了对树形结构操作的细致思考。 @node-drop: 当拖拽操作完成并释放后触发此事件。在此事件的回调函数 (handleDrop) 中,处理了前端树结构的变化,并收集变更信息发送给后端进行持久化。 前后端数据同步的复杂性处理 (拖拽后): 前端先行,后端确认: el-tree 组件在拖拽操作完成后,会首先在前端内部更新其数据模型 (treeNodeList.value 的结构会发生变化)。收集变更并发送: 在 @node-drop 事件触发后,前端代码需要基于这个已经变化的前端数据结构,重新计算每个节点的 pid 和 sort_order ,然后将这些变更信息 (updatesToSendToBackend) 发送给后端。后端批量更新: 后端接收到这些变更信息后,进行批量数据库更新。错误处理与回滚: 如果后端更新失败,前端需要有机制从后端重新加载数据以恢复到正确的状态 (loadMenuTree())。1 2 3 4 5 6 7 8 9 10 11 12 13 14 15 16 17 18 19 20 21 22 23 24 25 26 27 28 29 30 31 32 33 34 35 36 37 38 39 40 41 42 43 44 45 46 47 48 49 50 51 52 53 54 55 56 57 58 59 60 61 62 63 64 65 66 67 68 69 70 71 72 73 74 75 76 77 78 79 80 81 82 83 84 85 86 87 88 89 90 91 92 93 94 95 96 97 98 99 100 101 102 103 104 105 106 107 108 109 110 111 112 113 114 115 116 117 118 119 120 121 122 123 124 125 126 127 128 129 130 131 132 133 134 135 136 137 138 139 140 141 142 143 144 145 146 147 148 149 150 151 152 153 154 155 156 157 158 159 160 161 162 163 164 165 166 167 168 169 170 171 172 173 174 175 176 177 178 179 180 181 182 183 184 185 186 187 188 189 190 191 192 193 194 195 196 197 198 199 200 201 202 203 204 205 206 207 208 209 210 211 212 213 214 215 216 217 218 219 220 221 222 223 224 225 226 227 228 229 230 231 232 233 234 235 236 237 238 239 240 241 242 243 244 245 246 247 248 249 250 251 252 253 254 255 256 257 258 259 260 261 262 263 264 265 266 267 268 269 270 271 272 273 274 275 276 277 278 279 280 281 282 283 284 285 286 287 288 289 290 291 292 293 294 295 296 297 298 299 300 301 302 303 304 305 306 307 308 309 310 311 312 313 314 315 316 317 318 319 320 321 322 323 324 325 326 327 328 329 330 331 332 333 334 335 336 337 338 339 340 341 342 343 344 345 346 347 348 349 350 351 352 353 354 355 356 357 358 <template > <h2 > 管理菜单</h2 > <div style ="text-align: left" > <h4 > 选择新增节点的父节点(支持拖拽调整顺序)</h4 > <el-tree :props ="props" :data ="treeNodeList" node-key ="id" default-expand-all :expand-on-click-node ="false" ref ="treeRef" @node-click ="hanldNodeClick" :highlight-current ="true" draggable :allow-drop ="allowDrop" :allow-drag ="allowDrag" @node-drop ="handleDrop" > <template #default ="{ node, data }" > <span class ="custom-tree-node" > <span > {{ node.label }}</span > <span > <a @click.stop ="openEditDialog(data)" style ="color: var(--el-color-primary)" > 修改 </a > <a style ="margin-left: 8px; color: var(--el-color-danger)" @click.stop ="delMenus(node, data)" > 删除 </a > </span > </span > </template > </el-tree > </div > <hr /> <el-form :model ="menuForm" label-width ="120px" > <el-form-item label ="新增菜单名称" > <el-input v-model ="menuForm.label" style ="width: 50%" /> </el-form-item > <el-form-item > <el-button type ="primary" @click ="subMenuForm" > 保存</el-button > <el-button @click ="resetForm" > 取消</el-button > <el-button @click ="clearTreeSelection" style ="margin-left: 10px;" > 取消当前选中节点</el-button > </el-form-item > </el-form > <el-dialog title ="修改菜单" v-model ="dialogVisible" width ="30%" > <el-form :model ="editForm" label-width ="120px" > <el-form-item label ="菜单名称" > <el-input v-model ="editForm.label" style ="width: 50%" /> </el-form-item > </el-form > <template #footer > <el-button @click ="dialogVisible = false" > 取消</el-button > <el-button type ="primary" @click ="updateMenu" > 更新</el-button > </template > </el-dialog > </template > <script setup > import { onMounted, reactive, ref, nextTick } from "vue" ;import axios from "axios" ;import { ElMessage , ElMessageBox } from "element-plus" ;const props = { label : 'label' , children : 'subMenu' }; const treeNodeList = ref ([]);const treeRef = ref (null );const menuForm = reactive ({ id : null , label : '' , component : null , pid : 0 }); const dialogVisible = ref (false );const editForm = reactive ({ id : null , label : '' , component : null }); function loadMenuTree ( axios.get ("http://localhost:8080/listMenus" ) .then ((response ) => { treeNodeList.value = response.data ; }) .catch ((error ) => { console .log (error); ElMessage .error ("菜单加载失败" ); }); } onMounted (() => { loadMenuTree (); }); let currentSelectedPidForAdd = 0 ;function hanldNodeClick (data ) { currentSelectedPidForAdd = data.id ; } function openEditDialog (data ) { editForm.id = data.id ; editForm.label = data.label ; editForm.component = data.component ; dialogVisible.value = true ; } function updateMenu ( axios.put ("http://localhost:8080/updateMenus" , editForm) .then ((response ) => { if (response.data .code === 200 ) { loadMenuTree (); dialogVisible.value = false ; } ElMessage ({ type : response.data .code === 200 ? 'success' : 'error' , message : response.data .msg || (response.data .code === 200 ? '更新成功' : '更新失败' ) }); }) .catch ((error ) => { console .log (error); ElMessage .error ('修改失败,请稍后重试' ); }); } function resetForm ( menuForm.label = '' ; menuForm.component = null ; currentSelectedPidForAdd = 0 ; if (treeRef.value ) { treeRef.value .setCurrentKey (null ); } } function clearTreeSelection ( if (treeRef.value ) { treeRef.value .setCurrentKey (null ); } currentSelectedPidForAdd = 0 ; ElMessage .info ('已取消节点选择' ); } function subMenuForm ( if (!menuForm.label .trim ()) { ElMessage .warning ("菜单名称不能为空" ); return ; } menuForm.pid = currentSelectedPidForAdd; axios.post ("http://localhost:8080/saveMenus" , menuForm) .then ((response ) => { if (response.data .code === 200 ) { loadMenuTree (); resetForm (); } ElMessage ({ type : response.data .code === 200 ? 'success' : 'error' , message : response.data .msg || (response.data .code === 200 ? '添加成功' : '添加失败' ) }); }) .catch ((error ) => { console .log (error); ElMessage .error ('添加失败,请稍后重试' ); }); } async function delMenus (node, data ) { if (data.subMenu && data.subMenu .length > 0 ) { ElMessage .warning (data.label + ", 节点存在子节点不能删除!" ); return ; } try { await ElMessageBox .confirm ( `确定要删除菜单 "${data.label} " 吗?` , '提示' , { confirmButtonText : '确定' , cancelButtonText : '取消' , type : 'warning' } ); const response = await axios.delete ("http://localhost:8080/deleteMenus?id=" + data.id ); if (response.data .code === 200 ) { loadMenuTree (); } ElMessage ({ type : response.data .code === 200 ? 'success' : 'error' , message : response.data .msg }); } catch (error) { if (error !== 'cancel' && error !== 'close' ) { console .error ("删除失败:" , error); ElMessage .error ('删除操作失败' ); } else { ElMessage .info ('已取消删除' ); } } } const allowDrag = (draggingNode ) => { return true ; }; const isPidOfLevelOneNode = (pidToCheck ) => { if (!treeNodeList.value || treeNodeList.value .length === 0 ) return false ; return treeNodeList.value .some (levelOneNode =>id === pidToCheck); }; const getNodeLevel = (node ) => { if (!node || !node.data || typeof node.data .pid === 'undefined' ) return 0 ; if (node.data .pid === 0 ) return 1 ; if (node.data .pid !== 0 && isPidOfLevelOneNode (node.data .pid )) { return 2 ; } return 0 ; }; const allowDrop = (draggingNode, dropNode, type ) => { const draggingLevel = getNodeLevel (draggingNode); const dropLevel = getNodeLevel (dropNode); const draggingNodeHasChildren = draggingNode.childNodes && draggingNode.childNodes .length > 0 ; if (draggingLevel === 0 || dropLevel === 0 || draggingNode.key === dropNode.key ) { return false ; } if (draggingLevel === 1 ) { if (dropLevel === 1 ) { if (type === 'inner' ) { if (draggingNodeHasChildren) { return false ; } return true ; } return true ; } if (dropLevel === 2 ) { return false ; } } if (draggingLevel === 2 ) { if (dropLevel === 1 ) { if (type === 'prev' || type === 'next' ) { return true ; } return true ; } if (dropLevel === 2 ) { if (type === 'inner' ) { return false ; } return true ; } } return false ; }; const handleDrop = async (draggingNode, dropNode, dropType, ev ) => { if (dropType === 'none' ) { return ; } await nextTick (); const updateNodePidsAndCollectChanges = (nodes, parentId ) => { const changes = []; nodes.forEach ((nodeData, index ) => { nodeData.pid = parentId; changes.push ({ id : nodeData.id , pid : parentId, sortOrder : index, label : nodeData.label }); if (nodeData.subMenu && nodeData.subMenu .length > 0 ) { changes.push (...updateNodePidsAndCollectChanges (nodeData.subMenu , nodeData.id )); } else if (!nodeData.subMenu ) { nodeData.subMenu = []; } }); return changes; }; const updatesToSendToBackend = updateNodePidsAndCollectChanges (treeNodeList.value , 0 ); if (updatesToSendToBackend.length > 0 ) { try { const response = await axios.post ("http://localhost:8080/updateMenusOrder" , updatesToSendToBackend); if (response.data .code === 200 ) { ElMessage .success ('菜单顺序已同步到后端' ); } else { ElMessage .error (response.data .msg || '后端同步失败,正在还原...' ); loadMenuTree (); } } catch (error) { console .error ("Error updating menu order:" , error); ElMessage .error ('同步菜单顺序失败,正在还原...' ); loadMenuTree (); } } }; </script > <style scoped > ::v-deep .el-tree-node.is-current > .el-tree-node__content { background-color : var (--el-color-primary-light-9 ); color : var (--el-color-primary); } ::v-deep .el-tree-node__content:hover { background-color : var (--el-fill-color-light); } ::v-deep .el-tree { --el-tree-node-hover-bg-color : var (--el-fill-color-light); } .custom-tree-node { flex : 1 ; display : flex; align-items : center; justify-content : space-between; font-size : 14px ; padding-right : 8px ; } </style >
4.实现主页菜单同步修改 跨组件状态同步 (Event Bus - mitt):
问题场景: 当在 AddMenus.vue 页面修改了菜单结构(增、删、改、拖拽排序)后,主页 (index.vue,假设它也展示了菜单) 的菜单显示需要同步更新。由于这两个组件可能没有直接的父子关系,简单的 props/emit 可能不适用。解决方案: 引入了事件总线 (Event Bus) 机制,这里使用了 mitt 库。创建一个全局的事件总线实例 (src/eventBus.js)。 在菜单结构发生变化的组件 (AddMenus.vue) 中,当操作成功后,通过 emitter.emit(‘menu-structure-changed’) 发布 一个事件。 在需要响应这个变化的组件(主页 index.vue)中,通过 emitter.on(‘menu-structure-changed’, handleMenuStructureChanged) 订阅 这个事件,并在事件触发时执行相应的更新逻辑 (如重新获取菜单 fetchMenus())。 生命周期管理: 在订阅事件的组件卸载前 (onBeforeUnmount),需要通过 emitter.off() 移除监听器 ,以防止内存泄漏。这里学会了一种在 Vue 应用中进行非父子组件间通信和状态同步 的常用方法。事件总线提供了一种解耦的通信方式,使得组件间不需要直接相互依赖。 修改前端代码 根据教程vue – 事件总线 EventBus 和ai辅助,得知可以添加Event Bus (事件总线) ,以同步更新
首先,安装依赖
创建一个事件总线文件,如 src/eventBus.js
1 2 3 import mitt from 'mitt' ;const emitter = mitt ();export default emitter;
主页代码修改如下
1 2 3 4 5 6 7 8 9 10 11 12 13 14 15 16 17 18 19 20 21 22 23 24 import emitter from "@/eventBus" ;import { computed, onMounted, ref, watch, onBeforeUnmount } from "vue" ;const defaultOpeneds = computed (() => { return menus.value .map (menu =>id .toString ()); }); const handleMenuStructureChanged = ( fetchMenus (); }; onMounted (() => { fetchMenus (); emitter.on ('menu-structure-changed' , handleMenuStructureChanged); }); onBeforeUnmount (() => { emitter.off ('menu-structure-changed' , handleMenuStructureChanged); });
AddMenus.vue代码修改如下
1 2 3 4 import emitter from "@/eventBus" ;emitter.emit ('menu-structure-changed' );
Day8 0.实现后端存icon,前端显示 后端存储图标名称: 在 t_menu 表和对应的 POJO/VO 中增加了 icon_name 字段,用于存储 Element Plus 图标的名称 (如 “User”, “Setting”)。前端动态渲染图标: 在主页 (index.vue) 中,不再写死菜单图标,而是通过 :is=“getIcon(menu.iconName)” 动态地渲染内部的组件。 getIcon 函数负责根据后端返回的 iconName 从 @element-plus/icons-vue 中查找并返回对应的图标组件。如果找不到或 iconName 为空,则返回一个默认图标 (如 Document)。 后端实现 数据库对menu表添加图标字段
1 2 ALTER TABLE `t_menu`ADD COLUMN `icon_name` VARCHAR (50 ) DEFAULT NULL COMMENT 'Element Plus 图标名称 (例如 User, Setting, Folder)' AFTER `sort_order`;
menu pojo添加对应字段
1 2 3 4 5 @TableField("icon_name") private String iconName;
menu vo添加字段
1 private String iconName;
mapper添加字段
1 2 3 4 5 6 7 8 9 10 11 <resultMap id ="BaseResultMap" type ="com.example.demo.pojo.Menu" > <id property ="id" column ="id" /> <result property ="label" column ="label" /> <result property ="component" column ="component" /> <result property ="pid" column ="pid" /> <result property ="icon_name" column ="icon_name" /> </resultMap > <sql id ="Base_Column_List" > id,label,component,pid,icon_name </sql >
serviceimpl添加一行映射图标
1 2 3 4 5 6 7 8 9 10 11 12 13 private List<MenuVo> buildSubmenu (List<Menu> allMenu, Integer parentId) { List<MenuVo> submenuTree = new ArrayList <>(); for (Menu menu : allMenu) { if (menu.getPid() != null && menu.getPid().equals(parentId)) { MenuVo menuVo = new MenuVo (); BeanUtils.copyProperties(menu, menuVo); menuVo.setIconName(menu.getIconName()); menuVo.setSubMenu(buildSubmenu(allMenu, menu.getId())); submenuTree.add(menuVo); } } return submenuTree; }
前端实现 1 2 3 4 5 6 7 8 9 10 11 12 import * as ElementPlusIconsVue from '@element-plus/icons-vue' ;const getIcon = (iconName ) => { if (!iconName) return ElementPlusIconsVue .Document ; const icon = ElementPlusIconsVue [iconName]; return icon || ElementPlusIconsVue .Document ; };
修改写死的图标映射方式
1 2 3 4 5 6 7 8 9 10 11 12 13 14 15 16 17 <el-menu class ="app-menu" @select ="handlerSelect" v-if ="hasMenus" :default-active ="'1'" unique-opened :default-openeds ="defaultOpeneds" > <el-sub-menu v-for ="menu in menus" :key ="menu.id" :index ="menu.id.toString()" > <template #title > <el-icon > <component :is ="getIcon(menu.iconName)" /> </el-icon > <span > {{ menu.label }}</span > </template > <el-menu-item v-for ="subMenu in menu.subMenu" :key ="subMenu.id" :index ="subMenu.id.toString()" > <el-icon > <component :is ="getIcon(subMenu.iconName)" /> </el-icon > <span > {{ subMenu.label }}</span > </el-menu-item > </el-sub-menu >
1.实现角色增删改查 后端实现 Roleservice添加接口
1 public Map<String,Object> queryRolePageListService (Integer pageNum, Integer pageSize) ;
实现接口方法
1 2 3 4 5 6 7 8 9 10 11 12 13 14 @Autowired private RolerMapper rolerMapper; @Override public Map<String, Object> queryRolePageListService (Integer pageNum, Integer pageSize) { Page<Roler> page=new Page <>(pageNum,pageSize); List<Roler> rolerList = rolerMapper.selectList(page, null ); Map<String, Object> result=new HashMap <>(); result.put("total" ,page.getTotal()); result.put("rolerList" ,rolerList); return result; }
实现控制层
1 2 3 4 5 6 7 8 9 10 11 12 13 14 15 16 17 18 19 20 21 22 23 24 25 26 27 28 29 30 31 32 33 34 35 36 37 38 39 40 41 42 43 44 45 46 47 48 49 50 51 52 53 54 55 56 57 58 59 60 61 62 63 64 65 66 @RestController @CrossOrigin public class RolerController { @Autowired private RolerService rolerService; @GetMapping("/rolerList") public Map<String,Object> rolerList ( @RequestParam(defaultValue = "1") Integer pageNum , @RequestParam(defaultValue = "3") Integer pageSize) { return rolerService.queryRolePageListService(pageNum,pageSize); } @PostMapping("/updateRoler") public Map<String,Object> updateRoler (@RequestBody Roler roler) { Map<String,Object> result=new HashMap <>(); result.put("code" ,400 ); result.put("msg" ,"操作失败......." ); try { rolerService.updateById(roler); result.put("code" ,200 ); result.put("msg" ,"更新角色信息成功......" ); }catch (Exception ex){ ex.printStackTrace(); } return result; } @PostMapping("/saveRoler") public Map<String,Object> saveRoler (@RequestBody Roler roler) { Map<String,Object> result=new HashMap <>(); result.put("code" ,400 ); result.put("msg" ,"操作失败......." ); try { rolerService.save(roler); result.put("code" ,200 ); result.put("msg" ,"保存角色信息成功......" ); }catch (Exception ex){ ex.printStackTrace(); } return result; } @PostMapping("/deleteRoler") public Map<String,Object> deleteRoler (@RequestBody Roler roler) { Map<String,Object> result=new HashMap <>(); result.put("code" ,400 ); result.put("msg" ,"操作失败......." ); try { rolerService.removeById(roler.getId()); result.put("code" ,200 ); result.put("msg" ,"删除角色信息成功......" ); }catch (Exception ex){ ex.printStackTrace(); } return result; } }
前端实现 实现了一种表格内编辑 的功能。通过点击“编辑”按钮,行内对应的 el-input 变为可编辑状态,编辑完成后点击“保存”按钮提交更新。这是通过在行数据 (scope.row) 上添加一个 edit 标志位来控制的。 特色(表格内编辑): 这种交互方式比传统的“点击编辑 -> 打开新对话框/页面 -> 保存” 更为直接和便捷,尤其适用于少量字段的快速修改。添加RolerManager.vue页面
1 2 3 4 5 6 7 8 9 10 11 12 13 14 15 16 17 18 19 20 21 22 23 24 25 26 27 28 29 30 31 32 33 34 35 36 37 38 39 40 41 42 43 44 45 46 47 48 49 50 51 52 53 54 55 56 57 58 59 60 61 62 63 64 65 66 67 68 69 70 71 72 73 74 75 76 77 78 79 80 81 82 83 84 85 86 87 88 89 90 91 92 93 94 95 96 97 98 99 100 101 102 103 104 105 106 107 108 109 110 111 112 113 114 115 116 117 118 119 120 121 122 123 124 125 126 127 128 129 130 131 132 133 134 135 136 137 138 139 140 141 142 143 144 145 146 147 148 149 150 151 152 153 154 155 156 157 158 159 160 161 <template > <h2 > 角色管理</h2 > <div style ="text-align: left" > <el-button type ="primary" @click ="openRoleDialog" > 添加角色</el-button > </div > <el-table :data ="rolerList" stripe style ="width: 100%" > <el-table-column prop ="id" label ="编号" width ="180" /> <el-table-column label ="角色" width ="260" > <template #default ="scope" > <el-input v-if ="scope.row.edit" v-model ="scope.row.rname" > </el-input > <span v-else > {{ scope.row.rname }}</span > </template > </el-table-column > <el-table-column label ="描述" > <template #default ="scope" > <el-input v-if ="scope.row.edit" v-model ="scope.row.rdesc" > </el-input > <span v-else > {{ scope.row.rdesc }}</span > </template > </el-table-column > <el-table-column align ="right" > <template #header > <span > 操作</span > </template > <template #default ="scope" > <el-button v-if ="!scope.row.edit" size ="mini" @click ="handleEdit(scope.row)" > 编辑</el-button > <el-button v-else size ="mini" type ="success" @click ="handleSave(scope.row)" > 保存</el-button > <el-button size ="mini" type ="danger" @click ="handleDelete(scope.row)" > 删除</el-button > </template > </el-table-column > </el-table > <hr /> <el-pagination small background :page-size ="3" :pager-count ="10" layout ="prev, pager, next" :total ="total" class ="mt-4" @current-change ="rolerPageChange" /> <el-dialog v-model ="dialogRoleVisible" width ="80%" > <h2 > 角色信息</h2 > <el-form :model ="rolerForm" label-width ="120px" > <el-form-item label ="角色名称" > <el-input v-model ="rolerForm.rname" style ="width: 80%" /> </el-form-item > <el-form-item label ="角色描述" > <el-input v-model ="rolerForm.rdesc" style ="width: 80%" /> </el-form-item > <el-form-item > <el-button type ="primary" @click ="saveRoleForm" > 保存</el-button > <el-button > 取消</el-button > </el-form-item > </el-form > </el-dialog > </template > <script setup > import { onMounted, reactive, ref } from "vue" ;import axios from "axios" ;import { ElMessage , ElMessageBox } from "element-plus" ;const rolerList = ref ([]);const total = ref (0 );function queryRoleList (pageNum ) { axios.get ("http://localhost:8080/rolerList?pageNum=" + pageNum) .then ((response ) => { rolerList.value = response.data .rolerList ; total.value = response.data .total ; }) .catch ((error ) => { console .log (error); }); } onMounted (function ( queryRoleList (1 ); }) function rolerPageChange (pageNum ) { queryRoleList (pageNum); } function handleEdit (row ) { row.edit = true ; } function handleSave (row ) { axios.post ("http://localhost:8080/updateRoler" , row) .then ((response ) => { if (response.data .code == 200 ) { row.edit = false ; } ElMessage (response.data .msg ); }) .catch ((error ) => { console .log (error); }); } function handleDelete (row ) { ElMessageBox .confirm ('确认要删除该角色吗?' , '警告' , { confirmButtonText : '确定' , cancelButtonText : '取消' , type : 'warning' , }).then (() => { axios.post ("http://localhost:8080/deleteRoler" , row) .then ((response ) => { if (response.data .code == 200 ) { queryRoleList (1 ); } ElMessage (response.data .msg ); }) .catch ((error ) => { console .log (error); ElMessage ("删除失败,请稍后重试" ); }); }).catch (() => { ElMessage ("已取消删除" ); }); } const dialogRoleVisible = ref (false );const rolerForm = reactive ({ rname : '' , rdesc : '' }); function openRoleDialog ( dialogRoleVisible.value = true ; } function saveRoleForm ( axios.post ("http://localhost:8080/saveRoler" , rolerForm) .then ((response ) => { if (response.data .code == 200 ) { dialogRoleVisible.value = false ; rolerForm.rname = '' ; rolerForm.rdesc = '' ; queryRoleList (1 ); } ElMessage (response.data .msg ); }) .catch ((error ) => { console .log (error); }) } </script > <style scoped > </style >
注册此页面
1 2 3 4 5 6 7 8 9 10 11 12 13 14 15 16 17 import ListAfterSale from "@/views/RolerManager.vue" ; const views=[AddCustomer ,ListCustomer ,ListAfterSale ,ListCustOrder ,AddSellJh ,,,ListSellJh ,AddMenus ,RolerManager ];const views = [ markRaw (AddCustomer ), markRaw (ListCustomer ), markRaw (ListAfterSale ), markRaw (ListCustOrder ), markRaw (AddSellJh ), markRaw (AddSellJh ), markRaw (AddSellJh ), markRaw (ListSellJh ), markRaw (AddMenus ), markRaw (RolerManager ), ];
2.实现角色权限管理 后端实现 listRoleMenus (GET): 根据角色 ID (roleId) 查询该角色已经拥有的菜单 ID 列表。这对应 RoleMenuMapper.xml 中的 getMenusByRoleId。 grantRoleMenus (POST): 接收一个包含角色 ID 和多个菜单 ID 的数组,为该角色重新授权菜单。这对应 RoleMenuMapper.xml 中的 deleteByRoleId (先删除旧权限) 和 batchInsert (批量插入新权限)。这个操作同样使用了 @Transactional 来保证原子性。 RoleMenu Mapper.xml添加方法
1 2 3 4 5 6 7 8 9 10 11 12 13 14 15 16 17 18 < ! < select id= "getMenusByRoleId" resultType= "java.lang.Integer"> SELECT mid FROM t_role_menu WHERE rid = #{roleId} < / select > < ! < delete id= "deleteByRoleId"> DELETE FROM t_role_menu WHERE rid = #{roleId} < / delete > < ! < insert id= "batchInsert"> INSERT INTO t_role_menu(rid, mid) VALUES < foreach collection= "menuIds" item= "mid" separator= ","> (#{roleId}, #{mid}) < / foreach> < / insert >
对应RoleMenuService接口添加方法
1 2 List<Integer> getMenusByRoleId (Integer roleId) ; boolean grantRoleMenus (Integer[] ids) ;
实现方法
1 2 3 4 5 6 7 8 9 10 11 12 13 14 15 16 17 18 19 20 21 22 23 @Override public List<Integer> getMenusByRoleId (Integer roleId) { return baseMapper.getMenusByRoleId(roleId); } @Override public boolean grantRoleMenus (Integer[] ids) { if (ids.length > 0 ) { Integer roleId = ids[0 ]; List<Integer> menuIds = new ArrayList <>(); for (int i=1 ; i<ids.length; i++) { menuIds.add(ids[i]); } baseMapper.deleteByRoleId(roleId); if (menuIds != null && !menuIds.isEmpty()) { return baseMapper.batchInsert(roleId, menuIds) > 0 ; } return true ; } return false ; }
在RolerController添加方法(注意不是RolerMenuController)
1 2 3 4 5 6 7 8 9 10 11 12 13 14 15 16 17 18 19 20 21 22 23 24 25 @Autowired private RoleMenuService roleMenuService; @GetMapping("/listRoleMenus") public List<Integer> listRoleMenus (Integer roleId) { return roleMenuService.getMenusByRoleId(roleId); } @PostMapping("/grantRoleMenus") public Map<String,Object> grantRoleMenus (@RequestBody Integer[] ids) { Map<String,Object> result=new HashMap <>(); result.put("code" ,400 ); result.put("msg" ,"授权失败......" ); try { if (roleMenuService.grantRoleMenus(ids)) { result.put("code" ,200 ); result.put("msg" ,"授权成功......." ); } }catch (Exception ex){ ex.printStackTrace(); } return result; }
前端实现 点击“授权”按钮,弹出一个包含完整菜单树 (el-tree 且 show-checkbox 为 true) 的对话框。 加载并回显已有权限: 打开对话框时,会先加载完整的菜单树,然后调用 /listRoleMenus 接口获取当前角色已有的菜单 ID,并使用 treeRef.value.setCheckedKeys(leafNodeIds) 将这些菜单在树中设置为选中状态。处理父子节点联动选中: el-tree 的 show-checkbox 默认会处理父子节点的联动选中。前端代码中 filterLeafNodeIds 的逻辑是为了确保只将叶子节点的 ID 传递给 setCheckedKeys,这样 Element Plus Tree 组件会自动处理父节点的半选中或全选中状态,符合用户直观的授权体验。保存授权: 用户在树中勾选/取消勾选菜单后,点击“保存授权”按钮,前端会收集所有被选中的菜单节点的 ID (通过 treeRef.value.getCheckedNodes(false, true),其中 false 表示不只获取叶子节点,true 表示获取包括半选中状态的父节点,这里可以根据实际需求调整),连同角色 ID 一起发送给后端的 /grantRoleMenus 接口。1 2 3 4 5 6 7 8 9 10 11 12 13 14 15 16 17 18 19 20 21 22 23 24 25 26 27 28 29 30 31 32 33 34 35 36 37 38 39 <el-table-column align ="right" > <template #header > <span > 操作</span > </template > <template #default ="scope" > <el-button size ="small" @click ="handleAuthorize(scope.row)" > 授权</el-button > <el-button v-if ="!scope.row.edit" size ="small" @click ="handleEdit(scope.row)" > 编辑</el-button > <el-button v-else size ="small" type ="success" @click ="handleSave(scope.row)" > 保存</el-button > <el-button size ="small" type ="danger" @click ="handleDelete(scope.row)" > 删除</el-button > </template > </el-table-column > <el-dialog title ="角色授权" v-model ="authDialogVisible" width ="40%" > <div style ="text-align: left" > <h4 > 请选择该角色可访问的菜单</h4 > <el-tree :props ="props" :data ="treeNodeList" node-key ="id" show-checkbox default-expand-all ref ="treeRef" :highlight-current ="true" > <template #default ="{ node, data }" > <span class ="custom-tree-node" > <span > {{ node.label }}</span > </span > </template > </el-tree > </div > <template #footer > <el-button @click ="authDialogVisible = false" > 取消</el-button > <el-button type ="primary" @click ="saveRoleAuth" > 保存授权</el-button > </template > </el-dialog >
1 2 3 4 5 6 7 8 9 10 11 12 13 14 15 16 17 18 19 20 21 22 23 24 25 26 27 28 29 30 31 32 33 34 35 36 37 38 39 40 41 42 43 44 45 46 47 48 49 50 51 52 53 54 55 56 57 58 59 60 61 62 63 64 65 66 67 68 69 70 71 72 73 74 75 76 77 78 79 80 81 82 83 84 85 86 87 88 89 90 91 92 93 94 95 96 97 98 99 100 101 102 103 104 105 106 107 108 109 110 111 112 113 114 const treeNodeList = ref ([]);const treeRef = ref (null );const props = { label : 'label' , children : 'subMenu' }; const authDialogVisible = ref (false );const currentRoleId = ref (null );const currentRoleName = ref ('' );function handleAuthorize (row ) { currentRoleId.value = row.id ; currentRoleName.value = row.rname ; loadMenuTree (); loadRoleMenus (row.id ); authDialogVisible.value = true ; } function loadMenuTree ( axios.get ("http://localhost:8080/listMenus" ) .then ((response ) => { treeNodeList.value = response.data ; }) .catch ((error ) => { console .log (error); ElMessage .error ("菜单加载失败" ); }); } function loadRoleMenus (roleId ) { axios.get (`http://localhost:8080/listRoleMenus?roleId=${roleId} ` ) .then ((response ) => { setTimeout (() => { if (treeRef.value ) { treeRef.value .setCheckedKeys ([]); if (response.data && response.data .length > 0 ) { const leafNodeIds = filterLeafNodeIds (response.data , treeNodeList.value ); treeRef.value .setCheckedKeys (leafNodeIds); } } }, 100 ); }) .catch ((error ) => { console .log (error); ElMessage .error ("角色菜单权限加载失败" ); }); } function filterLeafNodeIds (ids, nodes ) { const parentIds = new Set (); function collectParentIds (nodeList ) { if (!nodeList || nodeList.length === 0 ) return ; for (const node of nodeList) { if (node.subMenu && node.subMenu .length > 0 ) { parentIds.add (node.id ); collectParentIds (node.subMenu ); } } } collectParentIds (nodes); return ids.filter (id =>has (id)); } function saveRoleAuth ( if (!treeRef.value || !currentRoleId.value ) { ElMessage .warning ("请先选择角色和菜单" ); return ; } const nodes = treeRef.value .getCheckedNodes (false , true ); const arr = [currentRoleId.value ]; nodes.forEach ((item ) => { arr.push (item.id ); }); axios.post ("http://localhost:8080/grantRoleMenus" , arr) .then ((response ) => { if (response.data .code === 200 ) { ElMessage .success ("授权成功" ); authDialogVisible.value = false ; } else { ElMessage .error (response.data .msg || "授权失败" ); } }) .catch ((error ) => { console .log (error); ElMessage .error ("授权失败,请稍后重试" ); }); }
Day9 补全昨天的逻辑 后端删除时,应该联级删除
当删除一个角色时,仅仅删除 t_roler 表中的记录是不够的,还需要删除 t_role_menu 表中与该角色相关的所有权限关联记录,否则会产生孤儿数据。 解决: 在 RolerController 的 deleteRoler 方法中,在删除角色本身 (rolerService.removeById(roler.getId())) 之前,先使用 QueryWrapper 构建条件,调用 roleMenuService.remove(queryWrapper) 来删除 t_role_menu 表中所有 rid 等于被删除角色 ID 的记录。修改昨天的删除代码
1 2 3 4 5 6 7 8 9 10 11 12 13 14 15 16 17 18 @PostMapping("/deleteRoler") public Map<String, Object> deleteRoler (@RequestBody Roler roler) { Map<String, Object> result = new HashMap <>(); result.put("code" , 400 ); result.put("msg" , "操作失败......." ); try { QueryWrapper<RoleMenu> queryWrapper = new QueryWrapper <>(); queryWrapper.eq("rid" , roler.getId()); roleMenuService.remove(queryWrapper); rolerService.removeById(roler.getId()); result.put("code" , 200 ); result.put("msg" , "删除角色信息成功......" ); } catch (Exception ex) { ex.printStackTrace(); } return result; }
Day10 1.实现用户管理页 在添加这个功能之前,我简化了前后端的api调用代码方法,具体方法看杂项里的内容
后端实现 这个位置完整地实现了 RBAC 模型中“用户-角色”这一核心关联的管理。
用户与角色的多对多关系处理: 后端数据结构: 在 User 实体类中添加了 @TableField(exist = false) 的 rids (角色ID数组) 属性,用于在前端提交用户数据时,同时传递该用户被分配的角色信息。后端保存逻辑 (saveUserRolerService): 先保存用户基本信息到 t_user 表。一个重要的细节是,通过自定义 Mapper XML (saveUserMapper 使用 useGeneratedKeys=“true” keyProperty=“id”),在插入用户数据后获取数据库自增生成的主键 ID 。这个 ID 后续用于在 t_user_role 关联表中建立关系。 然后遍历 user.getRids(),将用户 ID 和每个角色 ID 插入到 t_user_role 表中,从而建立用户和角色的关联。 后端更新逻辑 (updateUserRoleService): 先根据用户 ID 删除 t_user_role 表中该用户已有的所有角色关联(“先删后插”的策略)。 然后更新 t_user 表中的用户基本信息。 最后,根据 user.getRids() 重新插入新的用户角色关联。 后端删除逻辑 (deleteUserRoleService): 删除用户时,除了删除 t_user 表中的用户记录,还需要级联删除 t_user_role 表中与该用户相关的所有角色关联记录。后端查询用户已分配角色 (queryUserRids): 提供接口根据用户 ID 查询其在 t_user_role 表中关联的所有角色 ID,用于前端编辑用户时回显已分配的角色。修改user实体类
用户密码添加注解防止前端直接显示密码 扩展属性保存用户角色id 1 2 3 4 5 6 7 8 9 10 @JsonIgnore private String upwd; @TableField (exist = false )private Integer[] rids;
usermapper添加接口
1 2 public void saveUserMapper (User user) ;
实现此接口
1 2 3 4 5 6 7 8 9 <insert id ="saveUserMapper" parameterType ="com.example.demo.pojo.User" useGeneratedKeys ="true" keyProperty ="id" > insert into t_user values(null,#{uname},#{upwd},#{phone}, #{edu},#{age},#{title}) </insert >
userservice添加逻辑实现接口
1 2 3 4 5 6 7 8 9 10 11 Map<String,Object> queryUserListService (Integer pageNum, Integer pageSize) ; public void saveUserRolerService (User user) ;public void updateUserRoleService (User user) ;public void deleteUserRoleService (Integer id) ;
实现接口
1 2 3 4 5 6 7 8 9 10 11 12 13 14 15 16 17 18 19 20 21 22 23 24 25 26 27 28 29 30 31 32 33 34 35 36 37 38 39 40 41 42 43 44 45 46 47 48 49 50 51 52 53 54 55 56 57 58 59 60 61 62 63 64 65 66 67 68 69 70 @Autowired private UserMapper userMapper; @Autowired private UserRoleMapper userRoleMapper; @Override public Map<String, Object> queryUserListService (Integer pageNum, Integer pageSize) { Map<String, Object> result=new HashMap <>(); Page<User> page=new Page <>(pageNum,pageSize); List<User> userList = userMapper.selectList(page, null ); result.put("total" ,page.getTotal()); result.put("userList" ,userList); return result; } @Transactional @Override public void saveUserRolerService (User user) { System.out.println("1----" +user.getId()); userMapper.saveUserMapper(user); System.out.println("2----" +user.getId()); Integer uid=user.getId(); Integer[] rids=user.getRids(); for (Integer rid:rids){ UserRole ur=new UserRole (); ur.setUid(uid); ur.setRid(rid); userRoleMapper.insert(ur); } } @Transactional @Override public void updateUserRoleService (User user) { QueryWrapper<UserRole> del=new QueryWrapper <>(); del.eq("uid" ,user.getId()); userRoleMapper.delete(del); userMapper.updateById(user); Integer[] rids = user.getRids(); for (Integer rid:rids){ UserRole ur=new UserRole (); ur.setUid(user.getId()); ur.setRid(rid); userRoleMapper.insert(ur); } } @Transactional @Override public void deleteUserRoleService (Integer id) { userMapper.deleteById(id); QueryWrapper<UserRole> wrapper=new QueryWrapper <>(); wrapper.eq("uid" ,id); userRoleMapper.delete(wrapper); }
添加UserController
1 2 3 4 5 6 7 8 9 10 11 12 13 14 15 16 17 18 19 20 21 22 23 24 25 26 27 28 29 30 31 32 33 34 35 36 37 38 39 40 41 42 43 44 45 @RestController @CrossOrigin public class UserController { @Autowired private UserService userService; @Autowired private UserRoleService userRoleService; @GetMapping("/userList") public Map<String,Object> userList ( @RequestParam(defaultValue = "1") Integer pageNum ,@RequestParam(defaultValue = "10") Integer pageSize) { return userService.queryUserListService(pageNum,pageSize); } @PostMapping("/saveUser") public Map<String,Object> saveUser (@RequestBody User user) { userService.saveUserRolerService(user); return ResponseUtil.success("保存用户信息成功" ); } @GetMapping("/queryUserRids/{id}") public List<Integer> queryUserRids (@PathVariable Integer id) { QueryWrapper wrapper=new QueryWrapper (); wrapper.eq("uid" ,id); wrapper.select("rid" ); List<Integer> list = userRoleService.listObjs(wrapper); return list; } @PostMapping("/updateUser") public Map<String,Object> updateUser (@RequestBody User user) { userService.updateUserRoleService(user); return ResponseUtil.success("修改用户信息成功" ); } @PostMapping("/deleteUser") public Map<String,Object> deleteUser (@RequestBody User user) { userService.deleteUserRoleService(user.getId()); return ResponseUtil.success("删除用户信息成功" ); } }
前端实现 添加页面
1 2 3 4 5 6 7 8 9 10 11 12 13 14 15 16 17 18 19 20 21 22 23 24 25 26 27 28 29 30 31 32 33 34 35 36 37 38 39 40 41 42 43 44 45 46 47 48 49 50 51 52 53 54 55 56 57 58 59 60 61 62 63 64 65 66 67 68 69 70 71 72 73 74 75 76 77 78 79 80 81 82 83 84 85 86 87 88 89 90 91 92 93 94 95 96 97 98 99 100 101 102 103 104 105 106 107 108 109 110 111 112 113 114 115 116 117 118 119 120 121 122 123 124 125 126 127 128 129 130 131 132 133 134 135 136 137 138 139 140 141 142 143 144 145 146 147 148 149 150 151 152 153 154 155 156 157 158 159 160 161 162 163 164 165 166 167 168 169 170 171 172 173 174 175 176 177 178 179 180 181 182 183 184 185 186 187 188 189 190 191 192 193 194 195 196 197 198 199 200 201 202 203 204 205 206 207 208 209 210 211 212 213 214 215 216 217 218 219 220 221 222 223 224 225 226 227 228 229 230 231 232 233 234 235 236 237 238 239 240 241 242 243 244 245 246 247 248 249 250 251 252 253 254 255 256 257 258 259 260 261 262 263 264 265 266 267 268 269 270 271 272 273 274 275 276 277 278 279 280 281 282 283 284 <template > <h2 > 用户列表</h2 > <div style ="text-align: left" > <el-button type ="danger" @click ="openUserDialog" > 添加用户</el-button > </div > <el-table :data ="userList" stripe style ="width: 100%" > <el-table-column prop ="id" label ="用户编号" width ="180" /> <el-table-column prop ="uname" label ="用户名" width ="180" /> <el-table-column prop ="phone" label ="电话" /> <el-table-column prop ="edu" label ="学历" /> <el-table-column prop ="age" label ="年龄" /> <el-table-column prop ="title" label ="部门" /> <el-table-column fixed ="right" label ="操作" width ="120" > <template #default ="scope" > <el-button link type ="primary" size ="small" @click ="deleteUser(scope.row)" > 删除 </el-button > <el-button link type ="primary" size ="small" @click ="showUserDialog(scope.row)" > 修改 </el-button > </template > </el-table-column > </el-table > <hr /> <el-pagination small background :page-size ="pageSize" :pager-count ="10" layout ="prev, pager, next" :total ="total" class ="mt-4" @current-change ="handlerPageChange" /> <el-dialog v-model ="dialogUserVisible" width ="80%" :title ="userForm.id ? '修改用户信息' : '添加用户信息'" @close ="resetUserForm" > <el-form ref ="userFormRef" :model ="userForm" :rules ="rules" label-width ="120px" > <el-form-item label ="用户名" prop ="uname" > <el-input v-model ="userForm.uname" style ="width: 80%" /> </el-form-item > <el-form-item label ="电话" prop ="phone" > <el-input v-model ="userForm.phone" style ="width: 80%" /> </el-form-item > <el-form-item label ="学历" prop ="edu" > <el-input v-model ="userForm.edu" style ="width: 80%" /> </el-form-item > <el-form-item label ="年龄" prop ="age" > <el-input v-model ="userForm.age" style ="width: 80%" /> </el-form-item > <el-form-item label ="部门" prop ="title" > <el-input v-model ="userForm.title" style ="width: 80%" /> </el-form-item > <el-form-item label ="角色" prop ="rids" > <el-select v-model ="userForm.rids" placeholder ="请选择角色...." style ="width: 80%" multiple > <el-option v-for ="opt in optRoles" :label ="opt.rname" :value ="opt.id" :key ="opt.id" /> </el-select > </el-form-item > <el-form-item > <el-button type ="primary" @click ="subUserForm" > 保存</el-button > <el-button @click ="cancelUserForm" > 取消</el-button > </el-form-item > </el-form > </el-dialog > </template > <script setup > import { onMounted, reactive, ref } from "vue" ;import { ElMessage , ElMessageBox } from "element-plus" ;import { userApi } from "@/api/user" ;import { roleApi } from "@/api/role" ;const userList = ref ([]);const total = ref (0 );const pageSize = ref (10 );function queryUserList (pageNum ) { userApi.getUserList (pageNum, pageSize.value ) .then ((response ) => { userList.value = response.data .userList ; total.value = response.data .total ; }) .catch ((error ) => { console .log (error); }) } onMounted (function ( queryUserList (1 ); }); function handlerPageChange (pageNum ) { queryUserList (pageNum); } const dialogUserVisible = ref (false );const userFormRef = ref (null );const userForm = reactive ({ uname : '' , phone : '' , age : '' , edu : '' , title : '' , rids : [] }); const rules = { uname : [ { required : true , message : '请输入用户名' , trigger : 'blur' }, { min : 2 , max : 20 , message : '长度应在 2 到 20 个字符之间' , trigger : 'blur' } ], phone : [ { required : true , message : '请输入电话号码' , trigger : 'blur' }, { pattern : /^1[3-9]\d{9}$/ , message : '请输入正确的手机号码' , trigger : 'blur' } ], age : [ { required : true , message : '请输入年龄' , trigger : 'blur' }, { type : 'number' , message : '年龄必须为数字' , trigger : 'blur' }, { type : 'number' , min : 18 , max : 70 , message : '年龄必须在18到70之间' , trigger : 'blur' } ], edu : [ { required : true , message : '请输入学历' , trigger : 'blur' } ], title : [ { required : true , message : '请输入部门' , trigger : 'blur' } ], rids : [ { required : true , message : '请选择角色' , trigger : 'change' } ] } const resetUserForm = ( if (userFormRef.value ) { userFormRef.value .resetFields (); } Object .assign (userForm, { id : undefined , uname : '' , phone : '' , age : '' , edu : '' , title : '' , rids : [] }); } const optRoles = ref ([])const openUserDialog = ( resetUserForm (); dialogUserVisible.value = true ; userApi.loadAllRoles () .then ((response ) => { optRoles.value = response.data ; }) .catch ((error ) => { console .log (error); ElMessage .error ('加载角色信息失败' ); }); } const subUserForm = ( if (!userFormRef.value ) { ElMessage .error ('表单未正确加载,请重试' ); return ; } userFormRef.value .validate ((valid ) => { if (!valid) { return ; } const operation = userForm.id ? userApi.updateUser (userForm) : userApi.saveUser (userForm); operation.then ((response ) => { if (response.data .code == 200 ) { dialogUserVisible.value = false ; resetUserForm (); queryUserList (1 ); } ElMessage (response.data .message ); }) .catch ((error ) => { console .log (error); ElMessage .error ('操作失败,请重试' ); }); }); } const cancelUserForm = ( dialogUserVisible.value = false ; resetUserForm (); } const showUserDialog = (row ) => { dialogUserVisible.value = true ; userForm.age = row.age ; userForm.edu = row.edu ; userForm.id = row.id ; userForm.uname = row.uname ; userForm.phone = row.phone ; userForm.title = row.title ; userApi.loadAllRoles () .then ((response ) => { optRoles.value = response.data ; userApi.queryUserRids (row.id ) .then ((response => userForm.rids = response.data ; })); }) .catch ((error ) => { console .log (error); }); } const deleteUser = (row ) => { ElMessageBox .confirm ('是否删除该用户?' , '提示' , { confirmButtonText : '确定' , cancelButtonText : '取消' , type : 'warning' }).then (() => { userApi.deleteUser (row.id ) .then ((response ) => { if (response.data .code == 200 ) { queryUserList (1 ); } ElMessage (response.data .message ); }).catch ((error ) => { console .log (error); }); }).catch (() => { ElMessage ({ type : 'info' , message : '已取消删除' }); }); } </script > <style scoped > </style >
在主页注册页面
1 2 3 4 5 6 7 8 9 10 11 12 13 14 15 16 17 18 import ListAfterSale from "@/views/UserManager.vue" ; const views=[AddCustomer ,ListCustomer ,ListAfterSale ,ListCustOrder ,AddSellJh ,,,ListSellJh ,AddMenus ,RolerManager ,UserManager ];const views = [ markRaw (AddCustomer ), markRaw (ListCustomer ), markRaw (ListAfterSale ), markRaw (ListCustOrder ), markRaw (AddSellJh ), markRaw (AddSellJh ), markRaw (AddSellJh ), markRaw (ListSellJh ), markRaw (AddMenus ), markRaw (RolerManager ), markRaw (UserManager ), ];
2.用Echarts组件渲染图表 前端实现 安装Echarts
1 npm install --save echarts
添加测试页面
因为估计下一次要实现库存统计页面,所以这里添加StockStatistics.vue页面
1 2 3 4 5 6 7 8 9 10 11 12 13 14 15 16 17 18 19 20 21 22 23 24 25 26 27 28 29 30 31 32 33 34 35 36 37 38 39 40 41 42 43 44 45 46 47 48 49 50 51 52 53 54 55 56 57 58 59 60 61 62 63 64 65 66 67 68 69 70 71 72 73 74 75 76 <template > <div style ="display: flex;" > <div ref ="pieChartContainer" style ="width: 50%; height: 400px;" > </div > <div ref ="barChartContainer" style ="width: 50%; height: 400px;" > </div > </div > </template > <script setup > import * as echarts from 'echarts' ;import { onMounted, ref } from 'vue' ;const empData = ref ([ { name : '北京' , value : 100 }, { name : '上海' , value : 120 }, { name : '天津' , value : 130 }, { name : '重庆' , value : 70 }, { name : '武汉' , value : 90 } ]); const sellData = ref ({ xdata : ['1月' , '2月' , '3月' , '4月' , '5月' , '6月' , '7月' , '8月' , '9月' , '10月' , '11月' , '12月' ], ydata : Array .from ({ length : 12 }, () => Math .floor (Math .random () * (10000 - 500 + 1 )) + 500 ) }); const pieChartContainer = ref (null );const barChartContainer = ref (null );function renderPieChart ( const myEcharts = echarts.init (pieChartContainer.value ); const option = { tooltip : { trigger : 'item' }, legend : { top : '5%' , left : 'center' }, series : [ { name : '员工地区分布' , type : 'pie' , radius : ['40%' , '70%' ], avoidLabelOverlap : false , itemStyle : { borderRadius : 10 , borderColor : '#fff' , borderWidth : 2 }, label : { show : false , position : 'center' }, emphasis : { label : { show : true , fontSize : 40 , fontWeight : 'bold' } }, labelLine : { show : false }, data : empData.value } ] }; myEcharts.setOption (option); } function renderBarChart ( const myCharts = echarts.init (barChartContainer.value ); const option = { xAxis : { type : 'category' , data : sellData.value .xdata }, yAxis : { type : 'value' }, series : [ { data : sellData.value .ydata , type : 'bar' , showBackground : true , backgroundStyle : { color : 'rgba(180, 180, 180, 0.2)' } } ] }; myCharts.setOption (option); } onMounted (() => { renderPieChart (); renderBarChart (); }); </script >
在主页注册页面
1 2 3 4 5 6 7 8 9 10 11 12 13 14 15 16 17 18 import ListAfterSale from "@/views/StockStatistics.vue" ; const views=[AddCustomer ,ListCustomer ,ListAfterSale ,ListCustOrder ,AddSellJh ,StockStatistics ,,ListSellJh ,AddMenus ,RolerManager ,UserManager ];const views = [ markRaw (AddCustomer ), markRaw (ListCustomer ), markRaw (ListAfterSale ), markRaw (ListCustOrder ), markRaw (AddSellJh ), markRaw (StockStatistics ), markRaw (AddSellJh ), markRaw (ListSellJh ), markRaw (AddMenus ), markRaw (RolerManager ), markRaw (UserManager ), ];
Day11 1.实现商品类别管理页 后端递归构建树形 VO: 再次使用了递归 (toListTreeVo) 将从数据库查询到的平铺的商品分类列表 (List) 转换为前端 el-tree 需要的树形结构 (List)。这与之前菜单管理的实现类似,是对树形数据处理能力的巩固。 数据库实现 先在菜单中添加条目
1 2 3 4 5 INSERT INTO `t_menu` (`id`, `label`, `component`, `pid`, `sort_order`, `icon_name`) VALUES (15 , '商品管理' , 11 , 0 , 3 , 'Goods' ), (16 , '商品分类' , 12 , 15 , 0 , 'Grid' ), (17 , '商品入库' , 13 , 15 , 1 , 'Download' ), (18 , '商品出库' , 14 , 15 , 2 , 'Upload' );
添加商品类目表
1 2 3 4 5 6 7 8 CREATE TABLE `t_category` ( `id` int NOT NULL AUTO_INCREMENT COMMENT 'ID (主键)' , `isbn` varchar (255 ) NOT NULL COMMENT 'ISBN 编号' , `cate_name` varchar (255 ) DEFAULT NULL COMMENT '分类名称' , `remark` varchar (255 ) DEFAULT NULL COMMENT '备注信息' , `pid` int DEFAULT NULL COMMENT '父分类ID' , PRIMARY KEY (`id`) ) ENGINE= InnoDB DEFAULT CHARSET= utf8mb4 COLLATE = utf8mb4_0900_ai_ci COMMENT= '商品分类表' ;
给这个表插入一些数据
1 2 3 4 5 6 7 INSERT INTO `t_category` (`id`, `isbn`, `cate_name`, `remark`, `pid`) VALUES (1 , 'ISBN001' , '电子产品' , '主要分类' , 0 ), (2 , 'ISBN002' , '手机' , '子分类' , 1 ), (3 , 'ISBN003' , '笔记本电脑' , '子分类' , 1 ), (4 , 'ISBN004' , '服装' , '主要分类' , 0 ), (5 , 'ISBN005' , '男装' , '子分类' , 4 ), (6 , 'ISBN006' , '女装' , '子分类' , 4 );
后端实现 在idea里用mybatiesx生成代码
CategoryService添加服务接口
1 2 List<TreeVo> queryCategoryListService () ;
实现接口
1 2 3 4 5 6 7 8 9 10 11 12 13 14 15 16 17 18 19 20 21 22 23 24 25 26 27 28 29 30 31 32 33 @Autowired private CategoryMapper categoryMapper;@Override public List<TreeVo> queryCategoryListService () { List<Category> categrories = categoryMapper.selectList(null ); return toListTreeVo(categrories,0 ); } private List<TreeVo> toListTreeVo (List<Category> categories ,Integer id) { List<TreeVo> result = new ArrayList <>(); System.out.println("转换开始 - 当前父ID: " + id + ", 总记录数: " + categories.size()); for (Category category : categories){ System.out.println("处理节点: " + category.getCateName() + ", PID: " + (category.getPid() != null ? category.getPid().toString() : "null" ) + ", 当前ID: " + category.getId()); if (Objects.equals(category.getPid(), id)){ System.out.println("匹配到子节点: " + category.getCateName() + ", PID: " + id); TreeVo treeVo = new TreeVo (); treeVo.setId(category.getId()); treeVo.setLabel(category.getCateName()); treeVo.setChildren(toListTreeVo(categories, category.getId())); result.add(treeVo); } else { System.out.println("未匹配节点: " + category.getCateName() + ", PID: " + category.getPid() + ", 需要: " + id); } } System.out.println("转换结束 - 结果数量: " + result.size() + ", 父ID: " + id); return result; }
添加CategoryController代码
1 2 3 4 5 6 7 8 9 10 11 12 13 14 15 16 17 18 19 20 21 22 23 24 25 26 27 28 29 30 31 32 33 34 35 36 37 38 @RestController @CrossOrigin public class CategoryController { @Autowired private CategoryService categoryService; @GetMapping("/categoryList") public List<TreeVo> categoryList () { return categoryService.queryCategoryListService(); } @PostMapping("/saveCategory") public Map<String,Object> saveCategory (@RequestBody Category category) { categoryService.save(category); return ResponseUtil.success("添加商品类别成功" ); } @GetMapping("/loadCategory/{id}") public Category loadCategory (@PathVariable Integer id) { return categoryService.getById(id); } @PostMapping("/updateCategory") public Map<String,Object> updateCategory (@RequestBody Category category) { categoryService.updateById(category); return ResponseUtil.success("更新商品类别成功" ); } @GetMapping("/deleteCategory/{id}") public Map<String,Object> deleteCategory (@PathVariable Integer id) { categoryService.removeById(id); return ResponseUtil.success("删除商品类别成功" ); } }
前端实现 前端树形交互与表单联动: 使用 el-tree 展示商品分类,并允许用户点击节点进行选中。 将选中的树节点作为新增分类的父节点 (categoryForm.pid = node.id )。 在修改分类时,先根据 ID 从后端加载分类信息回显到表单。 删除分类时,增加了判断,如果分类下有子分类则不允许删除。 添加后端接口定义
1 2 3 4 5 6 7 8 9 10 11 12 13 14 15 16 17 18 19 20 21 22 23 24 25 26 27 28 29 import request from './config' export const categoryApi = { getCategoryTree ( return request.get ('/categoryList' ) }, getCategoryById (id ) { return request.get (`/loadCategory/${id} ` ) }, saveCategory (data ) { return request.post ('/saveCategory' , data) }, updateCategory (data ) { return request.post ('/updateCategory' , data) }, deleteCategory (id ) { return request.get (`/deleteCategory/${id} ` ) } }
实现页面代码
1 2 3 4 5 6 7 8 9 10 11 12 13 14 15 16 17 18 19 20 21 22 23 24 25 26 27 28 29 30 31 32 33 34 35 36 37 38 39 40 41 42 43 44 45 46 47 48 49 50 51 52 53 54 55 56 57 58 59 60 61 62 63 64 65 66 67 68 69 70 71 72 73 74 75 76 77 78 79 80 81 82 83 84 85 86 87 88 89 90 91 92 93 94 95 96 97 98 99 100 101 102 103 104 105 106 107 108 109 110 111 112 113 114 115 116 117 118 119 120 121 122 123 124 125 126 127 128 129 130 131 132 133 134 135 136 137 138 139 140 141 142 143 144 145 146 147 148 149 150 151 152 153 154 155 156 157 158 159 160 161 162 163 164 165 166 167 168 169 170 171 172 173 174 175 176 177 178 179 180 181 182 183 184 185 186 187 188 189 190 191 192 193 194 195 196 197 198 199 200 201 202 203 204 205 <template > <h2 > 商品类目管理</h2 > <div style ="text-align: left" > <h4 > 选择分类节点进行管理</h4 > <el-tree :props ="config" :data ="categoryList" default-expand-all node-key ="id" ref ="treeRef" :highlight-current ="true" :expand-on-click-node ="false" @node-click ="handleClickNode" > <template #default ="{ node, data }" > <span class ="custom-tree-node" > <span > {{ node.label }}</span > <span class ="operation-buttons" > <el-button type ="primary" size ="small" link @click.stop ="showCategory(node, data)" > 修改 </el-button > <el-button type ="danger" size ="small" link @click.stop ="handleDelete(node, data)" > 删除 </el-button > </span > </span > </template > </el-tree > </div > <hr /> <el-form :model ="categoryForm" label-width ="120px" class ="category-form" > <el-form-item label ="分类编号" > <el-input v-model ="categoryForm.isbn" style ="width: 80%" placeholder ="请输入分类编号" /> </el-form-item > <el-form-item label ="分类名称" > <el-input v-model ="categoryForm.cateName" style ="width: 80%" placeholder ="请输入分类名称" /> </el-form-item > <el-form-item label ="分类描述" > <el-input v-model ="categoryForm.remark" style ="width: 80%" placeholder ="请输入分类描述" /> </el-form-item > <el-form-item > <el-button type ="primary" @click ="saveCategoryForm" > 保存</el-button > <el-button @click ="resetForm" > 重置表单</el-button > </el-form-item > </el-form > </template > <script setup > import { onMounted, reactive, ref } from "vue" ;import { ElMessage , ElMessageBox } from "element-plus" ;import { categoryApi } from "@/api/category" ;const config = { id : 'id' , label : 'label' , children : 'children' }; const treeRef = ref (null );const categoryList = ref ([]);function queryCategoryTree ( categoryApi.getCategoryTree () .then ((response ) => { categoryList.value = response.data ; }) .catch ((error ) => { console .error ('加载分类树失败:' , error); ElMessage .error ('加载分类树失败,请稍后重试' ); }); } onMounted (() => { queryCategoryTree (); }); const categoryForm = reactive ({ id : 0 , isbn : '' , cateName : '' , remark : '' , pid : 0 }); let pnode = null ; function handleClickNode (node ) { pnode = node; if (categoryForm.id === 0 ) { categoryForm.pid = node.id ; } } function resetForm ( categoryForm.id = 0 ; categoryForm.isbn = '' ; categoryForm.cateName = '' ; categoryForm.remark = '' ; categoryForm.pid = 0 ; if (treeRef.value ) { treeRef.value .setCurrentKey (null ); } pnode = null ; } function saveCategoryForm ( if (!categoryForm.cateName .trim ()) { ElMessage .warning ('分类名称不能为空' ); return ; } if (categoryForm.id === 0 ) { if (pnode) { categoryForm.pid = pnode.id ; } } const apiCall = categoryForm.id === 0 ? categoryApi.saveCategory (categoryForm) : categoryApi.updateCategory (categoryForm); apiCall .then ((response ) => { if (response.data .code === 200 ) { ElMessage .success (response.data .message ); queryCategoryTree (); resetForm (); } else { ElMessage .error (response.data .message ); } }) .catch ((error ) => { console .error ('保存失败:' , error); ElMessage .error ('保存失败,请稍后重试' ); }); } function showCategory (node, data ) { categoryApi.getCategoryById (data.id ) .then ((response ) => { Object .assign (categoryForm, response.data ); pnode = node; }) .catch ((error ) => { console .error ('加载分类信息失败:' , error); ElMessage .error ('加载分类信息失败,请稍后重试' ); }); } function handleDelete (node, data ) { if (data.children && data.children .length > 0 ) { ElMessage .warning ('该分类下还有子分类,不能删除' ); return ; } ElMessageBox .confirm ( '确定要删除该分类吗?' , '警告' , { confirmButtonText : '确定' , cancelButtonText : '取消' , type : 'warning' , } ) .then (() => { categoryApi.deleteCategory (data.id ) .then ((response ) => { if (response.data .code === 200 ) { ElMessage .success (response.data .message ); queryCategoryTree (); resetForm (); } else { ElMessage .error (response.data .message ); } }) .catch ((error ) => { console .error ('删除失败:' , error); ElMessage .error ('删除失败,请稍后重试' ); }); }) .catch (() => { ElMessage .info ('已取消删除' ); }); } </script > <style scoped > .custom-tree-node { flex : 1 ; display : flex; align-items : center; justify-content : space-between; font-size : 14px ; padding-right : 8px ; } </style >
在主页注册页面
之前写过很多次,这里不重复
Day12-14 实现商品信息管理 数据库实现 为商品信息引入了多个关联表(品牌 t_brand, 产地 t_place, 仓库 t_store, 供货商 t_supply, 规格单位 t_unit)。这些表作为“字典数据”或“基础数据”,用于商品信息中的下拉选择。
添加 品牌表,产地表,仓库表,供货商表,规格单位表
t_brand, t_place, t_store, t_supply, t_unit
1 2 3 4 5 6 7 8 9 10 11 12 13 14 15 16 17 18 19 20 21 22 23 24 25 26 27 28 29 30 31 32 33 34 35 36 37 38 39 40 41 42 43 44 45 46 47 48 49 50 51 52 53 54 55 56 57 58 59 60 61 62 63 64 65 66 67 68 69 70 71 72 73 74 75 76 77 CREATE TABLE `t_brand` ( `brand_id` int NOT NULL AUTO_INCREMENT COMMENT '品牌ID' , `brand_name` varchar (100 ) CHARACTER SET utf8 COLLATE utf8_general_ci NULL DEFAULT NULL COMMENT '品牌名称' , `brand_leter` char (1 ) CHARACTER SET utf8 COLLATE utf8_general_ci NULL DEFAULT NULL COMMENT '品牌首字母' , `brand_desc` varchar (1000 ) CHARACTER SET utf8 COLLATE utf8_general_ci NULL DEFAULT NULL COMMENT '品牌描述' , PRIMARY KEY (`brand_id`) USING BTREE ) ENGINE = InnoDB AUTO_INCREMENT = 5 CHARACTER SET = utf8 COLLATE = utf8_general_ci COMMENT = '品牌表' ROW_FORMAT = Dynamic ; INSERT INTO `t_brand` VALUES (1 , '东东果蔬' , 'D' , '别买了,不能吃...' );INSERT INTO `t_brand` VALUES (2 , '美的' , 'M' , '还可以' );INSERT INTO `t_brand` VALUES (3 , '海尔' , 'H' , '我家洗衣机就是海尔啊' );INSERT INTO `t_brand` VALUES (4 , '华为' , 'H' , '中华有为' );CREATE TABLE `t_place` ( `place_id` int NOT NULL AUTO_INCREMENT COMMENT '产地ID' , `place_name` varchar (200 ) CHARACTER SET utf8 COLLATE utf8_general_ci NULL DEFAULT NULL COMMENT '产地名称' , `place_num` varchar (20 ) CHARACTER SET utf8 COLLATE utf8_general_ci NULL DEFAULT NULL COMMENT '产地编号' , `introduce` varchar (300 ) CHARACTER SET utf8 COLLATE utf8_general_ci NULL DEFAULT NULL COMMENT '产地介绍' , `is_delete` char (1 ) CHARACTER SET utf8 COLLATE utf8_general_ci NULL DEFAULT '0' COMMENT '逻辑删除标记(0:可用 1:不可用)' , PRIMARY KEY (`place_id`) USING BTREE ) ENGINE = InnoDB AUTO_INCREMENT = 8 CHARACTER SET = utf8 COLLATE = utf8_general_ci COMMENT = '产地表' ROW_FORMAT = Dynamic ; INSERT INTO `t_place` VALUES (1 , '湖南' , 'hunan' , '湖南挺好的啊' , '0' );INSERT INTO `t_place` VALUES (2 , '湖北' , 'hubei' , '湖北没有湖南好' , '0' );INSERT INTO `t_place` VALUES (3 , '陕西' , 'shanxi' , '还是陕西更好' , '0' );INSERT INTO `t_place` VALUES (4 , '浙江' , 'zhejiang' , '好地方' , '0' );INSERT INTO `t_place` VALUES (5 , '山东' , 'shandong' , '很好' , '0' );INSERT INTO `t_place` VALUES (6 , '广东' , 'guangdong' , '非常好' , '0' );INSERT INTO `t_place` VALUES (7 , '河北' , 'hebei' , '知道有个叫唐山的地方' , '0' );CREATE TABLE `t_store` ( `store_id` int NOT NULL AUTO_INCREMENT COMMENT '仓库ID' , `store_name` varchar (100 ) CHARACTER SET utf8 COLLATE utf8_general_ci NULL DEFAULT NULL COMMENT '仓库名称' , `store_num` varchar (20 ) CHARACTER SET utf8 COLLATE utf8_general_ci NULL DEFAULT NULL COMMENT '仓库编号' , `store_address` varchar (100 ) CHARACTER SET utf8 COLLATE utf8_general_ci NULL DEFAULT NULL COMMENT '仓库地址' , `concat` varchar (50 ) CHARACTER SET utf8 COLLATE utf8_general_ci NULL DEFAULT NULL COMMENT '联系人' , `phone` varchar (20 ) CHARACTER SET utf8 COLLATE utf8_general_ci NULL DEFAULT NULL COMMENT '联系电话' , PRIMARY KEY (`store_id`) USING BTREE ) ENGINE = InnoDB AUTO_INCREMENT = 5 CHARACTER SET = utf8 COLLATE = utf8_general_ci COMMENT = '仓库表' ROW_FORMAT = Dynamic ; INSERT INTO `t_store` VALUES (1 , '西安仓库' , 'xa1' , '西安市雁塔区' , '张三' , '13829086629' );INSERT INTO `t_store` VALUES (2 , '北京仓库' , 'bj2' , '北京市朝阳区 ' , '王麻子' , '15229267291' );INSERT INTO `t_store` VALUES (3 , '上海仓库' , 'sh3' , '上海市浦东区' , '李四' , '18092647320' );CREATE TABLE `t_supply` ( `supply_id` int NOT NULL AUTO_INCREMENT COMMENT '供应商ID' , `supply_num` varchar (20 ) CHARACTER SET utf8 COLLATE utf8_general_ci NULL DEFAULT NULL COMMENT '供应商编号' , `supply_name` varchar (100 ) CHARACTER SET utf8 COLLATE utf8_general_ci NULL DEFAULT NULL COMMENT '供应商名称' , `supply_introduce` longtext CHARACTER SET utf8 COLLATE utf8_general_ci NULL COMMENT '供应商介绍' , `concat` varchar (50 ) CHARACTER SET utf8 COLLATE utf8_general_ci NULL DEFAULT NULL COMMENT '联系人' , `phone` varchar (20 ) CHARACTER SET utf8 COLLATE utf8_general_ci NULL DEFAULT NULL COMMENT '联系电话' , `address` varchar (100 ) CHARACTER SET utf8 COLLATE utf8_general_ci NULL DEFAULT NULL COMMENT '供应商地址' , `is_delete` char (1 ) CHARACTER SET utf8 COLLATE utf8_general_ci NULL DEFAULT '0' COMMENT '逻辑删除标记(0:可用 1:不可用)' , PRIMARY KEY (`supply_id`) USING BTREE ) ENGINE = InnoDB AUTO_INCREMENT = 6 CHARACTER SET = utf8 COLLATE = utf8_general_ci COMMENT = '供货商表' ROW_FORMAT = Dynamic ; INSERT INTO `t_supply` VALUES (1 , 'zjsh' , '浙江三禾竹木有限公司' , '贷款是否会为加快和规范健康环境如何根据' , '任伟' , '15287653921' , '浙江省丽水市' , '0' );INSERT INTO `t_supply` VALUES (2 , 'lqlo' , '龙泉绿欧食品有限公司' , NULL , '张三' , '18134532830' , '浙江省龙泉市' , '0' );INSERT INTO `t_supply` VALUES (3 , 'dhgy' , '帝豪供应链公司' , NULL , '李四' , '17493976543' , '陕西省西安市' , '0' );INSERT INTO `t_supply` VALUES (4 , 'haier' , '海尔集团' , '海尔智家为用户提供衣、食、住、娱的智慧全场景解决方案,全面提升用户生活品质,以“云”体验、全链路服务、个性化智慧终端,实现交互、体验、销售、服务于一体的全流程生态平台。' , '周云杰' , '4006999511' , '山东省青岛市' , '0' );INSERT INTO `t_supply` VALUES (5 , 'midea' , '美的集团股份有限公司' , '科技尽善,生活尽美”– 美的集团秉承用科技创造美好生活的经营理念,如今已成为一家集智能家居事业群、机电事业群、暖通与楼宇事业部、机器人及自动化事业部、数字化创新业务五大板块为一体的全球化科技集团,产品及服务惠及全球200多个国家和地区约4亿用户。形成美的、小天鹅、东芝、华凌、布谷、COLMO、Clivet、Eureka、库卡、GMCC、威灵在内的多品牌组合。' , '方洪波' , '075726338788' , '广东省佛山市' , '0' );CREATE TABLE `t_unit` ( `unit_id` int NOT NULL AUTO_INCREMENT COMMENT '单位ID' , `unit_name` varchar (20 ) CHARACTER SET utf8 COLLATE utf8_general_ci NULL DEFAULT NULL COMMENT '单位名称' , `unit_desc` varchar (20 ) CHARACTER SET utf8 COLLATE utf8_general_ci NULL DEFAULT NULL COMMENT '单位描述' , PRIMARY KEY (`unit_id`) USING BTREE ) ENGINE = InnoDB AUTO_INCREMENT = 8 CHARACTER SET = utf8 COLLATE = utf8_general_ci COMMENT = '规格单位表' ROW_FORMAT = Dynamic ; INSERT INTO `t_unit` VALUES (1 , '箱/件' , '箱/件' );INSERT INTO `t_unit` VALUES (2 , '个' , '个' );INSERT INTO `t_unit` VALUES (3 , '公斤' , '公斤' );INSERT INTO `t_unit` VALUES (4 , '只' , '只' );INSERT INTO `t_unit` VALUES (5 , '克' , '克' );INSERT INTO `t_unit` VALUES (6 , '台' , '台' );
后端实现 实现文件上传 外部教程:Spring基础知识(19)- Spring MVC (九) | 文件上传、 文件下载
添加了 commons-io 和 commons-fileupload 依赖。 创建了 FileController,使用 MultipartFile 接收前端上传的文件。 实现了文件保存逻辑:生成唯一文件名 (UUID + 后缀),创建保存目录,使用 FileUtils.copyInputStreamToFile 将文件保存到服务器指定位置。 返回文件的可访问 URL 给前端。 通过 WebMvcConfigurer 配置了静态资源处理器 (addResourceHandlers),使得上传到服务器本地目录的图片可以通过 URL 被外部访问。 添加依赖
1 2 3 4 5 6 7 8 9 10 11 12 <dependency > <groupId > commons-io</groupId > <artifactId > commons-io</artifactId > <version > 2.19.0</version > </dependency > <dependency > <groupId > commons-fileupload</groupId > <artifactId > commons-fileupload</artifactId > <version > 1.5</version > </dependency >
添加FileController,使后端能接收前端的信息并存储
1 2 3 4 5 6 7 8 9 10 11 12 13 14 15 16 17 18 19 20 21 22 23 24 25 26 27 28 29 30 31 32 33 34 35 36 37 38 39 40 41 42 43 44 45 @RestController @CrossOrigin public class FileController { private static final String UPLOAD_DIR = "uploads/imgs/" ; @PostMapping("/uploadImg") public String uploadImg (MultipartFile file) { if (file == null || file.isEmpty()) { return "文件为空" ; } String originalName = file.getOriginalFilename(); if (originalName == null ) { return "文件名无效" ; } String uuid = UUID.randomUUID().toString(); String ext = originalName.substring(originalName.lastIndexOf("." )); String newName = uuid + ext; System.out.println("新文件名: " + newName); File dir = new File (UPLOAD_DIR); if (!dir.exists()) { dir.mkdirs(); } File target = new File (dir, newName); try { FileUtils.copyInputStreamToFile(file.getInputStream(), target); } catch (IOException e) { e.printStackTrace(); return "上传失败: " + e.getMessage(); } return "http://localhost:8080/uploads/imgs/" + newName; } }
添加WebConfig,以配置springboot,使后端能正常访问图片
1 2 3 4 5 6 7 8 9 10 11 12 import org.springframework.context.annotation.Configuration;import org.springframework.web.servlet.config.annotation.ResourceHandlerRegistry;import org.springframework.web.servlet.config.annotation.WebMvcConfigurer;@Configuration public class WebConfig implements WebMvcConfigurer { @Override public void addResourceHandlers (ResourceHandlerRegistry registry) { registry.addResourceHandler("/uploads/**" ) .addResourceLocations("file:./uploads/" ); } }
实现前端字典接口 为上述每个关联表都创建了 Controller,提供了查询列表的接口(通常只查询 ID 和名称字段),专门用于前端的下拉框数据填充。这是典型的“数据字典”服务实现方式。 实现类似于字典的功能,方便前端展示下拉列表
以下代码及其雷同,都是去查各个表的id和对应名称
2. 创建SupplyController
1 2 3 4 5 6 7 8 9 10 11 12 13 14 15 16 @RestController @CrossOrigin public class SupplyController { @Autowired private SupplyService supplyService; @GetMapping("/supplyList") public List<Supply> querySupplyList () { QueryWrapper<Supply> wrapper=new QueryWrapper <>(); wrapper.select("supply_id" ,"supply_name" ); List<Supply> list = supplyService.list(wrapper); return list; } }
3. 创建PlaceController
1 2 3 4 5 6 7 8 9 10 11 12 13 14 15 @RestController @CrossOrigin public class PlaceController { @Autowired private PlaceService placeService; @GetMapping("/placeList") public List<Place> queryPlaceList () { QueryWrapper<Place> wrapper=new QueryWrapper <>(); wrapper.select("place_id" ,"place_name" ); return placeService.list(wrapper); } }
4. 创建UnitController
1 2 3 4 5 6 7 8 9 10 11 12 13 14 15 16 @RestController @CrossOrigin public class UnitController { @Autowired private UnitService unitService; @GetMapping("/unitList") public List<Unit> queryUnitList () { QueryWrapper<Unit> wrapper=new QueryWrapper <>(); wrapper.select("unit_id" ,"unit_name" ); return unitService.list(wrapper); } }
5.创建BrandController
1 2 3 4 5 6 7 8 9 10 11 12 13 14 15 @RestController @CrossOrigin public class BrandController { @Autowired private BrandService brandService; @GetMapping("/brandList") public List<Brand> queryBrandList () { QueryWrapper<Brand> wrapper=new QueryWrapper <>(); wrapper.select("brand_id" ,"brand_name" ); return brandService.list(wrapper); } }
6.创建StoreController
1 2 3 4 5 6 7 8 9 10 11 12 13 14 15 @RestController @CrossOrigin public class StoreController { @Autowired private StoreService storeService; @GetMapping("/storeList") public List<Store> storeList () { QueryWrapper<Store> wrapper=new QueryWrapper <>(); wrapper.select("store_id" ,"store_name" ); return storeService.list(wrapper); } }
实现对item的增删改查 修改Item实体类
Item POJO 中添加了大量 @TableField(exist = false) 的扩展属性(如 brandName, placeName 等),用于在后端进行多表 INNER JOIN 查询后,将关联表的名称信息直接封装到 Item 对象中,方便前端直接展示。
添加注解,使前端能正常回显时间
1 2 3 4 5 6 7 8 9 10 @JsonFormat(pattern = "yyyy-MM-dd") private Date itemDate;@JsonFormat(pattern = "yyyy-MM-dd") private Date endDate;
添加字段,使其能回显字段对应名称
1 2 3 4 5 6 7 8 9 10 11 12 13 @TableField(exist = false) private String brandName;@TableField(exist = false) private String placeName;@TableField(exist = false) private String supplyName;@TableField(exist = false) private String unitName;@TableField(exist = false) private String cateName;@TableField(exist = false) private String storeName;
新建ItemCond类
1 2 3 4 5 6 7 8 9 @Data public class ItemCond { private String itemNum; private String itemName; private Integer statue; private Integer pageNum=1 ; private Integer pageSize=3 ; }
添加mapper方法
1 2 List<Item> queryItemListMapper (ItemCond itemCond) ;
在mapper.xml里添加对应sql
使用复杂的多表 INNER JOIN 和动态及条件(如按商品编号、名称、状态模糊查询),这比之前的动态查询更为复杂。
1 2 3 4 5 6 7 8 9 10 11 12 13 14 15 16 17 18 19 20 21 22 23 < select id= "queryItemListMapper" resultType= "com.example.demo.pojo.Item" parameterType= "com.example.demo.vo.ItemCond"> select item.* ,type.cate_name,brand.brand_name,store.store_name, supply.supply_name,place.place_name,unit.unit_name from t_item item inner join t_categrory type on type.id= item.type_id inner join t_brand brand on brand.brand_id= item.brand_id inner join t_store store on store.store_id= item.store_id inner join t_supply supply on supply.supply_id= item.supply_id inner join t_place place on place.place_id= item.place_id inner join t_unit unit on unit.unit_id= item.unit_id < where > < if test= "itemNum!=null and itemNum!=''"> item.item_num like concat('%' , #{itemNum}, '%' ) < / if> < if test= "itemName!=null and itemName!=''"> and item.item_name like concat('%' , #{itemName}, '%' ) < / if> < if test= "statue!=null"> and item.statue= #{statue} < / if> < / where > < / select >
添加service接口
1 2 Map<String,Object> queryItemListService (ItemCond itemCond) ;
添加对应实现
1 2 3 4 5 6 7 8 9 10 11 12 13 14 15 @Override public Map<String, Object> queryItemListService (ItemCond itemCond) { Page<Object> page = PageHelper.startPage(itemCond.getPageNum(), itemCond.getPageSize()); List<Item> items = itemMapper.queryItemListMapper(itemCond); Map<String, Object> result=new HashMap <>(); result.put("items" ,items); result.put("total" ,page.getTotal()); return result; }
添加CodeUtils,方便给前端生成产品编码
1 2 3 4 5 6 7 8 9 10 11 12 13 public class CodeUtils { public static String toItemCode () { SimpleDateFormat simpleDateFormat = new SimpleDateFormat ("yyyyMMddHHmmssSSS" ); return simpleDateFormat.format(new Date ()); } public static void main (String[] args) { String code = toItemCode(); System.out.println(code); } }
创建ItemController ,实现增删改查接口
1 2 3 4 5 6 7 8 9 10 11 12 13 14 15 16 17 18 19 20 21 22 23 24 25 26 27 28 29 30 31 32 33 34 35 36 37 38 39 40 41 42 43 44 45 46 47 48 49 50 51 52 53 54 55 56 57 58 59 60 61 62 63 64 65 66 67 68 69 70 71 72 73 74 75 @RestController @CrossOrigin public class itemController { @Autowired private ItemService itemService; @GetMapping("/getCode") public String toItemCode () { return CodeUtils.toItemCode(); } @PostMapping("/saveItem") public Map<String, Object> saveItem (@RequestBody Item item) { itemService.save(item); return ResponseUtil.success("添加商品成功" ); } @PostMapping("/itemList") public Map<String,Object> itemList (@RequestBody ItemCond itemCond) { return itemService.queryItemListService(itemCond); } @DeleteMapping("/deleteItem/{id}") public Map<String, Object> deleteItem (@PathVariable Integer id) { boolean removed = itemService.removeById(id); if (removed) { return ResponseUtil.success("删除成功" ); } else { return ResponseUtil.error(400 , "删除失败" ); } } @PutMapping("/updateItem") public Map<String, Object> updateItem (@RequestBody Item item) { boolean updated = itemService.updateById(item); if (updated) { return ResponseUtil.success("修改成功" ); } else { return ResponseUtil.error(400 , "修改失败" ); } } @GetMapping("/downItem/{id}") public Map<String, Object> downItem (@PathVariable Integer id) { Item item = new Item (); item.setId(id); item.setStatue(1 ); boolean updated = itemService.updateById(item); if (updated) { return ResponseUtil.success("商品下架成功" ); } else { return ResponseUtil.error(400 , "操作失败,请重试" ); } } @GetMapping("/upItem/{id}") public Map<String, Object> upItem (@PathVariable Integer id) { Item item = new Item (); item.setId(id); item.setStatue(0 ); boolean updated = itemService.updateById(item); if (updated) { return ResponseUtil.success("商品上架成功" ); } else { return ResponseUtil.error(400 , "操作失败,请重试" ); } } }
实现采购功能 创建采购表
1 2 3 4 5 6 7 8 9 10 11 12 13 14 CREATE TABLE `t_buy_list` ( `buy_id` int NOT NULL AUTO_INCREMENT COMMENT '采购单ID' , `product_id` int DEFAULT NULL COMMENT '产品ID,关联产品表' , `store_id` int DEFAULT NULL COMMENT '仓库ID,关联仓库表' , `buy_num` int DEFAULT NULL COMMENT '计划采购数量' , `fact_buy_num` int DEFAULT NULL COMMENT '实际采购数量' , `buy_time` datetime DEFAULT NULL COMMENT '采购时间' , `supply_id` int DEFAULT NULL COMMENT '供应商ID,关联供应商表' , `place_id` int DEFAULT NULL COMMENT '采购地点ID,关联地点表' , `buy_user` varchar (20 ) DEFAULT NULL COMMENT '采购人姓名' , `phone` varchar (20 ) DEFAULT NULL COMMENT '采购人联系电话' , `is_in` char (1 ) DEFAULT NULL COMMENT '是否入库:0-否,1-是' , PRIMARY KEY (`buy_id`) ) ENGINE= InnoDB AUTO_INCREMENT= 49 DEFAULT CHARSET= utf8mb3 COMMENT= '采购单表,记录商品采购信息' ;
用mybatiesx生成对应层级代码
BuyListService添加方法
1 2 public Map<String,Object> queryAutoDataBuyService (Integer id) ;
在impl里实现方法
1 2 3 4 5 6 7 8 9 10 11 12 13 14 15 16 17 18 19 20 21 22 23 24 25 26 27 28 29 30 31 32 33 34 35 36 37 @Service public class BuyListServiceImpl extends ServiceImpl <BuyListMapper, BuyList> implements BuyListService { @Autowired private ItemMapper itemMapper; @Autowired private StoreMapper storeMapper; @Autowired private SupplyMapper supplyMapper; @Autowired private PlaceMapper placeMapper; @Override public Map<String, Object> queryAutoDataBuyService (Integer id) { Map<String, Object> result=new HashMap <>(); Item item = itemMapper.selectById(id); result.put("id" ,item.getId()); result.put("itemName" ,item.getItemName()); Integer storeId = item.getStoreId(); Store store = storeMapper.selectById(storeId); result.put("storeId" ,store.getStoreId()); result.put("storeName" ,store.getStoreName()); Integer supplyId = item.getSupplyId(); Supply supply = supplyMapper.selectById(supplyId); result.put("supplyId" ,supply.getSupplyId()); result.put("supplyName" ,supply.getSupplyName()); Integer placeId = item.getPlaceId(); Place place = placeMapper.selectById(placeId); result.put("placeId" ,place.getPlaceId()); result.put("placeName" ,place.getPlaceName()); return result; } }
添加BuyListController控制层代码
1 2 3 4 5 6 7 8 9 10 11 12 13 14 15 16 17 18 19 20 21 @RestController @CrossOrigin public class BuyListController { @Autowired private BuyListService buyListService; @GetMapping("/buyAutoInfo/{id}") public Map<String,Object> buyAutoInfo (@PathVariable Integer id) { return buyListService.queryAutoDataBuyService(id); } @PostMapping("/saveBuy") public Map<String,Object> saveBuy (@RequestBody BuyList buyList) { buyList.setBuyTime(new Date ()); buyList.setIsIn("0" ); buyList.setFactBuyNum(0 ); return buyListService.save(buyList)? ResponseUtil.success("保存成功" ):ResponseUtil.error("保存失败" ); } }
前端实现 实现商品信息页面
ItemManager.vue 中的添加/修改商品表单包含了大量的输入项,包括多个下拉选择框(品牌、门店、供应商、产地、单位等),这些下拉框的数据都是通过调用后端提供的字典接口动态加载的 (loadAllData 使用 Promise.all 并行加载)。
使用 Element Plus 的 el-upload 组件实现图片上传界面 (list-type=“picture-card”)。
配置了 action (后端上传接口 URL)、:on-success (上传成功回调,将返回的图片 URL 保存到表单数据中)、:on-remove (移除图片回调)、:on-preview (图片预览)。
1 2 3 4 5 6 7 8 9 10 11 12 13 14 15 16 17 18 19 20 21 22 23 24 25 26 27 28 29 30 31 32 33 34 35 36 37 38 39 40 41 42 43 44 45 46 47 48 49 50 51 52 53 54 55 56 57 58 59 60 61 62 63 64 65 66 67 68 69 70 71 72 73 74 75 76 77 78 79 80 81 82 83 84 85 86 87 88 89 90 91 92 93 94 95 96 97 98 99 100 101 102 103 104 105 106 107 108 109 110 111 112 113 114 115 116 117 118 119 120 121 122 123 124 125 126 127 128 129 130 131 132 133 134 135 136 137 138 139 140 141 142 143 144 145 146 147 148 149 150 151 152 153 154 155 156 157 158 159 160 161 162 163 164 165 166 167 168 169 170 171 172 173 174 175 176 177 178 179 180 181 182 183 184 185 186 187 188 189 190 191 192 193 194 195 196 197 198 199 200 201 202 203 204 205 206 207 208 209 210 211 212 213 214 215 216 217 218 219 220 221 222 223 224 225 226 227 228 229 230 231 232 233 234 235 236 237 238 239 240 241 242 243 244 245 246 247 248 249 250 251 252 253 254 255 256 257 258 259 260 261 262 263 264 265 266 267 268 269 270 271 272 273 274 275 276 277 278 279 280 281 282 283 284 285 286 287 288 289 290 291 292 293 294 295 296 297 298 299 300 301 302 303 304 305 306 307 308 309 310 311 312 313 314 315 316 317 318 319 320 321 322 323 324 325 326 327 328 329 330 331 332 333 334 335 336 337 338 339 340 341 342 343 344 345 346 347 348 349 350 351 352 353 354 355 356 357 358 359 360 361 362 363 364 365 366 367 368 369 370 371 372 373 374 375 376 377 378 379 380 381 382 383 384 385 386 387 388 389 390 391 392 393 394 395 396 397 398 399 400 401 402 403 404 405 406 407 408 409 410 411 412 413 414 415 416 417 418 419 420 421 422 423 424 425 426 427 428 429 430 431 432 433 434 435 436 437 438 439 440 441 442 443 444 445 446 447 448 449 450 451 452 453 454 455 456 457 458 459 460 461 462 463 464 465 466 467 468 469 470 471 472 473 474 475 476 477 478 479 480 481 482 483 484 485 486 487 488 489 490 491 492 493 494 495 496 497 498 499 500 501 502 503 504 505 506 507 508 509 510 511 512 513 514 515 516 517 518 519 520 521 522 523 524 525 526 527 528 529 530 531 532 533 534 535 536 537 538 539 540 541 542 543 544 545 546 547 548 549 550 551 552 553 554 555 556 557 558 559 560 561 562 563 564 565 566 567 568 569 570 571 572 573 574 575 576 577 578 579 580 581 582 583 584 585 586 587 588 589 590 591 592 593 594 595 596 597 598 599 600 601 602 603 604 605 606 607 608 609 610 611 612 613 614 615 616 617 618 619 620 621 622 623 624 625 626 627 628 629 630 631 632 633 634 635 636 637 638 639 640 641 642 643 644 645 646 647 648 649 650 651 652 653 654 655 656 657 658 659 660 661 662 663 664 665 666 667 668 669 670 671 672 673 674 675 676 677 678 679 680 681 682 683 684 685 686 687 688 689 690 691 692 693 694 695 696 697 698 699 700 <template > <h2 > 商品信息</h2 > <div style ="display: flex; justify-content: space-between; align-items: center; margin-bottom: 20px;" > <el-button type ="primary" @click ="openItemDialog" > 添加商品</el-button > <el-form :inline ="true" :model ="searchForm" class ="search-form" ref ="searchFormRef" > <el-form-item label ="商品编号" prop ="itemNum" > <el-input v-model ="searchForm.itemNum" placeholder ="请输入商品编号" clearable /> </el-form-item > <el-form-item label ="商品名称" prop ="itemName" > <el-input v-model ="searchForm.itemName" placeholder ="请输入商品名称" clearable /> </el-form-item > <el-form-item label ="状态" prop ="statue" > <el-select v-model ="searchForm.statue" placeholder ="请选择" clearable style ="width: 100px;" > <el-option label ="上架" :value ="0" /> <el-option label ="下架" :value ="1" /> </el-select > </el-form-item > <el-form-item > <el-button type ="primary" @click ="handleSearch" > 查询</el-button > <el-button @click ="resetSearchForm" > 重置</el-button > </el-form-item > </el-form > </div > <el-table :data ="itemList" row-key ="id" stripe style ="width: 100%" > <el-table-column type ="expand" > <template #default ="{ row }" > <el-descriptions :column ="2" border style ="margin: 10px 20px;" > <el-descriptions-item label ="商品图片" > <template v-if ="row.imgs && Array.isArray(row.imgs) && row.imgs.length > 0" > <div class ="image-preview" > <el-image v-for ="(img, index) in row.imgs" :key ="index" :src ="img" :preview-src-list ="row.imgs" :initial-index ="index" :preview-teleported ="true" :z-index ="3000" class ="table-image" fit ="cover" style ="width: 60px; height: 60px; margin-right: 5px; border-radius: 4px;" @error ="() => handleImageError(index)" > <template #error > <div style ="width: 60px; height: 60px; display: flex; align-items: center; justify-content: center; background: #f5f7fa; color: #909399; font-size: 12px;" > 加载失败<br /> 或无图片 </div > </template > </el-image > </div > </template > <span v-else > 无图片</span > </el-descriptions-item > <el-descriptions-item label ="商品描述" > {{ row.itemDesc }}</el-descriptions-item > <el-descriptions-item label ="进货价格" > {{ row.price }}</el-descriptions-item > <el-descriptions-item label ="会员价格" > {{ row.vipPrice }}</el-descriptions-item > <el-descriptions-item label ="供应商" > {{ row.supplyName }}</el-descriptions-item > <el-descriptions-item label ="产地" > {{ row.placeName }}</el-descriptions-item > <el-descriptions-item label ="单位" > {{ row.unitName }}</el-descriptions-item > <el-descriptions-item label ="所属仓库" > {{ row.storeName }}</el-descriptions-item > <el-descriptions-item label ="生产日期" > {{ row.itemDate }}</el-descriptions-item > <el-descriptions-item label ="到期日期" > {{ row.endDate }}</el-descriptions-item > <el-descriptions-item label ="促销标题" > {{ row.hotTitle }}</el-descriptions-item > <el-descriptions-item label ="制造商" > {{ row.facturer }}</el-descriptions-item > <el-descriptions-item label ="创建者" > {{ row.createBy }}</el-descriptions-item > </el-descriptions > </template > </el-table-column > <el-table-column label ="商品编号" prop ="itemNum" /> <el-table-column label ="商品名称" prop ="itemName" /> <el-table-column label ="商品类型" prop ="cateName" /> <el-table-column label ="品牌" prop ="brandName" /> <el-table-column label ="库存" prop ="store" width ="80" /> <el-table-column label ="销售价格" prop ="sellPrice" /> <el-table-column label ="状态" prop ="statue" width ="80" > <template #default ="{ row }" > <el-tag :type ="row.statue === 0 ? 'success' : 'danger'" > {{ row.statue === 0 ? '上架' : '下架' }} </el-tag > </template > </el-table-column > <el-table-column fixed ="right" label ="操作" width ="180" > <template #default ="{ row }" > <el-button link size ="small" type ="primary" @click ="handleDeleteItem(row.id)" > 删除</el-button > <el-button link size ="small" type ="primary" @click ="openUpdateDialog(row)" > 修改</el-button > <el-button link size ="small" type ="primary" @click ="openPurchaseDialog(row)" > 采购</el-button > <el-button v-if ="row.statue === 1" link size ="small" type ="success" @click ="handleUpItem(row.id)" > 上架</el-button > <el-button v-if ="row.statue === 0" link size ="small" type ="warning" @click ="handleDownItem(row.id)" > 下架</el-button > </template > </el-table-column > </el-table > <el-pagination :page-size ="10" :pager-count ="5" :total ="total" background class ="mt-4" layout ="prev, pager, next" size ="small" @current-change ="handlePageChange" /> <el-dialog v-model ="dialogItemVisible" :width ="dialogWidth" title ="添加商品" > <div style ="margin-bottom: 20px;" > <span > 商品图片:</span > <el-upload :action ="uploadImageUrl" :auto-upload ="true" :file-list ="fileList" :on-preview ="handlePictureCardPreview" :on-remove ="handleRemove" :on-success ="handleAvatarSuccess" list-type ="picture-card" method ="post" preview-teleported > <el-icon > <Plus /> </el-icon > </el-upload > </div > <el-form ref ="itemFormRef" :model ="itemForm" :rules ="itemRules" label-width ="120px" > <el-row :gutter ="20" > <el-col :md ="8" :sm ="12" :xs ="24" > <el-form-item label ="商品编号" prop ="itemNum" > <el-input v-model ="itemForm.itemNum" readonly /> </el-form-item > </el-col > <el-col :md ="8" :sm ="12" :xs ="24" > <el-form-item label ="商品名称" prop ="itemName" > <el-input v-model ="itemForm.itemName" /> </el-form-item > </el-col > <el-col :md ="8" :sm ="12" :xs ="24" > <el-form-item label ="商品类型" prop ="typeId" > <el-input v-model ="selectedTypeName" disabled placeholder ="点击选择商品类型" /> <el-button size ="small" style ="margin-left: 10px;" type ="primary" @click ="openTypeDialog" > 选择</el-button > </el-form-item > </el-col > <el-col :md ="8" :sm ="12" :xs ="24" > <el-form-item label ="库存数量" prop ="store" > <el-input v-model.number ="itemForm.store" type ="number" /> </el-form-item > </el-col > <el-col :md ="8" :sm ="12" :xs ="24" > <el-form-item label ="品牌" prop ="brandId" > <el-select v-model ="itemForm.brandId" placeholder ="请选择品牌" > <el-option v-for ="item in brandList" :key ="item.brandId" :label ="item.brandName" :value ="item.brandId" /> </el-select > </el-form-item > </el-col > <el-col :md ="8" :sm ="12" :xs ="24" > <el-form-item label ="门店" prop ="storeId" > <el-select v-model ="itemForm.storeId" placeholder ="请选择门店" > <el-option v-for ="item in storeList" :key ="item.storeId" :label ="item.storeName" :value ="item.storeId" /> </el-select > </el-form-item > </el-col > <el-col :md ="8" :sm ="12" :xs ="24" > <el-form-item label ="供应商" prop ="supplyId" > <el-select v-model ="itemForm.supplyId" placeholder ="请选择供应商" > <el-option v-for ="item in supplyList" :key ="item.supplyId" :label ="item.supplyName" :value ="item.supplyId" /> </el-select > </el-form-item > </el-col > <el-col :md ="8" :sm ="12" :xs ="24" > <el-form-item label ="产地" prop ="placeId" > <el-select v-model ="itemForm.placeId" placeholder ="请选择产地" > <el-option v-for ="item in placeList" :key ="item.placeId" :label ="item.placeName" :value ="item.placeId" /> </el-select > </el-form-item > </el-col > <el-col :md ="8" :sm ="12" :xs ="24" > <el-form-item label ="单位" prop ="unitId" > <el-select v-model ="itemForm.unitId" placeholder ="请选择单位" > <el-option v-for ="item in unitList" :key ="item.unitId" :label ="item.unitName" :value ="item.unitId" /> </el-select > </el-form-item > </el-col > <el-col :md ="8" :sm ="12" :xs ="24" > <el-form-item label ="进货价格" prop ="price" > <el-input v-model.number ="itemForm.price" type ="number" /> </el-form-item > </el-col > <el-col :md ="8" :sm ="12" :xs ="24" > <el-form-item label ="销售价格" prop ="sellPrice" > <el-input v-model.number ="itemForm.sellPrice" type ="number" /> </el-form-item > </el-col > <el-col :md ="8" :sm ="12" :xs ="24" > <el-form-item label ="会员价格" prop ="vipPrice" > <el-input v-model.number ="itemForm.vipPrice" type ="number" /> </el-form-item > </el-col > <el-col :md ="24" :sm ="24" :xs ="24" > <el-form-item label ="商品描述" prop ="itemDesc" > <el-input v-model ="itemForm.itemDesc" :rows ="3" type ="textarea" /> </el-form-item > </el-col > <el-col :md ="8" :sm ="12" :xs ="24" > <el-form-item label ="生产日期" prop ="itemDate" > <el-date-picker v-model ="itemForm.itemDate" placeholder ="选择生产日期" type ="date" /> </el-form-item > </el-col > <el-col :md ="8" :sm ="12" :xs ="24" > <el-form-item label ="到期日期" prop ="endDate" > <el-date-picker v-model ="itemForm.endDate" placeholder ="选择到期日期" type ="date" /> </el-form-item > </el-col > <el-col :md ="8" :sm ="12" :xs ="24" > <el-form-item label ="促销标题" prop ="hotTitle" > <el-input v-model ="itemForm.hotTitle" /> </el-form-item > </el-col > <el-col :md ="8" :sm ="12" :xs ="24" > <el-form-item label ="制造商" prop ="facturer" > <el-input v-model ="itemForm.facturer" /> </el-form-item > </el-col > <el-col :md ="8" :sm ="12" :xs ="24" > <el-form-item label ="商品状态" prop ="statue" > <el-select v-model ="itemForm.statue" placeholder ="请选择状态" > <el-option :value ="0" label ="上架" /> <el-option :value ="1" label ="下架" /> </el-select > </el-form-item > </el-col > <el-col :md ="8" :sm ="12" :xs ="24" > <el-form-item label ="创建者" prop ="createBy" > <el-input v-model ="itemForm.createBy" /> </el-form-item > </el-col > </el-row > </el-form > <template #footer > <el-button @click ="dialogItemVisible = false" > 取消</el-button > <el-button type ="primary" @click ="submitItem" > 保存</el-button > </template > </el-dialog > <el-dialog v-model ="dialogTypeVisible" :width ="dialogWidth" title ="选择商品类型" > <el-tree ref ="typeTreeRef" :data ="typeList" :expand-on-click-node ="false" :highlight-current ="true" :props ="typeTreeConfig" default-expand-all node-key ="id" @node-click ="handleTypeNodeClick" > <template #default ="{ node }" > <span > {{ node.label }}</span > </template > </el-tree > <template #footer > <el-button @click ="dialogTypeVisible = false" > 取消</el-button > <el-button type ="primary" @click ="confirmTypeSelection" > 确认</el-button > </template > </el-dialog > <el-dialog v-model ="buyDialog" title ="商品采购" :width ="dialogWidth" > <el-form :model ="buyForm" label-width ="120px" ref ="buyFormRef" > <el-form-item label ="商品名称" > <el-input v-model ="buyForm.itemName" disabled /> </el-form-item > <el-form-item label ="门店" > <el-input v-model ="buyForm.storeName" disabled /> </el-form-item > <el-form-item label ="供应商" > <el-input v-model ="buyForm.supplyName" disabled /> </el-form-item > <el-form-item label ="产地" > <el-input v-model ="buyForm.placeName" disabled /> </el-form-item > <el-form-item label ="采购数量" prop ="buyNum" > <el-input v-model ="buyForm.buyNum" type ="number" /> </el-form-item > <el-form-item label ="采购人" prop ="buyUser" > <el-input v-model ="buyForm.buyUser" /> </el-form-item > <el-form-item label ="联系电话" prop ="phone" > <el-input v-model ="buyForm.phone" /> </el-form-item > </el-form > <template #footer > <el-button @click ="buyDialog = false" > 取消</el-button > <el-button type ="primary" @click ="submitPurchase" > 确认采购</el-button > </template > </el-dialog > <el-image-viewer v-if ="dialogVisible" :hide-on-click-modal ="false" :initial-index ="0" :teleported ="true" :url-list ="[dialogImageUrl]" :z-index ="3000" :zoom-rate ="1.2" @close ="dialogVisible = false" /> </template > <script setup > import {computed, nextTick, onMounted, reactive, ref} from "vue" ;import {Plus } from '@element-plus/icons-vue' ;import {ElMessage , ElMessageBox } from "element-plus" ;import {categoryApi} from "@/api/category" ;import {itemApi, uploadImageUrl} from "@/api/item" ;function handleImageError (index ) { console .warn (`图片加载失败: ${index} ` ); } const dialogItemVisible = ref (false );const dialogTypeVisible = ref (false );const dialogVisible = ref (false );const dialogImageUrl = ref ('' );const itemFormRef = ref (null );const typeTreeRef = ref (null );const searchFormRef = ref (null );const fileList = ref ([]);const buyForm = reactive ({ productId : '' ,storeId : '' ,supplyId : '' ,placeId : '' ,itemName : '' , storeName : '' ,supplyName : '' ,placeName : '' ,buyNum : '' ,buyUser : '' ,phone : '' }); const buyDialog = ref (false );const buyFormRef = ref (null );const itemList = ref ([]);const total = ref (0 );const dialogWidth = computed (() => { return window .innerWidth < 768 ? '90%' : window .innerWidth < 1024 ? '70%' : '60%' ; }); const typeTreeConfig = { id : 'id' , label : 'label' , children : 'children' }; const searchForm = reactive ({ itemNum : '' , itemName : '' , statue : null , }); const initialItemFormState = { itemNum : '' , itemName : '' , typeId : null , store : 0 , brandId : null , storeId : null , supplyId : null , placeId : null , unitId : null , price : 0 , sellPrice : 0 , vipPrice : 0 , itemDesc : '' , itemDate : null , endDate : null , hotTitle : '' , facturer : '' , statue : 1 , imgs : [], createBy : '' , id : null }; const itemForm = reactive ({ ...initialItemFormState });const selectedTypeName = ref ('' );const itemRules = { itemNum : [{required : true , message : '请输入商品编号' , trigger : 'blur' }], itemName : [{required : true , message : '请输入商品名称' , trigger : 'blur' }], typeId : [{required : true , message : '请选择商品类型' , trigger : 'change' }], store : [{required : true , message : '请输入库存数量' , trigger : 'blur' }], brandId : [{required : true , message : '请选择品牌' , trigger : 'change' }], storeId : [{required : true , message : '请选择门店' , trigger : 'change' }], supplyId : [{required : true , message : '请选择供应商' , trigger : 'change' }], placeId : [{required : true , message : '请选择产地' , trigger : 'change' }], unitId : [{required : true , message : '请选择单位' , trigger : 'change' }], price : [{required : true , message : '请输入进货价格' , trigger : 'blur' }], sellPrice : [{required : true , message : '请输入销售价格' , trigger : 'blur' }], vipPrice : [{required : true , message : '请输入会员价格' , trigger : 'blur' }], itemDate : [{required : true , message : '请选择生产日期' , trigger : 'change' }], endDate : [{required : true , message : '请选择到期日期' , trigger : 'change' }], statue : [{required : true , message : '请选择商品状态' , trigger : 'change' }], }; const typeList = ref ([]), supplyList = ref ([]), placeList = ref ([]), unitList = ref ([]), brandList = ref ([]), storeList = ref ([]);function resetItemRelatedState ( selectedTypeName.value = '' ; fileList.value = []; } function openItemDialog ( Object .assign (itemForm, { ...initialItemFormState }); resetItemRelatedState (); nextTick (() => { if (itemFormRef.value ) { itemFormRef.value .resetFields (); } }); itemApi.getItemCode () .then (response => itemForm.itemNum = response.data ; }) .catch (() => { ElMessage .error ('获取商品编号失败' ); }); dialogItemVisible.value = true ; } function openTypeDialog ( dialogTypeVisible.value = true ; } function handleTypeNodeClick (data ) { if (data.children && data.children .length > 0 ) { ElMessage .warning ('只能选择叶子节点' ); typeTreeRef.value .setCurrentKey (null ); } else { typeTreeRef.value .setCurrentKey (data.id ); } } function confirmTypeSelection ( const selectedNode = typeTreeRef.value .getCurrentNode (); if (!selectedNode) { ElMessage .warning ('请选择一个商品类型' ); return ; } if (selectedNode.children && selectedNode.children .length > 0 ) { ElMessage .warning ('只能选择叶子节点' ); return ; } itemForm.typeId = selectedNode.id ; selectedTypeName.value = selectedNode.label ; dialogTypeVisible.value = false ; } function handleAvatarSuccess (response ) { const imageUrl = typeof response === 'string' ? response : (response.url || '' ); if (imageUrl) { if (!Array .isArray (itemForm.imgs )) itemForm.imgs = []; itemForm.imgs .push (imageUrl); fileList.value .push ({url : imageUrl, status : 'success' }); } } function handleRemove (file ) { const index = fileList.value .indexOf (file); if (index !== -1 ) { fileList.value .splice (index, 1 ); itemForm.imgs .splice (index, 1 ); } } function handlePictureCardPreview (uploadFile ) { dialogImageUrl.value = uploadFile.url ; dialogVisible.value = true ; } function submitItem ( itemFormRef.value .validate ((valid ) => { if (valid) { const apiCall = itemForm.id ? itemApi.updateItem (itemForm) : itemApi.saveItem (itemForm); apiCall .then ((response ) => { if (response.data && response.data .code === 500 ) { ElMessage .error (response.data .message || '操作失败,请稍后重试' ); return ; } ElMessage .success (itemForm.id ? '修改成功' : '添加成功' ); dialogItemVisible.value = false ; Object .assign (itemForm, { ...initialItemFormState }); resetItemRelatedState (); loadItemList (1 ); }) .catch ((error ) => { const errorMsg = error.response ?.data ?.message || '保存失败,请稍后重试' ; ElMessage .error (errorMsg); }); } }); } function submitPurchase ( buyFormRef.value .validate ((valid ) => { if (valid) { itemApi.saveBuy (buyForm) .then ((response ) => { if (response.data .code === 200 ) { ElMessage .success (response.data .message || '采购成功' ); buyDialog.value = false ; loadItemList (1 ); Object .assign (buyForm, { productId : '' , storeId : '' , supplyId : '' , placeId : '' , itemName : '' , storeName : '' , supplyName : '' , placeName : '' , buyNum : '' , buyUser : '' , phone : '' }); } else { ElMessage .error (response.data .message || '采购失败' ); } }) .catch ((error ) => { console .error ('采购失败:' , error); ElMessage .error ('采购失败,请稍后重试' ); }); } else { ElMessage .warning ('请填写完整的采购信息' ); } }); } function loadAllData ( Promise .all ([ categoryApi.getCategoryTree (), itemApi.getSupplyList (), itemApi.getPlaceList (), itemApi.getUnitList (), itemApi.getBrandList (), itemApi.getStoreList () ]) .then (([typeRes, supplyRes, placeRes, unitRes, brandRes, storeRes] ) => { typeList.value = typeRes.data ; supplyList.value = supplyRes.data ; placeList.value = placeRes.data ; unitList.value = unitRes.data ; brandList.value = brandRes.data ; storeList.value = storeRes.data ; }) .catch (() => { ElMessage .error ('加载数据失败,请稍后重试' ); }); } function loadItemList (pageNum = 1 , pageSize = 10 ) { const params = { pageNum, pageSize, itemNum : searchForm.itemNum , itemName : searchForm.itemName , statue : searchForm.statue , }; itemApi.getItemList (params) .then ((response ) => { if (response.data && response.data .items ) { itemList.value = response.data .items ; total.value = response.data .total ; } else { itemList.value = []; total.value = 0 ; ElMessage .warning ('商品数据格式不正确或为空' ); } }) .catch (() => { ElMessage .error ('加载商品列表失败' ); }); } function handleSearch ( loadItemList (1 ); } function resetSearchForm ( if (searchFormRef.value ) { searchFormRef.value .resetFields (); } searchForm.itemNum = '' ; searchForm.itemName = '' ; searchForm.statue = null ; loadItemList (1 ); } function handleDeleteItem (id ) { ElMessageBox .confirm ('确定要删除这个商品吗?' , '提示' , { confirmButtonText : '确定' , cancelButtonText : '取消' , type : 'warning' , }) .then (() => { itemApi.deleteItem (id) .then ((response ) => { if (response.data .code === 200 ) { ElMessage .success (response.data .message || '删除成功' ); loadItemList (1 ); } else { ElMessage .error (response.data .message || '删除失败' ); } }) .catch (() => { ElMessage .error ('删除失败' ); }); }) .catch (() => { ElMessage .info ('已取消删除' ); }); } function handleDownItem (id ) { itemApi.downItem (id) .then ((response ) => { if (response.data .code === 200 ) { ElMessage .success (response.data .message || '下架成功' ); loadItemList (1 ); } else { ElMessage .error (response.data .message || '下架失败' ); } }) .catch (() => { ElMessage .error ('下架失败' ); }); } function handleUpItem (id ) { itemApi.upItem (id) .then ((response ) => { if (response.data .code === 200 ) { ElMessage .success (response.data .message || '上架成功' ); loadItemList (1 ); } else { ElMessage .error (response.data .message || '上架失败' ); } }) .catch (() => { ElMessage .error ('上架失败' ); }); } function openUpdateDialog (row ) { dialogItemVisible.value = true ; Object .assign (itemForm, { id : row.id , itemNum : row.itemNum || '' , itemName : row.itemName || '' , typeId : row.typeId , store : row.store || 0 , brandId : row.brandId , storeId : row.storeId , supplyId : row.supplyId , placeId : row.placeId , unitId : row.unitId , price : row.price || 0 , sellPrice : row.sellPrice || 0 , vipPrice : row.vipPrice || 0 , itemDesc : row.itemDesc || '' , itemDate : row.itemDate , endDate : row.endDate , hotTitle : row.hotTitle || '' , facturer : row.facturer || '' , statue : row.statue , imgs : row.imgs || [], createBy : row.createBy || '' }); fileList.value = (row.imgs || []).map (url =>status : 'success' })); selectedTypeName.value = row.cateName || '' ; loadAllData (); } onMounted (() => { loadItemList (1 ); loadAllData (); }); function handlePageChange (value ) { loadItemList (value); } function openPurchaseDialog (row ) { buyDialog.value = true ; itemApi.getBuyAutoInfo (row.id ) .then ((response ) => { const item = response.data ; buyForm.productId = item.id ; buyForm.itemName = item.itemName ; buyForm.storeId = item.storeId ; buyForm.storeName = item.storeName ; buyForm.supplyId = item.supplyId ; buyForm.supplyName = item.supplyName ; buyForm.placeId = item.placeId ; buyForm.placeName = item.placeName ; }) .catch ((error ) => { console .error ('获取采购信息失败:' , error); ElMessage .error ('获取采购信息失败' ); }); } </script > <style scoped > </style >
注册页面方法之前讲过,这里不重复
Day15 1.实现采购管理 采购单管理 (t_buy_list): 实现了采购单的后端增删改查和前端列表展示、修改对话框等。 自动带入数据: 在商品列表页面点击“采购”按钮时,会弹出一个采购对话框,并通过调用后端接口 (/buyAutoInfo/{id}) 自动带入与该商品相关的默认信息(如商品名称、仓库、供应商、产地)。后端实现 添加数据库表
1 2 3 4 5 6 7 8 9 10 11 12 13 14 CREATE TABLE `t_buy_list` ( `buy_id` int NOT NULL AUTO_INCREMENT COMMENT '采购单ID' , `product_id` int DEFAULT NULL COMMENT '产品ID,关联产品表' , `store_id` int DEFAULT NULL COMMENT '仓库ID,关联仓库表' , `buy_num` int DEFAULT NULL COMMENT '计划采购数量' , `fact_buy_num` int DEFAULT NULL COMMENT '实际采购数量' , `buy_time` datetime DEFAULT NULL COMMENT '采购时间' , `supply_id` int DEFAULT NULL COMMENT '供应商ID,关联供应商表' , `place_id` int DEFAULT NULL COMMENT '采购地点ID,关联地点表' , `buy_user` varchar (20 ) DEFAULT NULL COMMENT '采购人姓名' , `phone` varchar (20 ) DEFAULT NULL COMMENT '采购人联系电话' , `is_in` char (1 ) DEFAULT NULL COMMENT '是否入库:0-否,1-是' , PRIMARY KEY (`buy_id`) ) ENGINE= InnoDB AUTO_INCREMENT= 49 DEFAULT CHARSET= utf8mb3 COMMENT= '采购单表,记录商品采购信息' ;
用mybatiesx插件生成代码
生成的Buylistpojo添加属性
1 2 3 4 5 6 7 8 9 10 11 12 @JsonFormat(pattern = "yyyy-MM-dd HH:mm:ss") private Date buyTime;@TableField(exist = false) private static final long serialVersionUID = 1L ;@TableField(exist = false) private String itemName;@TableField(exist = false) private String storeName;
对应mapper添加接口方法
1 2 List<BuyList> queryBuyListMapper () ;
实现对应sql
1 2 3 4 5 6 7 < ! < select id= "queryBuyListMapper" resultType= "com.example.demo.pojo.BuyList"> select buy.* , store.store_name, item.item_name from t_buy_list buy inner join t_store store on buy.store_id = store.store_id inner join t_item item on buy.product_id = item.id < / select >
添加service方法接口
1 2 3 4 5 Map<String,Object> queryAutoDataBuyService (Integer id) ; Map<String,Object> queryBuyListService (Integer pageNum,Integer pageSize) ;
实现接口方法
1 2 3 4 5 6 7 8 9 10 11 12 13 14 15 16 17 18 19 20 21 22 23 24 25 26 27 28 29 30 31 32 33 34 35 36 37 38 39 40 41 42 43 44 45 46 47 48 49 private final ItemMapper itemMapper;private final StoreMapper storeMapper;private final SupplyMapper supplyMapper;private final PlaceMapper placeMapper;public BuyListServiceImpl (ItemMapper itemMapper, StoreMapper storeMapper, SupplyMapper supplyMapper, PlaceMapper placeMapper, BuyListMapper buyListMapper) { this .itemMapper = itemMapper; this .storeMapper = storeMapper; this .supplyMapper = supplyMapper; this .placeMapper = placeMapper; this .buyListMapper = buyListMapper; } @Override public Map<String, Object> queryAutoDataBuyService (Integer id) { Map<String, Object> result=new HashMap <>(); Item item = itemMapper.selectById(id); result.put("id" ,item.getId()); result.put("itemName" ,item.getItemName()); Integer storeId = item.getStoreId(); Store store = storeMapper.selectById(storeId); result.put("storeId" ,store.getStoreId()); result.put("storeName" ,store.getStoreName()); Integer supplyId = item.getSupplyId(); Supply supply = supplyMapper.selectById(supplyId); result.put("supplyId" ,supply.getSupplyId()); result.put("supplyName" ,supply.getSupplyName()); Integer placeId = item.getPlaceId(); Place place = placeMapper.selectById(placeId); result.put("placeId" ,place.getPlaceId()); result.put("placeName" ,place.getPlaceName()); return result; } private final BuyListMapper buyListMapper;@Override public Map<String, Object> queryBuyListService (Integer pageNum, Integer pageSize) { Page<Object> page = PageHelper.startPage(pageNum, pageSize); List<BuyList> buyLists = buyListMapper.queryBuyListMapper(); Map<String, Object> result=new HashMap <>(); result.put("total" ,page.getTotal()); result.put("buyLists" ,buyLists); return result; }
实现增删改查接口
1 2 3 4 5 6 7 8 9 10 11 12 13 14 15 16 17 18 19 20 21 22 23 24 25 26 27 28 29 30 31 32 33 34 35 36 37 38 39 40 41 @RestController @CrossOrigin public class BuyListController { private final BuyListService buyListService; public BuyListController (BuyListService buyListService) { this .buyListService = buyListService; } @GetMapping("/buyAutoInfo/{id}") public Map<String,Object> buyAutoInfo (@PathVariable Integer id) { return buyListService.queryAutoDataBuyService(id); } @PostMapping("/saveBuy") public Map<String,Object> saveBuy (@RequestBody BuyList buyList) { buyList.setBuyTime(new Date ()); buyList.setIsIn("0" ); buyList.setFactBuyNum(0 ); return buyListService.save(buyList)? ResponseUtil.success("保存成功" ):ResponseUtil.error("保存失败" ); } @GetMapping("/queryBuyList") public Map<String,Object> queryBuyList ( @RequestParam(defaultValue = "1") Integer pageNum ,@RequestParam(defaultValue = "3") Integer pageSize) { return buyListService.queryBuyListService(pageNum,pageSize); } @PostMapping("/updateBuyList") public Map<String,Object> updateBuyList (@RequestBody BuyList buyList) { return buyListService.updateById(buyList)? ResponseUtil.success("修改成功" ):ResponseUtil.error("修改失败" ); } @PostMapping("/deleteBuy/{id}") public Map<String,Object> deleteBuy (@PathVariable Integer id) { return buyListService.removeById(id)? ResponseUtil.success("删除成功" ):ResponseUtil.error("删除失败" ); } }
前端实现 修改昨天的商品信息页,添加采购功能,相关内容已经在之前的代码里实现了
添加BuyListManager.vue
1 2 3 4 5 6 7 8 9 10 11 12 13 14 15 16 17 18 19 20 21 22 23 24 25 26 27 28 29 30 31 32 33 34 35 36 37 38 39 40 41 42 43 44 45 46 47 48 49 50 51 52 53 54 55 56 57 58 59 60 61 62 63 64 65 66 67 68 69 70 71 72 73 74 75 76 77 78 79 80 81 82 83 84 85 86 87 88 89 90 91 92 93 94 95 96 97 98 99 100 101 102 103 104 105 106 107 108 109 110 111 112 113 114 115 116 117 118 119 120 121 122 123 124 125 126 127 128 129 130 131 132 133 134 135 136 137 138 139 140 141 142 143 144 145 146 147 148 149 150 151 152 153 154 155 156 157 158 159 160 161 162 163 164 165 166 167 168 169 170 171 172 173 174 175 176 <template > <h2 > 采购单列表</h2 > <el-table :data ="buyList" style ="width: 100%" > <el-table-column prop ="storeName" label ="仓库名称" /> <el-table-column prop ="itemName" label ="商品名称" /> <el-table-column prop ="buyNum" label ="预计采购数量" /> <el-table-column prop ="factBuyNum" label ="实际采购数量" /> <el-table-column prop ="buyUser" label ="采购人" /> <el-table-column prop ="buyTime" label ="采购时间" width ="200px" /> <el-table-column prop ="phone" label ="采购人电话" /> <el-table-column prop ="isIn" label ="状态" > <template #default ="scope" > <span v-if ="scope.row.isIn == 0" style ="color:green" > 未入库</span > <span v-else style ="color:red" > 已入库</span > </template > </el-table-column > <el-table-column fixed ="right" label ="操作" width ="240" > <template #default ="scope" > <el-button link type ="primary" v-if ="scope.row.factBuyNum == 0" size ="small" @click ="showBuyListDialog(scope.row)" > 修改</el-button > <el-button link type ="primary" v-if ="scope.row.factBuyNum == 0" size ="small" @click ="delBuyList(scope.row.id)" > 删除</el-button > <el-button link type ="primary" size ="small" v-if ="scope.row.isIn == 0" > 生成入库单</el-button > </template > </el-table-column > </el-table > <el-pagination small background :page-size ="3" :pager-count ="10" layout ="prev, pager, next" :total ="total" class ="mt-4" @current-change ="handlerPageChange" /> <el-dialog v-model ="buyListDialog" width ="60%" > <h2 > 商品采购</h2 > <el-form :model ="buyForm" label-width ="120px" > <el-form-item label ="商品名称" > {{ buyForm.itemName }} </el-form-item > <el-form-item label ="仓库" > {{ buyForm.storeName }} </el-form-item > <el-form-item label ="供应商" > {{ buyForm.supplyName }} </el-form-item > <el-form-item label ="产地" > {{ buyForm.placeName }} </el-form-item > <el-form-item label ="预计采购量" > <el-input v-model ="buyForm.buyNum" style ="width: 80%" /> </el-form-item > <el-form-item label ="采购人" > <el-input v-model ="buyForm.buyUser" style ="width: 80%" /> </el-form-item > <el-form-item label ="采购人电话" > <el-input v-model ="buyForm.phone" style ="width: 80%" /> </el-form-item > <el-form-item label ="实际采购数" > <el-input v-model ="buyForm.factBuyNum" style ="width: 80%" /> </el-form-item > <el-form-item > <el-button type ="primary" @click ="updateBuyOrder" > 保存</el-button > <el-button > 取消</el-button > </el-form-item > </el-form > </el-dialog > </template > <script setup > import axios from 'axios' ;import { onMounted, reactive, ref } from "vue" ;import { ElMessage } from "element-plus" ;const buyList = ref ([]);const total = ref (0 );function queryBuyList (pageNum ) { axios.get ("http://localhost:8080/queryBuyList?pageNum=" + pageNum) .then ((response ) => { buyList.value = response.data .buyLists ; total.value = response.data .total ; }) } onMounted (function ( queryBuyList (1 ); }); function handlerPageChange (pageNum ) { queryBuyList (pageNum); } const buyForm = reactive ({ productId : '' , storeId : '' , supplyId : '' , placeId : '' , itemName : '' , storeName : '' , supplyName : '' , placeName : '' , buyNum : '' , buyUser : '' , phone : '' , factBuyNum : '' }) const buyListDialog = ref (false );function showBuyListDialog (row ) { var productId = row.productId ; buyListDialog.value = true ; axios.get ("http://localhost:8080/buyAutoInfo/" + productId) .then ((response ) => { var item = response.data ; buyForm.productId = item.id ; buyForm.itemName = item.itemName ; buyForm.storeId = item.storeId ; buyForm.storeName = item.storeName ; buyForm.supplyId = item.supplyId ; buyForm.supplyName = item.supplyName ; buyForm.placeId = item.placeId ; buyForm.placeName = item.placeName ; buyForm.buyUser = row.buyUser ; buyForm.buyNum = row.buyNum ; buyForm.factBuyNum = row.factBuyNum ; buyForm.phone = row.phone ; buyForm.buyId = row.buyId ; }) .catch ((error ) => { console .log (error); }); } function updateBuyOrder ( axios.post ("http://localhost:8080/updateBuyList" , buyForm) .then ((response ) => { if (response.data .code == 200 ) { buyListDialog.value = false ; queryBuyList (1 ); } ElMessage (response.data .message ); }) .catch ((error ) => { console .log (error); }) } function delBuyList (id ) { axios.get ("http://localhost:8080/deleteBuyList/" + id) .then ((response ) => { if (response.data .code == 200 ) { queryBuyList (1 ); } ElMessage (response.data .message ); }) .catch ((ex ) => { console .log (ex); }); } </script > <style scoped > </style >
2.实现商品入库管理 创建了入库表和相应的后端代码。 在采购单列表页面添加了“生成入库单”按钮。点击后,调用后端 /buyInStore 接口。 后端入库逻辑 (saveBuyOrderInStoreService): 更新商品库存: 根据采购单的实际采购数量,增加对应商品的库存 (这里代码是 goods.getStore()-buyList.getFactBuyNum() 应该是 +,表示入库增加库存,或者需要根据实际业务是“减少未入库库存”等具体逻辑调整)。更新采购单状态: 将采购单的 is_in 状态标记为“已入库”。生成入库记录: 在 t_in_store 表中插入一条新的入库记录。后端实现 添加入库表
1 2 3 4 5 6 7 8 9 10 CREATE TABLE `t_in_store` ( `ins_id` int NOT NULL AUTO_INCREMENT COMMENT '入库单ID' , `store_id` int NULL DEFAULT NULL COMMENT '仓库ID(关联仓库表)' , `product_id` int NULL DEFAULT NULL COMMENT '商品ID(关联商品表)' , `in_num` int NULL DEFAULT NULL COMMENT '入库数量' , `create_by` int NULL DEFAULT NULL COMMENT '创建人ID(关联用户表)' , `create_time` datetime NULL DEFAULT NULL COMMENT '创建时间' , `is_in` char (1 ) CHARACTER SET utf8 COLLATE utf8_general_ci NULL DEFAULT NULL COMMENT '入库状态(0-未入库,1-已入库)' , PRIMARY KEY (`ins_id`) USING BTREE ) ENGINE = InnoDB AUTO_INCREMENT = 50 CHARACTER SET = utf8 COLLATE = utf8_general_ci COMMENT = '入库单表(记录商品入库信息)' ROW_FORMAT = Dynamic ;
用插件生成基础代码
添加service接口方法
1 2 void saveBuyOrderInStoreService (BuyList buyList) ;
实现方法
1 2 3 4 5 6 7 8 9 10 11 12 13 14 15 16 17 18 19 20 21 22 23 24 25 26 27 28 29 30 31 32 33 34 35 36 37 38 39 40 41 42 private final BuyListMapper buyListMapper;private final ItemMapper itemMapper;private final InStoreMapper inStoreMapper;public InStoreServiceImpl (BuyListMapper buyListMapper, ItemMapper itemMapper, InStoreMapper inStoreMapper) { this .buyListMapper = buyListMapper; this .itemMapper = itemMapper; this .inStoreMapper = inStoreMapper; } @Override public void saveBuyOrderInStoreService (BuyList buyList) { Integer productId = buyList.getProductId(); Item goods = itemMapper.selectById(productId); Item item = new Item (); item.setId(productId); item.setStore(goods.getStore()-buyList.getFactBuyNum()); itemMapper.updateById(item); Integer buyId=buyList.getBuyId(); BuyList bl=new BuyList (); bl.setBuyId(buyId); bl.setIsIn("1" ); buyListMapper.updateById(bl); InStore inStore=new InStore (); inStore.setStoreId(buyList.getStoreId()); inStore.setProductId(buyList.getProductId()); inStore.setInNum(buyList.getFactBuyNum()); inStore.setCreateBy(1009 ); inStore.setCreateTime(new Date ()); inStore.setIsIn("1" ); inStoreMapper.insert(inStore); }
添加Controller
1 2 3 4 5 6 7 8 9 10 11 12 13 @RestController @CrossOrigin public class InStoreController { @Autowired private InStoreService inStoreService; @PostMapping("/buyInStore") public Map<String,Object> buyInStore (@RequestBody BuyList buyList) { inStoreService.saveBuyOrderInStoreService(buyList); return ResponseUtil.success("入库成功" ); } }
前端实现 采购管理页添加入库方法
1 2 3 4 5 6 7 8 9 10 11 12 13 14 function doInStore (row ){ axios.post ("http://localhost:8080/buyInStore" ,row) .then ((response )=> { if (response.data .code ==200 ){ queryBuyList (1 ); } ElMessage (response.data .message ); }) .catch ((ex )=> { console .log (ex); }); }
修改按钮,绑定事件方法
1 2 <el-button link type ="primary" size ="small" v-if ="scope.row.isIn == 0" @click ="doInStore(scope.row)" > 生成入库单</el-button >
3.实现表的导入导出 外部教程:java导出excel(一):单sheet
后端实现 添加了 Apache POI 依赖 (poi-ooxml)。 在 BuyListServiceImpl 中实现了 exportExcelService 方法:创建 XSSFWorkbook (Excel 文件对象) 和 XSSFSheet (工作表)。 创建表头行并设置样式 (合并单元格、字体、对齐方式等)。 查询数据库获取采购单列表数据。 遍历数据,为每条记录创建数据行,并将数据填充到单元格中。特别注意了日期格式的处理。 在 BuyListController 中创建了 /exportExcel 接口:调用 Service 获取 XSSFWorkbook 对象。 将 workbook 写入 ByteArrayOutputStream。 设置 HTTP 响应头 (HttpHeaders),包括 Content-Type (application/octet-stream 表示二进制流) 和 Content-Disposition (attachment;filename=… 指定下载文件名,并进行了 URL 编码处理中文名)。 返回 ResponseEntity<byte[]>,将 Excel 文件内容作为字节流响应给客户端。 Maven添加依赖
1 2 3 4 5 6 <dependency > <groupId > org.apache.poi</groupId > <artifactId > poi-ooxml</artifactId > <version > 5.4.0</version > </dependency >
application.properties添加pagehelper配置
这个配置防止pageSizeZero不可以为零导致返回出错的情况
1 2 3 4 5 6 pagehelper.helper-dialect =mysql pagehelper.reasonable =false pagehelper.support-methods-arguments =true pagehelper.params =count=countSql pagehelper.page-size-zero =true
BuyListService添加方法
1 2 XSSFWorkbook exportExcelService () ;
实现接口方法
1 2 3 4 5 6 7 8 9 10 11 12 13 14 15 16 17 18 19 20 21 22 23 24 25 26 27 28 29 30 31 32 33 34 35 36 37 38 39 40 41 42 43 44 45 46 47 48 49 50 51 52 53 54 55 56 57 58 59 60 61 62 63 64 65 66 67 68 69 70 @Override public XSSFWorkbook exportExcelService () { XSSFWorkbook xwb = new XSSFWorkbook (); XSSFSheet sheet = xwb.createSheet("采购单信息" ); XSSFRow row0 = sheet.createRow(0 ); XSSFCell row0cell0 = row0.createCell(0 ); row0cell0.setCellValue("采购单列表" ); XSSFCellStyle style = xwb.createCellStyle(); style.setAlignment(HorizontalAlignment.CENTER); style.setFillBackgroundColor(new XSSFColor ( new java .awt.Color(255 , 0 , 0 ), null )); XSSFFont font = new XSSFFont (); font.setFontHeight(30 ); style.setFont(font); row0cell0.setCellStyle(style); sheet.addMergedRegion(new CellRangeAddress (0 , 0 , 0 , 8 )); XSSFRow row1 = sheet.createRow(1 ); row1.createCell(0 ).setCellValue("仓库名称" ); row1.createCell(1 ).setCellValue("商品名称" ); row1.createCell(2 ).setCellValue("预计采购数量" ); row1.createCell(3 ).setCellValue("实际采购数量" ); row1.createCell(4 ).setCellValue("采购人" ); row1.createCell(5 ).setCellValue("采购时间" ); row1.createCell(6 ).setCellValue("采购人电话" ); row1.createCell(7 ).setCellValue("状态" ); PageHelper.startPage(1 , 0 ); List<BuyList> buyLists = buyListMapper.queryBuyListMapper(); System.out.println(buyLists); int index = 2 ; for (BuyList buy : buyLists) { XSSFRow rown = sheet.createRow(index); rown.createCell(0 ).setCellValue(buy.getStoreName()); rown.createCell(1 ).setCellValue(buy.getItemName()); rown.createCell(2 ).setCellValue(buy.getBuyNum()); rown.createCell(3 ).setCellValue(buy.getFactBuyNum()); rown.createCell(4 ).setCellValue(buy.getBuyUser()); XSSFCell cell = rown.createCell(5 ); CellStyle dateStyle = xwb.createCellStyle(); short dateFormat = xwb.getCreationHelper().createDataFormat() .getFormat("yyyy-MM-dd HH:mm:ss" ); dateStyle.setDataFormat(dateFormat); cell.setCellStyle(dateStyle); cell.setCellValue(buy.getBuyTime()); rown.createCell(6 ).setCellValue(buy.getPhone()); String isIn = buy.getIsIn(); String result = "0" .equals(isIn) ? "未入库" : "已入库" ; rown.createCell(7 ).setCellValue(result); index++; } return xwb; }
添加对于controller接口
1 2 3 4 5 6 7 8 9 10 11 12 13 14 15 16 17 18 19 20 21 22 23 24 25 26 @GetMapping("/exportExcel") public ResponseEntity exportExcel () { XSSFWorkbook workbook = buyListService.exportExcelService(); ByteArrayOutputStream baos = new ByteArrayOutputStream (); try { workbook.write(baos); } catch (IOException e) { e.printStackTrace(); } byte [] bytes = baos.toByteArray(); HttpHeaders headers = new HttpHeaders (); headers.setContentType(MediaType.APPLICATION_OCTET_STREAM); String name = "采购单列表.xlsx" ; name = URLEncoder.encode(name, StandardCharsets.UTF_8); System.out.println("name=" + name); headers.add(HttpHeaders.CONTENT_DISPOSITION, "attachment;filename=" + name); return (ResponseEntity<byte []>) new ResponseEntity (bytes, headers, HttpStatus.CREATED); }
前端实现 添加导出按钮
1 2 3 <div style ="text-align: left" > <el-button type ="success" @click ="exportData" > 导出数据</el-button > </div >
实现绑定的事件
1 2 3 4 function exportData ( location.href ="http://localhost:8081/exportExcel" ; }
Day16 1.实现入库单列表增删改查 后端实现 InStore实体类添加属性
1 2 3 4 5 6 7 8 9 @Serial @TableField(exist = false) private static final long serialVersionUID = 1L ;@TableField(exist = false) private String storeName;@TableField(exist = false) private String itemName;
InStoreMapper添加方法
1 2 public List<InStore> queryInStoreListMapper () ;
实现mapper接口
1 2 3 4 5 6 7 8 < ! < select id= "queryInStoreListMapper" resultType= "com.example.demo.pojo.InStore"> select inst.* ,store.store_name,item.item_name from t_in_store inst inner join t_item item on item.id= inst.product_id inner join t_store store on store.store_id= inst.store_id < / select >
对应service添加方法接口
1 2 public Map<String,Object> queryInStoreListService (Integer pageNum, Integer pageSize) ;
实现接口
1 2 3 4 5 6 7 8 9 10 11 @Override public Map<String, Object> queryInStoreListService (Integer pageNum, Integer pageSize) { Page<Object> page = PageHelper.startPage(pageNum, pageSize); List<InStore> inStores = inStoreMapper.queryInStoreListMapper(); Map<String,Object> result=new HashMap <>(); result.put("total" ,page.getTotal()); result.put("inStores" ,inStores); return result; }
InStoreController添加方法
1 2 3 4 5 6 7 8 9 10 11 12 13 14 15 16 17 18 19 20 21 22 23 24 25 26 @GetMapping("/queryInList") public Map<String,Object> queryInStoreList ( @RequestParam(defaultValue = "1") Integer pageNum ,@RequestParam(defaultValue = "10") Integer pageSize) { return inStoreService.queryInStoreListService(pageNum,pageSize); } @PostMapping("/deleteInList/{id}") public Map<String, Object> deleteInList (@PathVariable Integer id) { return inStoreService.removeById(id) ? R.success("删除成功" ) : R.error("删除失败" ); } @PostMapping("/updateInList") public Map<String, Object> updateInList (@RequestBody InStore inStore) { return inStoreService.updateById(inStore) ? R.success("修改成功" ) : R.error("修改失败" ); } @PostMapping("/updateInStore/{id}") public Map<String,Object> updateInStore (@PathVariable Integer id) { InStore inStore=new InStore (); inStore.setInsId(id); inStore.setIsIn("0" ); return inStoreService.updateById(inStore)? R.success("确认成功" ): R.error("确认失败" ); }
前端实现 创建InStoreList.vue组件
1 2 3 4 5 6 7 8 9 10 11 12 13 14 15 16 17 18 19 20 21 22 23 24 25 26 27 28 29 30 31 32 33 34 35 36 37 38 39 40 41 42 43 44 45 46 47 48 49 50 51 52 53 54 55 56 57 58 59 60 61 62 63 64 65 66 67 68 69 70 71 72 73 74 75 76 77 78 79 80 81 82 83 84 85 86 87 88 89 90 91 92 93 94 95 96 97 98 99 100 101 102 103 104 105 106 107 108 109 110 111 112 113 114 115 116 117 118 119 120 121 122 123 124 125 126 127 128 129 130 131 132 133 134 135 136 137 138 139 140 141 142 143 144 145 146 147 148 149 150 151 152 153 154 155 156 157 <template > <h2 > 入库单列表</h2 > <el-table :data ="inStoreList" style ="width: 100%" > <el-table-column prop ="storeName" label ="仓库名称" /> <el-table-column prop ="itemName" label ="商品名称" /> <el-table-column prop ="inNum" label ="入库数量" /> <el-table-column prop ="createBy" label ="创建人ID" /> <el-table-column prop ="createTime" label ="创建时间" width ="200px" /> <el-table-column prop ="isIn" label ="状态" > <template #default ="scope" > <span v-if ="scope.row.isIn == 0" style ="color:green" > 未入库</span > <span v-else style ="color:red" > 已入库</span > </template > </el-table-column > <el-table-column fixed ="right" label ="操作" width ="180" > <template #default ="scope" > <el-button link type ="primary" size ="small" @click ="showInStoreDialog(scope.row)" > 修改</el-button > <el-button link type ="primary" size ="small" @click ="delInStore(scope.row.insId)" > 删除</el-button > <el-button link type ="primary" size ="small" v-if ="scope.row.isIn == 1" @click ="confirmIsIn(scope.row.insId)" > 确认入库</el-button > </template > </el-table-column > </el-table > <el-pagination small background :page-size ="pageSize" :pager-count ="10" layout ="prev, pager, next" :total ="total" class ="mt-4" @current-change ="handlerPageChange" /> <el-dialog v-model ="inStoreDialog" width ="60%" > <h2 > 入库单信息</h2 > <el-form :model ="inStoreForm" label-width ="120px" > <el-form-item label ="商品名称" > {{ inStoreForm.itemName }} </el-form-item > <el-form-item label ="仓库" > {{ inStoreForm.storeName }} </el-form-item > <el-form-item label ="入库数量" > <el-input v-model ="inStoreForm.inNum" style ="width: 80%" /> </el-form-item > <el-form-item label ="创建人ID" > <el-input v-model ="inStoreForm.createBy" style ="width: 80%" /> </el-form-item > <el-form-item label ="创建时间" > <el-input v-model ="inStoreForm.createTime" style ="width: 80%" disabled /> </el-form-item > <el-form-item label ="状态" > <el-select v-model ="inStoreForm.isIn" style ="width: 80%" > <el-option label ="未入库" value ="0" /> <el-option label ="已入库" value ="1" /> </el-select > </el-form-item > <el-form-item > <el-button type ="primary" @click ="updateInStore" > 保存</el-button > <el-button @click ="inStoreDialog = false" > 取消</el-button > </el-form-item > </el-form > </el-dialog > </template > <script setup > import { onMounted, reactive, ref } from "vue" ;import { ElMessage } from "element-plus" ;import { InStoreApi } from '@/api/InStore' ;const inStoreList = ref ([]);const total = ref (0 );const pageSize = 10 ;function queryInStoreList (pageNum ) { InStoreApi .queryInList (pageNum, pageSize) .then ((response ) => { inStoreList.value = response.data .inStores || []; total.value = response.data .total ; }) .catch (error => console .error ('获取入库单列表失败:' , error); ElMessage .error ('获取入库单列表失败' ); }); } onMounted (function ( queryInStoreList (1 ); }); function handlerPageChange (pageNum ) { queryInStoreList (pageNum); } const inStoreForm = reactive ({ insId : '' , storeId : '' , productId : '' , inNum : '' , createBy : '' , createTime : '' , isIn : '' , storeName : '' , itemName : '' }); const inStoreDialog = ref (false );function showInStoreDialog (row ) { Object .assign (inStoreForm, row); inStoreDialog.value = true ; } function updateInStore ( InStoreApi .updateInList (inStoreForm) .then ((response ) => { if (response.data .code == 200 ) { inStoreDialog.value = false ; queryInStoreList (1 ); } ElMessage (response.data .message ); }) .catch ((error ) => { console .error ('更新入库单失败:' , error); ElMessage .error ('更新入库单失败' ); }); } function delInStore (id ) { InStoreApi .deleteInList (id) .then ((response ) => { if (response.data .code == 200 ) { queryInStoreList (1 ); } ElMessage (response.data .message ); }) .catch ((error ) => { console .error ('删除入库单失败:' , error); ElMessage .error ('删除入库单失败' ); }); } function confirmIsIn (id ) { InStoreApi .updateInStore (id) .then ((response ) => { if (response.data .code == 200 ) { queryInStoreList (1 ); } }) .catch ((error ) => { console .log (error); }) } </script > <style scoped > </style >
在菜单表里添加菜单
在主页代码中注册页面
之前写过很多次,这里不重复
2.实现商品信息页的出库功能 后端实现 创建t_out_store表
1 2 3 4 5 6 7 8 9 10 11 12 13 CREATE TABLE `t_out_store` ( `outs_id` int NOT NULL AUTO_INCREMENT COMMENT '出库单ID,主键,自增' , `product_id` int DEFAULT NULL COMMENT '产品ID' , `store_id` int DEFAULT NULL COMMENT '仓库ID' , `tally_id` int DEFAULT NULL COMMENT '理货ID' , `out_price` decimal (8 ,2 ) DEFAULT NULL COMMENT '出库单价' , `out_num` int DEFAULT NULL COMMENT '出库数量' , `create_by` int DEFAULT NULL COMMENT '创建人ID' , `create_time` datetime DEFAULT NULL COMMENT '创建时间' , `is_out` char (1 ) DEFAULT NULL COMMENT '是否出库:0 否,1 是' , PRIMARY KEY (`outs_id`) ) ENGINE= InnoDB AUTO_INCREMENT= 15 DEFAULT CHARSET= utf8mb3 COMMENT= '出库单' ;
在idea用mybatiesx生成代码
OutStoreService添加方法
1 2 public void saveOutStoreService (OutStore outStore) ;
实现方法
1 2 3 4 5 6 7 8 9 10 11 12 13 14 15 16 17 18 19 20 21 22 23 24 25 26 27 28 29 30 31 32 33 private final ItemMapper itemMapper;private final OutStoreMapper outStoreMapper;public OutStoreServiceImpl (ItemMapper itemMapper, OutStoreMapper outStoreMapper) { this .itemMapper = itemMapper; this .outStoreMapper = outStoreMapper; } @Transactional @Override public boolean saveOutStoreService (OutStore outStore) { Item product = itemMapper.selectById(outStore.getProductId()); Item item = new Item (); item.setId(outStore.getProductId()); item.setStore(product.getStore()-outStore.getOutNum()); itemMapper.updateById(item); outStore.setIsOut("0" ); outStore.setCreateTime(new Date ()); outStore.setCreateBy(101010 ); outStore.setOutPrice(BigDecimal.valueOf(product.getSellPrice())); outStore.setStoreId(product.getStoreId()); outStore.setProductId(product.getId()); outStoreMapper.insert(outStore); return false ; }
创建OutStoreController
1 2 3 4 5 6 7 8 9 10 11 12 13 14 15 16 17 18 19 20 21 22 23 24 25 26 27 28 29 30 31 32 33 34 35 36 37 @RestController @CrossOrigin public class OutStoreController { @Autowired private OutStoreService outStoreService; @PostMapping("/doItemOutStore") public Map<String,Object> doItemOutStore (@RequestBody OutStore outStore) { if (outStoreService.saveOutStoreService(outStore)){ return R.success("商品出库成功" ); }else { return R.error("商品出库失败" ); } } @GetMapping("/outStoreList") public Map<String,Object> outStoreList ( @RequestParam(defaultValue = "1") Integer pageNum ,@RequestParam(defaultValue = "3") Integer pageSize) { return outStoreService.queryOutStoreListMapper(pageNum,pageSize); } @GetMapping("/updateOutStore") public Map<String,Object> updateOutStore (Integer id) { OutStore os=new OutStore (); os.setOutsId(id); os.setIsOut("1" ); if (outStoreService.updateById(os)){ return R.success("确认成功" ); }else { return R.error("确认失败" ); } } }
前端实现 在商品信息页添加按钮和对应事件
添加出库按钮
1 <el-button link type ="primary" size ="small" @click ="openOutDialog(row)" > 出库</el-button >
添加出库对话框
1 2 3 4 5 6 7 8 9 10 11 12 13 14 15 16 17 18 19 20 21 22 23 24 25 26 <el-dialog v-model ="itemOutDialog" width ="60%" > <h2 > 商品采购</h2 > <el-form :model ="outForm" label-width ="120px" > <el-form-item label ="商品名称" > {{ outForm.itemName }} </el-form-item > <el-form-item label ="仓库" > {{ outForm.storeName }} </el-form-item > <el-form-item label ="商品库存" > {{ outForm.store }} </el-form-item > <el-form-item label ="出库数量" > <el-input v-model ="outForm.outNum" style ="width: 80%" /> </el-form-item > <el-form-item > <el-button type ="primary" @click ="saveOutOrder" > 保存</el-button > <el-button > 取消</el-button > </el-form-item > </el-form > </el-dialog >
添加相关变量和函数实现
1 2 3 4 5 6 7 8 9 10 11 12 13 14 15 16 17 18 19 20 21 22 23 24 25 26 27 28 29 30 31 32 33 34 35 36 37 38 39 40 41 42 const itemOutDialog=ref (false );const outForm=reactive ({ itemName :'' , storeName :'' , store :0 , outNum :0 , productId : undefined }); function openOutDialog (row ){ itemOutDialog.value =true ; outForm.itemName =row.itemName ; outForm.store =row.store ; outForm.storeName =row.storeName ; outForm.productId = row.id ; outForm.outNum = 0 ; } function saveOutOrder ( if (!outForm.outNum || outForm.outNum <= 0 ) { ElMessage .warning ('请输入正确的出库数量' ); return ; } if (outForm.outNum > outForm.store ) { ElMessage .warning ('出库数量不能大于库存' ); return ; } itemApi.doItemOutStore (outForm) .then ((response ) => { if (response.data .code == 200 ) { itemOutDialog.value = false ; loadItemList (1 ); } ElMessage (response.data .message ); }) .catch ((error ) => { console .log (error); }) }
3.实现出库单分页查询和出库确认 后端实现 OutStore实体类添加属性
1 2 3 4 5 @TableField(exist = false) private String itemName;@TableField(exist = false) private String storeName;
OutStoreMapper接口定义方法
1 2 List<OutStore> queryOutStorListeMapper () ;
实现接口方法
1 2 3 4 5 6 < select id= "queryOutStorListeMapper" resultType= "com.example.demo.pojo.OutStore"> select ose.* , item.item_name, store.store_name from t_out_store ose inner join t_item item on ose.product_id = item.id inner join t_store store on ose.store_id = store.store_id < / select >
OutStoreService添加方法
1 2 3 Map<String,Object> queryOutStoreListMapper (Integer pageNum,Integer pageSize) ;
实现方法
1 2 3 4 5 6 7 8 9 10 11 12 13 14 @Override public Map<String, Object> queryOutStoreListMapper (Integer pageNum, Integer pageSize) { Map<String,Object> result=new HashMap <>(); Page<Object> page = PageHelper.startPage(pageNum, pageSize); List<OutStore> outStoreList = outStoreMapper.queryOutStorListeMapper(); result.put("total" ,page.getTotal()); result.put("outStoreList" ,outStoreList); return result; }
OutStoreController添加方法
1 2 3 4 5 6 7 8 9 10 11 12 13 14 15 16 17 18 19 20 21 22 23 24 25 26 27 @GetMapping("/outStoreList") public Map<String,Object> outStoreList ( @RequestParam(defaultValue = "1") Integer pageNum ,@RequestParam(defaultValue = "3") Integer pageSize) { return outStoreService.queryOutStoreListMapper(pageNum,pageSize); } @GetMapping("/updateOutStore") public Map<String,Object> updateOutStore (Integer id) { Map<String,Object> result=new HashMap <>(); result.put("code" ,400 ); result.put("msg" ,"操作失败......" ); try { OutStore os=new OutStore (); os.setOutsId(id); os.setIsOut("1" ); outStoreService.updateById(os); result.put("code" ,200 ); result.put("msg" ,"出库单确认成功......." ); }catch (Exception ex){ ex.printStackTrace(); } return result; }
前端实现 菜单表添加数据
实现前端页面
1 2 3 4 5 6 7 8 9 10 11 12 13 14 15 16 17 18 19 20 21 22 23 24 25 26 27 28 29 30 31 32 33 34 35 36 37 38 39 40 41 42 43 44 45 46 47 48 49 50 51 52 53 54 55 56 57 58 59 60 61 62 63 64 65 66 67 68 69 70 71 72 73 74 75 76 77 <template > <h2 > 出库单列表</h2 > <el-table :data ="outStoreList" style ="width: 100%" > <el-table-column prop ="storeName" label ="仓库名称" /> <el-table-column prop ="itemName" label ="商品名称" /> <el-table-column prop ="outNum" label ="出库数量" /> <el-table-column prop ="createBy" label ="出库人" /> <el-table-column prop ="createTime" label ="采购时间" width ="200px" /> <el-table-column prop ="isOut" label ="状态" > <template #default ="scope" > <span v-if ="scope.row.isOut == 0" style ="color:green" > 未确认</span > <span v-else style ="color:red" > 已确认</span > </template > </el-table-column > <el-table-column fixed ="right" label ="操作" width ="240" > <template #default ="scope" > <el-button link type ="primary" size ="small" v-if ="scope.row.isOut == 0" @click ="confirmIsOut(scope.row.outsId)" > 确认出库</el-button > </template > </el-table-column > </el-table > <el-pagination small background :page-size ="3" :pager-count ="10" layout ="prev, pager, next" :total ="total" class ="mt-4" @current-change ="handlerOutStorePageChange" /> </template > <script setup > import { onMounted, ref } from "vue" ;import axios from 'axios' ;import { ElMessage } from "element-plus" ;const outStoreList = ref ([]);const total = ref (0 );function queryItmOutServiceList (pageNum ) { axios.get ("http://localhost:8080/outStoreList?pageNum=" + pageNum) .then ((response ) => { outStoreList.value = response.data .outStoreList ; total.value = response.data .total ; }) .catch ((error ) => { console .log (error); }) } onMounted (function ( queryItmOutServiceList (1 ); }) function handlerOutStorePageChange (pageNum ) { queryItmOutServiceList (pageNum); } function confirmIsOut (id ) { axios.get ("http://localhost:8080/updateOutStore?id=" + id) .then ((response ) => { if (response.data .code == 200 ) { queryItmOutServiceList (1 ); } ElMessage (response.data .message ); }) .catch ((err ) => { console .log (err); }) } </script > <style scoped > </style >
4.实现仓库数据增删改查 后端实现 StoreController添加方法
1 2 3 4 5 6 7 8 9 10 11 12 13 14 15 16 17 18 19 20 21 22 23 24 25 26 27 28 29 30 31 32 @GetMapping("/storePageList") public Map<String, Object> queryStoreList ( @RequestParam(defaultValue = "1") Integer pageNum , @RequestParam(defaultValue = "10") Integer pageSize) { Page<Store> page = new Page <>(pageNum, pageSize); List<Store> storeList = storeService.list(page); Map<String, Object> result = new HashMap <>(); result.put("total" , page.getTotal()); result.put("storeList" , storeList); return result; } @PostMapping("/saveStore") public Map<String, Object> saveStore (@RequestBody Store store) { return storeService.save(store) ? R.success("保存仓库信息成功" ) : R.error("保存仓库信息失败" ); } @PostMapping("/updateStore") public Map<String, Object> updateStore (@RequestBody Store store) { return storeService.updateById(store) ? R.success("修改仓库信息成功" ) : R.error("修改仓库信息失败" ); } @PostMapping("/deleteStore") public Map<String, Object> deleteStore (@RequestBody Store store) { return storeService.removeById(store) ? R.success("删除仓库信息成功" ) : R.error("删除仓库信息失败" ); }
前端实现 创建页面
1 2 3 4 5 6 7 8 9 10 11 12 13 14 15 16 17 18 19 20 21 22 23 24 25 26 27 28 29 30 31 32 33 34 35 36 37 38 39 40 41 42 43 44 45 46 47 48 49 50 51 52 53 54 55 56 57 58 59 60 61 62 63 64 65 66 67 68 69 70 71 72 73 74 75 76 77 78 79 80 81 82 83 84 85 86 87 88 89 90 91 92 93 94 95 96 97 98 99 100 101 102 103 104 105 106 107 108 109 110 111 112 113 114 115 116 117 118 119 120 121 122 123 124 125 126 127 128 129 130 131 132 133 134 135 136 137 138 139 140 141 142 143 144 145 146 147 148 149 150 151 152 153 154 155 156 157 158 159 160 161 162 163 164 165 166 167 168 169 170 171 172 173 174 175 176 177 178 179 180 181 182 183 184 <template > <h2 > 仓库列表</h2 > <div style ="text-align: left" > <el-button type ="primary" @click ="openStoreDialog" > 添加仓库</el-button > </div > <el-table :data ="storeList" style ="width: 100%" > <el-table-column prop ="storeName" label ="仓库名称" /> <el-table-column prop ="storeNum" label ="仓库编号" /> <el-table-column prop ="storeAddress" label ="仓库地址" /> <el-table-column prop ="concat" label ="联系人" /> <el-table-column prop ="phone" label ="联系电话" /> <el-table-column fixed ="right" label ="操作" width ="240" > <template #default ="scope" > <el-button link type ="primary" size ="small" @click ="openEditStore(scope.row)" > 修改</el-button > <el-button link type ="primary" size ="small" @click ="deleteStore(scope.row.storeId)" > 删除</el-button > </template > </el-table-column > </el-table > <el-pagination background :page-size ="3" :total ="total" size ="small" :pager-count ="5" layout ="prev, pager, next" class ="mt-4" @current-change ="handlerStorePageChange" /> <el-dialog v-model ="dialogStoreVisible" width ="80%" > <h2 > {{ operationType === 'add' ? '添加仓库信息' : '修改仓库信息' }}</h2 > <el-form :model ="storeForm" label-width ="120px" > <el-form-item label ="仓库名称" > <el-input v-model ="storeForm.storeName" style ="width: 80%" /> </el-form-item > <el-form-item label ="仓库编号" > <el-input v-model ="storeForm.storeNum" style ="width: 80%" /> </el-form-item > <el-form-item label ="仓库地址" > <el-input v-model ="storeForm.storeAddress" style ="width: 80%" /> </el-form-item > <el-form-item label ="联系人" > <el-input v-model ="storeForm.concat" style ="width: 80%" /> </el-form-item > <el-form-item label ="联系电话" > <el-input v-model ="storeForm.phone" style ="width: 80%" /> </el-form-item > <el-form-item > <el-button type ="primary" @click ="subStoreForm" > 保存</el-button > <el-button > 取消</el-button > </el-form-item > </el-form > </el-dialog > </template > <script setup > import { onMounted, reactive, ref } from "vue" ;import { ElMessage } from "element-plus" ;import { storeApi } from '@/api/store' const storeList = ref ([]);const total = ref (0 );function queryStoreList (pageNum ) { storeApi.queryStoreList (pageNum) .then ((response ) => { storeList.value = response.data .storeList ; total.value = response.data .total ; }) .catch ((err ) => { console .log (err); }) } onMounted (function ( queryStoreList (1 ); }); function handlerStorePageChange (pageNum ) { queryStoreList (pageNum); } const dialogStoreVisible = ref (false );const operationType = ref ('add' );const storeForm = reactive ({ storeId : '' , storeName : '' , storeNum : '' , storeAddress : '' , concat : '' , phone : '' }); function resetForm ( storeForm.storeId = '' ; storeForm.storeName = '' ; storeForm.storeNum = '' ; storeForm.storeAddress = '' ; storeForm.concat = '' ; storeForm.phone = '' ; } function openStoreDialog ( dialogStoreVisible.value = true ; operationType.value = 'add' ; resetForm (); } function subStoreForm ( const submitData = { ...storeForm }; if (operationType.value === 'add' ) { delete submitData.storeId ; storeApi.saveStore (submitData) .then ((response ) => { if (response.data .code == 200 ) { queryStoreList (1 ); dialogStoreVisible.value = false ; resetForm (); } ElMessage (response.data .message ); }) .catch ((error ) => { console .log (error); }); } else { storeApi.updateStore (submitData) .then ((response ) => { if (response.data .code == 200 ) { queryStoreList (1 ); dialogStoreVisible.value = false ; resetForm (); } ElMessage (response.data .message ); }) .catch ((error ) => { console .log (error); }); } } function openEditStore (row ) { operationType.value = 'edit' ; dialogStoreVisible.value = true ; Object .assign (storeForm, row); } function deleteStore (id ) { storeApi.deleteStore (id) .then ((response ) => { if (response.data .code == 200 ) { queryStoreList (1 ); } ElMessage (response.data .message ); }) .catch ((error ) => { console .log (error); }) } </script > <style scoped > </style >
Day17 1.实现客户地区分布统计 后端实现 创建CountResult实体类
1 2 3 4 5 6 7 8 9 package com.erp.dto;import lombok.Data;@Data public class CountResult { private String name; private Integer value; }
CustomerMapper添加方法
1 2 public List<CountResult> countCustomerAreaMapper () ;
CustomerMapper.xml定义sql
1 2 3 4 < ! < select id= "countCustomerAreaMapper" resultType= "com.erp.dto.CountResult"> select address 'name' ,count (0 ) 'value' from t_customer group by address < / select >
CustomerService添加方法
1 2 public List<CountResult> countCustService () ;
CustomerServiceImpl实现方法
1 2 3 4 @Override public List<CountResult> countCustService () { return customerMapper.countCustomerAreaMapper(); }
CustomerController添加方法
1 2 3 4 5 @GetMapping("/countCust") public List<CountResult> countCust () { return customerService.countCustService(); }
前端实现 新建CustomerArea.vue页面
1 2 3 4 5 6 7 8 9 10 11 12 13 14 15 16 17 18 19 20 21 22 23 24 25 26 27 28 29 30 31 32 33 34 35 36 37 38 39 40 41 42 43 44 45 46 47 48 49 50 51 52 53 54 55 56 57 58 59 60 61 62 63 64 65 66 67 68 69 70 <template> <!-- div容器用来渲染echarts控件 --> <div id="main" style="width: 100%;height: 100%"></div> </template> <script setup> import * as echarts from 'echarts'; import {onMounted} from "vue"; import axios from "axios"; //定义函数统计客户地区分布 function countCustomerArea(){ //发送ajax请求,获得统计数据 axios.get("http://localhost:8081/countCust") .then((response)=>{ //响应成功渲染图表 var custDom = document.getElementById('main'); var custChart = echarts.init(custDom); var option = { title: { text: '客户地区分布统计', left: 'center' }, tooltip: { trigger: 'item', formatter: '{a} <br/>{b} : {c} ({d}%)' }, toolbox: { show: true, feature: { mark: { show: true }, dataView: { show: true, readOnly: false }, restore: { show: true }, saveAsImage: { show: true } } }, series: [ { name: '客户分布', type: 'pie', radius: [20, 140], center: ['50%', '50%'], roseType: 'area', itemStyle: { borderRadius: 5 }, data:response.data } ] }; option && custChart.setOption(option); }) .catch((error)=>{ console.log(error); }) } //加载视图调用函数 onMounted(function(){ countCustomerArea(); }) </script> <style scoped> </style>
2.实现年-月销售统计 后端实现(年统计) OrderMapper接口定义方法
1 2 public List<Integer> querySellYearMapper () ;
实现接口sql
1 2 3 4 < ! < select id= "querySellYearMapper" resultType= "java.lang.Integer"> select distinct year (order_date) from t_order < / select >
OrderService添加方法
1 2 public List<Map<String, Object>> querySellYearService () ;
OrderServiceImpl实现方法
1 2 3 4 5 6 7 8 9 10 11 12 @Override public List<Map<String, Object>> querySellYearService () { List<Integer> integerList = orderMapper.querySellYearMapper(); List<Map<String, Object>> list=new ArrayList <>(); for (Integer year:integerList){ Map<String, Object> result=new HashMap <>(); result.put("year" ,year); result.put("label" ,year+"年" ); list.add(result); } return list; }
OrderController添加方法
1 2 3 4 5 @GetMapping("/queryYear") public List<Map<String, Object>> queryYear () { return orderService.querySellYearService(); }
后端实现(月统计) 创建SellResult实体类
1 2 3 4 5 6 7 8 9 10 11 package com.erp.dto;import lombok.Data;@Data public class SellResult { private Integer mth; private Double mny; }
OrderMapper添加方法
1 2 public List<SellResult> countSellMonthMapper (String year) ;
OrderMapper.xml定义sql
1 2 3 4 5 6 7 8 < ! < select id= "countSellMonthMapper" resultType= "com.erp.dto.SellResult" parameterType= "java.lang.String"> select month (order_date) mth ,sum (pay_money) mny from t_order where year (order_date) = #{year } group by mth order by mth < / select >
OrderService添加方法
1 public Map<String,Object> queryYearMonthService (String year) ;
OrderServiceImpl实现方法
1 2 3 4 5 6 7 8 9 10 11 12 13 14 15 16 17 18 19 20 21 22 23 24 25 26 27 28 29 @Override public Map<String, Object> queryYearMonthService (String year) { List<SellResult> sellResults = orderMapper.countSellMonthMapper(year); Map<String, Object> result=new HashMap <>(); List<String> mths=new ArrayList (); List<Double> mnys=new ArrayList <>(); for (int m=1 ;m<=12 ;m++){ mths.add(m+"月" ); mnys.add(0.0 ); } for (SellResult sr:sellResults){ System.out.println("sr=====" +sr); if (sr!=null ){ System.out.println(sr.getMth()-1 +"------" +sr.getMny()); Integer mth = sr.getMth(); mnys.set(mth-1 ,sr.getMny()); } } result.put("xdata" ,mths); result.put("ydata" ,mnys); return result; }
OrderController添加方法
1 2 3 4 5 6 /*处理某年12个月销售额的请求*/ @GetMapping("/countSell") public Map<String,Object> countYearSell(String year){ return orderService.queryYearMonthService(year); }
前段实现 1 2 3 4 5 6 7 8 9 10 11 12 13 14 15 16 17 18 19 20 21 22 23 24 25 26 27 28 29 30 31 32 33 34 35 36 37 38 39 40 41 42 43 44 45 46 47 48 49 50 51 52 53 54 55 56 57 58 59 60 61 62 63 64 65 66 67 68 69 70 71 72 73 74 75 76 77 78 79 80 81 82 83 84 85 86 87 88 89 90 91 92 <template > <h2 > 请选择年份</h2 > <el-form :model ="yearForm" label-width ="120px" :inline ="true" > <el-form-item label ="年份" style ="width: 34%" > <el-select v-model ="yearForm.year" class ="m-2" placeholder ="请选择年份" @change ="handleYearMthSell" > <el-option v-for ="item in yearList" :key ="item.year" :label ="item.label" :value ="item.year" /> </el-select > </el-form-item > </el-form > <div id ="sellCharts" style ="width: 100%; height: 100%" > </div > </template > <script setup > import {onMounted, reactive, ref} from "vue" ;import axios from "axios" ;import * as echarts from "echarts" ;const yearForm=reactive ({ year :'' }); const yearList=ref ([]);function loadYear ( axios.get ("http://localhost:8081/queryYear" ) .then ((response )=> { yearList.value =response.data ; }) .catch ((error )=> { console .log (error); }) } onMounted (function ( loadYear (); }); function handleYearMthSell (year ){ console .log (year); axios.get ("http://localhost:8081/countSell?year=" +year) .then ((response )=> { var sellDom = document .getElementById ('sellCharts' ); var sellChart = echarts.init (sellDom); var option = { xAxis : { type : 'category' , data : response.data .xdata }, yAxis : { type : 'value' }, series : [ { data : response.data .ydata , type : 'bar' , showBackground : true , backgroundStyle : { color : 'rgba(180, 180, 180, 0.2)' } } ] }; option && sellChart.setOption (option); }) .catch ((error )=> {}) } </script > <style scoped > </style >
Day18 1.实现员工信息统计 后端实现(年龄分布统计) UserMapper接口添加方法
1 2 public List<CountResult> countEmployeeAageMapper () ;
UserMapper.xml定义SQL
1 2 3 4 5 6 7 8 9 10 11 12 13 14 < ! < select id= "countEmployeeAageMapper" resultType= "com.erp.dto.CountResult"> select count (id) 'value' , CASE WHEN age between 18 and 25 THEN '[18 TO 25]' WHEN age between 26 and 30 THEN '[26 TO 30]' WHEN age between 31 and 35 THEN '[31 TO 35]' WHEN age between 36 and 40 THEN '[36 TO 40]' WHEN age between 41 and 45 THEN '[41 TO 45]' ELSE '[56 TO 100]' END 'name' from t_user group by name < / select >
UserService添加方法
1 2 public List<CountResult> countEmployeeAageService () ;
UserServiceImpl实现方法
1 2 3 4 @Override public List<CountResult> countEmployeeAageService () { return userMapper.countEmployeeAageMapper(); }
UserController添加方法
1 2 3 4 5 @GetMapping("/countEmpAge") public List<CountResult> countEmpAge () { return userService.countEmployeeAageService(); }
后端实现(学历分布统计) UserMapper添加方法
1 2 public List<CountResult> countEmployeeEduMapper () ;
UserMapper.xml定义sql
1 2 3 4 < ! < select id= "countEmployeeEduMapper" resultType= "com.erp.dto.CountResult"> select edu name, count (id) value from t_user group by edu < / select >
UserService添加方法
1 2 public List<CountResult> countEmployeeEduService () ;
UserServiceImpl实现方法
1 2 3 4 @Override public List<CountResult> countEmployeeEduService () { return userMapper.countEmployeeEduMapper(); }
UserController添加方法
1 2 3 4 5 @GetMapping("/countEmpEdu") public List<CountResult> countEmpEdu () { return userService.countEmployeeEduService(); }
前端实现 在menu表中注册页面
实现员工信息统计页面
1 2 3 4 5 6 7 8 9 10 11 12 13 14 15 16 17 18 19 20 21 22 23 24 25 26 27 28 29 30 31 32 33 34 35 36 37 38 39 40 41 42 43 44 45 46 47 48 49 50 51 52 53 54 55 56 57 58 59 60 61 62 63 64 65 66 67 68 69 70 71 72 73 74 75 76 77 78 79 80 81 82 83 84 85 86 87 88 89 90 91 92 93 94 95 96 97 98 99 100 101 102 103 104 105 106 107 108 109 110 111 112 113 114 115 116 117 118 119 120 121 122 123 <template > <h2 > 员工信息统计</h2 > <el-button type ="success" @click ="countEmpAge" > 年龄分布统计</el-button > <el-button type ="success" @click ="countEmpEdu" > 学历分布统计</el-button > <hr /> <div id ="empInfo" style ="width:100%;height: 100%" > </div > </template > <script setup > import * as echarts from 'echarts' import {onMounted} from "vue" ;import axios from "axios" ;function countEmpAge ( axios.get ("http://localhost:8081/countEmpAge" ) .then (response => var empDom=document .getElementById ("empInfo" ); var ageEcharts=echarts.init (empDom) var option = { tooltip : { trigger : 'item' }, legend : { top : '5%' , left : 'center' }, series : [ { name : '员工年龄分部' , type : 'pie' , radius : ['40%' , '70%' ], avoidLabelOverlap : false , padAngle : 5 , itemStyle : { borderRadius : 10 }, label : { show : false , position : 'center' }, emphasis : { label : { show : true , fontSize : 40 , fontWeight : 'bold' } }, labelLine : { show : false }, data :response.data } ] }; option&&ageEcharts.setOption (option); }) .catch (error => } onMounted (function ( countEmpAge (); }) function countEmpEdu ( axios.get ("http://localhost:8081/countEmpEdu" ) .then ((response )=> { var empDom=document .getElementById ("empInfo" ); var eudEcharts=echarts.init (empDom) var option = { tooltip : { trigger : 'item' }, legend : { top : '5%' , left : 'center' }, series : [ { name : '员工学历分部' , type : 'pie' , radius : ['40%' , '70%' ], avoidLabelOverlap : false , padAngle : 5 , itemStyle : { borderRadius : 10 }, label : { show : false , position : 'center' }, emphasis : { label : { show : true , fontSize : 40 , fontWeight : 'bold' } }, labelLine : { show : false }, data :response.data } ] }; option&&eudEcharts.setOption (option); }) .catch ((error )=> { console .log (error); }); } </script > <style scoped > </style >
修改index.vue,注册页面
2.实现投诉问题统计 后端实现(问题类型统计) AfterSalesMapper添加方法
1 2 public List<CountResult> countQuestionTypeService () ;
AfterSalesMapper.xml定义sql
1 2 3 4 5 6 7 8 9 10 11 < select id= "countQuestionTypeMapper" resultType= "com.erp.dto.CountResult"> select sum 'value' , concat(question, ' : ' , TRUNCATE (sum/ total* 100 , 2 ), '%' ) 'name' from ( select question, count (id) sum, (select count (id) from t_after_sales) total from t_after_sales group by question ) out_table < / select >
AfterSalesService添加方法
1 2 public List<CountResult> countQuestionTypeService () ;
AfterSalesServiceImpl实现方法
1 2 3 4 @Override public List<CountResult> countQuestionTypeService () { return afterSalesMapper.countQuestionTypeMapper(); }
AfterSalesController添加方法
1 2 3 4 5 @GetMapping("/countQuestionType") public List<CountResult> countQuestionType () { return afterSalesService.countQuestionTypeService(); }
后端实现(问题状态统计) AfterSalesMapper添加方法
1 2 public List<CountResult> countQuestionStateMapper () ;
AfterSalesMapper.xml顶级sql
1 2 3 4 5 6 7 8 9 10 11 12 13 < ! < select id= "countQuestionStateMapper" resultType= "com.erp.dto.CountResult"> select sum 'value' , concat(' [ ' , state, ' ] ' , TRUNCATE (sum/ total* 100 , 2 ), '%' ) 'name' from ( select state, count (id) sum, (select count (id) from t_after_sales) total from t_after_sales group by state ) out_table < / select >
AfterSalesService添加方法
1 2 public List<CountResult> countQuestionStateService () ;
AfterSalesServiceImpl实现方法
1 2 3 4 @Override public List<CountResult> countQuestionStateService () { return afterSalesMapper.countQuestionStateMapper(); }
AfterSalesController添加方法
1 2 3 4 5 @GetMapping("/countQuestionState") public List<CountResult> countQuestionState () { return afterSalesService.countQuestionStateService(); }
前端实现 在menu表中注册页面
实现投诉问题统计页面
1 2 3 4 5 6 7 8 9 10 11 12 13 14 15 16 17 18 19 20 21 22 23 24 25 26 27 28 29 30 31 32 33 34 35 36 37 38 39 40 41 42 43 44 45 46 47 48 49 50 51 52 53 54 55 56 57 58 59 60 61 62 63 64 65 66 67 68 69 70 71 72 73 74 75 76 77 78 79 80 81 82 83 84 85 86 87 88 89 90 91 92 93 94 95 96 97 98 99 100 101 102 103 104 105 106 107 108 109 110 111 112 113 114 115 116 117 118 119 120 121 122 123 124 125 126 <template > <h2 > 投诉统计</h2 > <el-button type ="success" @click ="questionTypeCount" > 投诉类型统计</el-button > <el-button type ="success" @click ="questionStateCount" > 回复状态统计</el-button > <div id ="questionInfo" style ="width:100%;height: 100%" > </div > </template > <script setup > import * as echarts from "echarts" ; import {onMounted} from "vue" ; import axios from "axios" ; function questionTypeCount ( axios.get ("http://localhost:8081/countQuestionType" ) .then ((response )=> { var questionDom=document .getElementById ("questionInfo" ); var typeEcharts=echarts.init (questionDom) var option = { tooltip : { trigger : 'item' }, legend : { top : '5%' , left : 'center' }, series : [ { name : '投诉问题类型数据' , type : 'pie' , radius : ['40%' , '70%' ], avoidLabelOverlap : false , padAngle : 5 , itemStyle : { borderRadius : 10 }, label : { show : false , position : 'center' }, emphasis : { label : { show : true , fontSize : 40 , fontWeight : 'bold' } }, labelLine : { show : false }, data :response.data } ] }; option&& typeEcharts.setOption (option); }) .catch ((error )=> { console .log (error); }); } onMounted (function ( questionTypeCount (); }) function questionStateCount ( axios.get ("http://localhost:8081/countQuestionState" ) .then ((response )=> { var quesDom=document .getElementById ("questionInfo" ); var stateEcharts=echarts.init (quesDom) var option = { tooltip : { trigger : 'item' }, legend : { top : '5%' , left : 'center' }, series : [ { name : '回复状态统计' , type : 'pie' , radius : ['40%' , '70%' ], avoidLabelOverlap : false , padAngle : 5 , itemStyle : { borderRadius : 10 }, label : { show : false , position : 'center' }, emphasis : { label : { show : true , fontSize : 40 , fontWeight : 'bold' } }, labelLine : { show : false }, data : response.data } ] }; option && stateEcharts.setOption (option); }) .catch ((error )=> { console .log (error); }); } </script > <style scoped > </style >
修改index.vue,注册页面
3.实现统计12个月销售量 后端实现 OrderMapper添加方法
1 2 public List<SellResult> countSellNumMapper (String year) ;
OrderMapper.xml定义sql
1 2 3 4 5 6 7 < ! < select id= "countSellNumMapper" resultType= "com.erp.dto.SellResult"> select month (order_date) mth, sum (num) mny from t_order where year (order_date)= #{year } group by mth order by mth < / select >
OrderService添加方法
1 2 public Map<String, Object> querySellNumService (String year) ;
OrderServiceImpl实现方法
1 2 3 4 5 6 7 8 9 10 11 12 13 14 15 16 17 18 19 20 21 22 23 24 25 26 27 @Override public Map<String, Object> querySellNumService (String year) { List<SellResult> sellResults = orderMapper.countSellNumMapper(year); List<String> mths = new ArrayList <>(); List<Double> nums = new ArrayList <>(); for (int x = 1 ; x <= 12 ; x++) { mths.add(x + "月" ); nums.add((double ) 0 ); } for (SellResult sr : sellResults) { if (sr != null ) { nums.set(sr.getMth() - 1 , sr.getMny()); } } Map<String, Object> result = new HashMap <>(); result.put("xdata" , mths); result.put("ydata" , nums); return result; }
OrderController添加方法
1 2 3 4 5 @GetMapping("/countNum") public Map<String, Object> countNum (String year) { return orderService.querySellNumService(year); }
前端实现 在menu表中注册页面
实现销售额统计页面
1 2 3 4 5 6 7 8 9 10 11 12 13 14 15 16 17 18 19 20 21 22 23 24 25 26 27 28 29 30 31 32 33 34 35 36 37 38 39 40 41 42 43 44 45 46 47 48 49 50 51 52 53 54 55 56 57 58 59 60 61 62 63 64 65 66 67 68 69 70 71 72 73 74 75 76 77 78 79 80 81 82 83 84 85 86 87 88 89 90 91 92 93 94 95 96 97 98 99 100 101 102 103 104 105 106 107 108 109 110 111 112 <template > <div class ="common-layout" > <el-container > <el-header class ="top" > ERP-欢乐斗地主小组</el-header > <el-container > <el-aside width ="240px" class ="left" > 系统菜单 <el-menu class ="el-menu-vertical-demo" @select ="handlerSelect" > <el-sub-menu v-for ="menu in menus" :index ="String(menu.id)" > <template #title > <span > {{ menu.label }}</span > </template > <el-menu-item v-for ="subMenu in menu.subMenus" :index ="String(subMenu.id)" > {{subMenu.label}} </el-menu-item > </el-sub-menu > </el-menu > </el-aside > <el-main class ="right" > <component :is ="currentComponent" > </component > </el-main > </el-container > </el-container > </div > </template > <script setup > import AddCustomer from "@/views/AddCustomer" ; import ListCustomer from "@/views/ListCustomer" ; import AddSellJh from "@/views/AddSellJh" ; import ListSellJh from "@/views/ListSellJh" ; import ListCustOrder from "@/views/ListCustOrder" ; import ListAfterSale from "@/views/ListAfterSale" import TreeDemo from '@/views/TreeDemo' import AddMenus from '@/views/AddMenus' import RoleManager from '@/views/RoleManager' import UserManager from '@/views/UserManager' import CategoryManager from '@/views/CategoryManager' import ItemManager from '@/views/ItemManager' import BuyListManager from '@/views/BuyListManager' import InStoreList from '@/views/InStoreList' import ListOutStore from '@/views/ListOutStore' import ListStore from '@/views/ListStore' import CustomerArea from '@/views/CustomerArea' import YearMonthCount from '@/views/YearMonthCount' import EmployeeCount from '@/views/EmployeeCount' import AfterSaleCount from '@/views/AfterSaleCount' import YearNumCount from '@/views/YearNumCount' ; import {onMounted, ref} from "vue" ; import axios from 'axios' ; const views=[AddCustomer ,ListCustomer ,ListAfterSale ,ListCustOrder ,AddSellJh ,CustomerArea ,YearMonthCount ,ListSellJh ,AddMenus ,UserManager ,RoleManager ,,TreeDemo ,,CategoryManager ,ItemManager ,BuyListManager ,InStoreList ,ListOutStore ,ListStore ,EmployeeCount ,AfterSaleCount ,YearNumCount ]; const currentComponent=ref (views[0 ]); const menus=ref ([]); const handlerSelect=function (id ){ console .log (id); axios.get ("http://localhost:8081/compIndex?id=" +id) .then ((response )=> { currentComponent.value =views[response.data ]; }) .catch ((error )=> { console .log (error); }); } onMounted (function ( axios.get ("http://localhost:8081/listMenus" ) .then ((response )=> { console .log (response); menus.value =response.data ; }) .catch ((error )=> { console .log (error); }); }); </script > <style scoped > .top { background-color : azure; padding-top : 15px ; } .left { background-color : blanchedalmond; height : 600px ; } .right { background-color : cornsilk; } </style >
修改index.vue,注册页面
杂项 0.配置编辑器提升编码体验 格式化代码 教程:VS Code批量格式化文件
IDEA格式化项目中所有文件的方法
自动导包 IDEA 自动导包&删除包(图文讲解)
多文件搜索 在写java代码的时候,经常需要找到某个实体类相关的mapper,service和controller代码
在idea中,可以双击shift按钮打开全局搜索,搜索该层级代码即可快速找到并打开相关代码文件
1.屏蔽某些不影响程序的警告 前端 改变窗口大小时弹出黑框警告 按照下面的教程在main.js里加代码就行
element-plus的el-select报ResizeObserver loop completed with undelivered notifications错的一种可能原因及解决方案
样式定义错误警告 如果遇到以下报错
1 2 runtime-core.esm-bundler.js:238 [Vue warn]: Invalid prop: custom validator check failed for prop "pagerCount" . at <ElPagination small="" background="" page-size=10 ... >
需要看看相关定义是不是缺少属性值
例如我这里就是没有指定是size属性,而是直接写了small值
错误代码:
1 <el-pagination small background :page-size ="10" :pager-count ="7" layout ="prev, pager, next" :total ="total" class ="mt-4" @current-change ="rolerPageChange" />
正确代码:
1 <el-pagination size ="small" background :page-size ="10" :pager-count ="7" layout ="prev, pager, next" :total ="total" class ="mt-4" @current-change ="rolerPageChange" />
Invalid prop警告 遇到类似下面这种警告
1 2 runtime-core.esm-bundler.js:238 [Vue warn]: Invalid prop: custom validator check failed for prop "pagerCount" . at <ElPagination size="small" background="" page-size=10 ... >
这是应为pagerCount 属性必须是 5 到 21 之间的奇数
例如下面这个位置,pager-count必须为奇数
1 2 <el-pagination size ="small" background :page-size ="10" :pager-count ="7" layout ="prev, pager, next" :total ="totalReplay" class ="mt-4" @current-change ="handlerReplayPageChange" />
后端 解决mybatis的mapper文件中错误 报错提示:应为 <statement> 或 DELIMITER,得到 ‘id‘
解决方法
2.优化接口的定义 后端优化 优化策略与辅助工具:
在进行 Controller 精简时,引入以下辅助机制:
统一响应工具类 (ResponseUtil) :code(状态码)、message(/msg,提示信息)以及可选的 data(业务数据)字段的 Map<String, Object> 或自定义响应对象。这样避免在每个 Controller 方法中手动创建和填充 HashMap。
1 2 3 4 5 6 7 8 9 10 11 12 13 14 15 16 17 18 19 20 21 22 23 24 25 26 27 28 29 30 31 32 33 34 35 package com.example.demo.util;import java.util.HashMap;import java.util.Map;public class ResponseUtil { private static final String KEY_CODE = "code" ; private static final String KEY_MESSAGE = "message" ; public static Map<String, Object> success (String message) { Map<String, Object> result = new HashMap <>(); result.put(KEY_CODE, 200 ); result.put(KEY_MESSAGE, message); return result; } public static <T> Map<String, Object> success (String message, T data) { Map<String, Object> result = success(message); result.put("data" , data); return result; } public static Map<String, Object> error (int code, String message) { Map<String, Object> result = new HashMap <>(); result.put(KEY_CODE, code); result.put(KEY_MESSAGE, message); return result; } public static Map<String, Object> error (String message) { return error(400 , message); } }
全局异常处理 (@ControllerAdvice & @ExceptionHandler) :@ControllerAdvice 注解的类,并结合 @ExceptionHandler 注解的方法,可以集中处理所有 Controller(或指定包下的 Controller)抛出的异常。这样做的好处是:
Controller 方法中不再需要 try-catch 块来捕获通用异常。 统一了错误响应的格式。 便于统一记录错误日志。 可以针对不同类型的异常返回不同的 HTTP 状态码和错误信息。 我用的全局异常处理代码:
1 2 3 4 5 6 7 8 9 10 11 12 13 14 15 16 17 18 19 20 21 22 23 package com.example.demo.config;import com.example.demo.util.ResponseUtil;import org.slf4j.Logger;import org.slf4j.LoggerFactory;import org.springframework.web.bind.annotation.ControllerAdvice;import org.springframework.web.bind.annotation.ExceptionHandler;import org.springframework.web.bind.annotation.ResponseBody;import java.util.Map;@ControllerAdvice @ResponseBody public class GlobalExceptionHandler { private static final Logger logger = LoggerFactory.getLogger(GlobalExceptionHandler.class); @ExceptionHandler(Exception.class) public Map<String, Object> handleGlobalException (Exception e) { logger.error("发生未捕获异常: " , e); return ResponseUtil.error(500 , "服务器内部错误,请稍后再试或联系管理员" ); } }
Service 层承担业务逻辑 :
现在,让我们看看 OrderController 在应用这些策略前后的代码对比。
在优化之前,OrderController 的每个方法都包含了手动创建响应 Map 以及 try-catch 块来处理异常和构建不同状态的响应。
1 2 3 4 5 6 7 8 9 10 11 12 13 14 15 16 17 18 19 20 21 22 23 24 25 26 27 28 29 30 31 32 33 34 35 36 37 38 39 40 41 42 43 44 @PostMapping("/saveOrder") public Map<String, Object> saveOrder (@RequestBody Order order) { Map<String, Object> result = new HashMap <>(); try { orderService.save(order); result.put("code" , 200 ); result.put("message" , "添加成功" ); } catch (Exception e) { result.put("code" , 400 ); result.put("message" , "添加失败" ); } return result; } @DeleteMapping("/deleteOrder/{id}") public Map<String, Object> deleteOrder (@PathVariable Integer id) { Map<String, Object> result = new HashMap <>(); try { orderService.removeById(id); result.put("code" , 200 ); result.put("message" , "删除成功" ); } catch (Exception e) { result.put("code" , 400 ); result.put("message" , "删除失败" ); } return result; } @PutMapping("/updateOrder") public Map<String, Object> updateOrder (@RequestBody Order order) { Map<String, Object> result = new HashMap <>(); try { orderService.updateById(order); result.put("code" , 200 ); result.put("message" , "修改成功" ); } catch (Exception e) { result.put("code" , 400 ); result.put("message" , "修改失败" ); } return result; }
应用了上述优化策略后,Controller 代码变得更加简洁和专注。
1 2 3 4 5 6 7 8 9 10 11 12 13 14 15 16 17 18 19 20 21 22 23 @PostMapping("/saveOrder") public Map<String, Object> saveOrder (@RequestBody Order order) { orderService.save(order); return ResponseUtil.success("添加成功" ); } @DeleteMapping("/deleteOrder/{id}") public Map<String, Object> deleteOrder (@PathVariable Integer id) { boolean removed = orderService.removeById(id); if (removed) {return ResponseUtil.success("删除成功" );} else {return ResponseUtil.error(400 , "删除失败,订单可能不存在" );} } @PutMapping("/updateOrder") public Map<String, Object> updateOrder (@RequestBody Order order) { boolean updated = orderService.updateById(order); if (updated) {return ResponseUtil.success("修改成功" );} else {return ResponseUtil.error(400 , "修改失败,订单可能不存在或数据无变更" );} }
Controller 方法体大大缩减,逻辑更清晰。更专注于接收请求、调用 Service 和基于 Service 的直接业务结果(如 boolean 返回值)来构建响应。
统一处理 :异常由GlobalExceptionHandler 统一处理,响应由ResponseUtil 统一构建。易于维护 :修改响应格式或异常处理逻辑时,只需改动工具类或全局处理器。健壮性提升 :对于 Service 层返回 boolean 的方法,优化后的代码能更明确地根据业务结果来判断成功或失败,并给出相应的提示。
引入统一响应处理和全局异常捕获机制后,有效地精简 Controller 层的代码,使其职责更加单一,从而提高整个后端应用的开发效率和代码质量。对于那些 Service 方法本身就返回特定数据结构(如分页查询直接返回 Map)的接口,可以保持其原有返回,因为它们不一定适用标准的 code/message 包装。
前端优化 
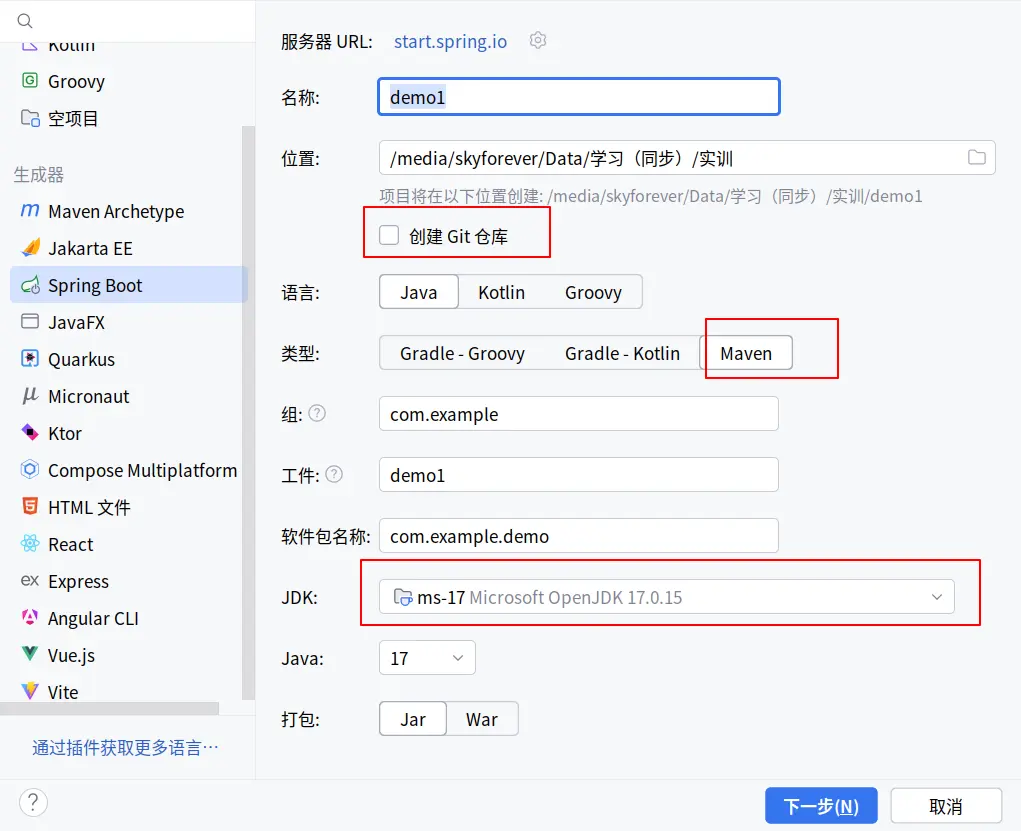 .
.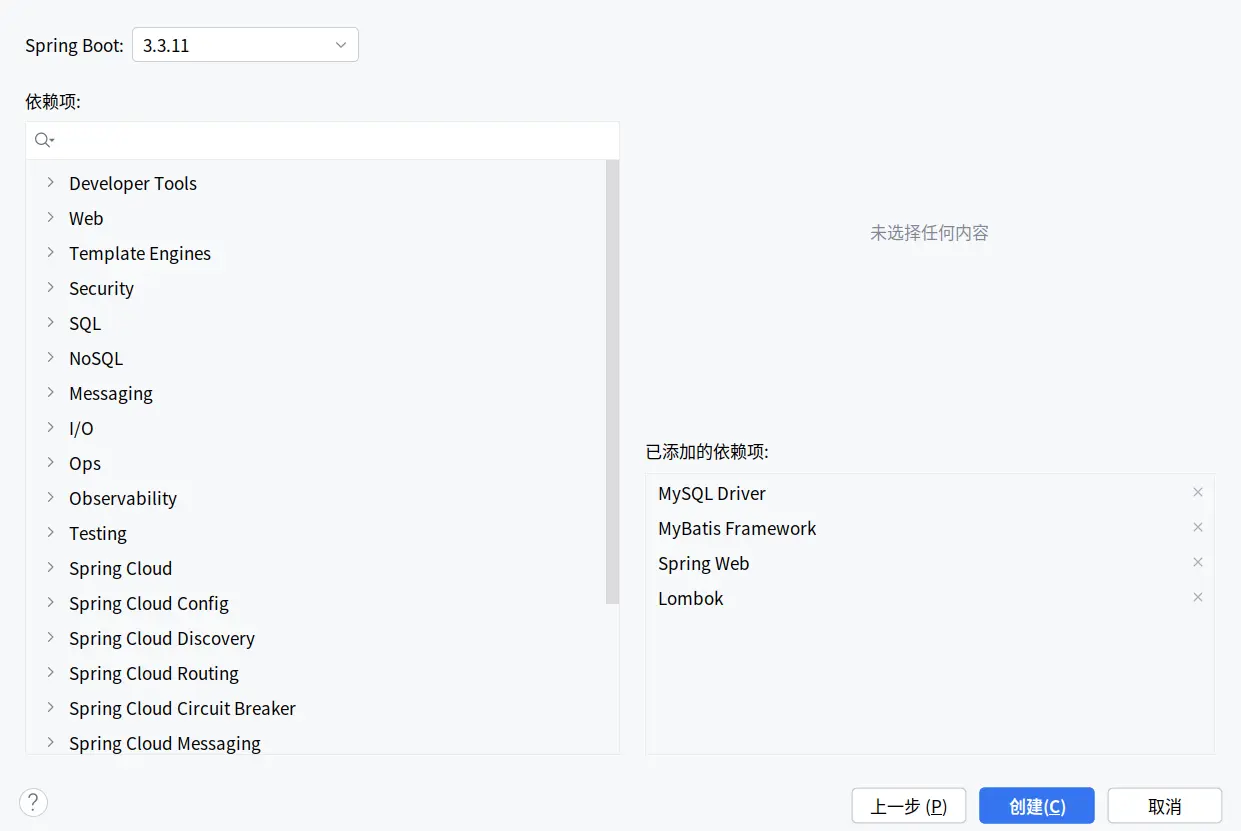 .
.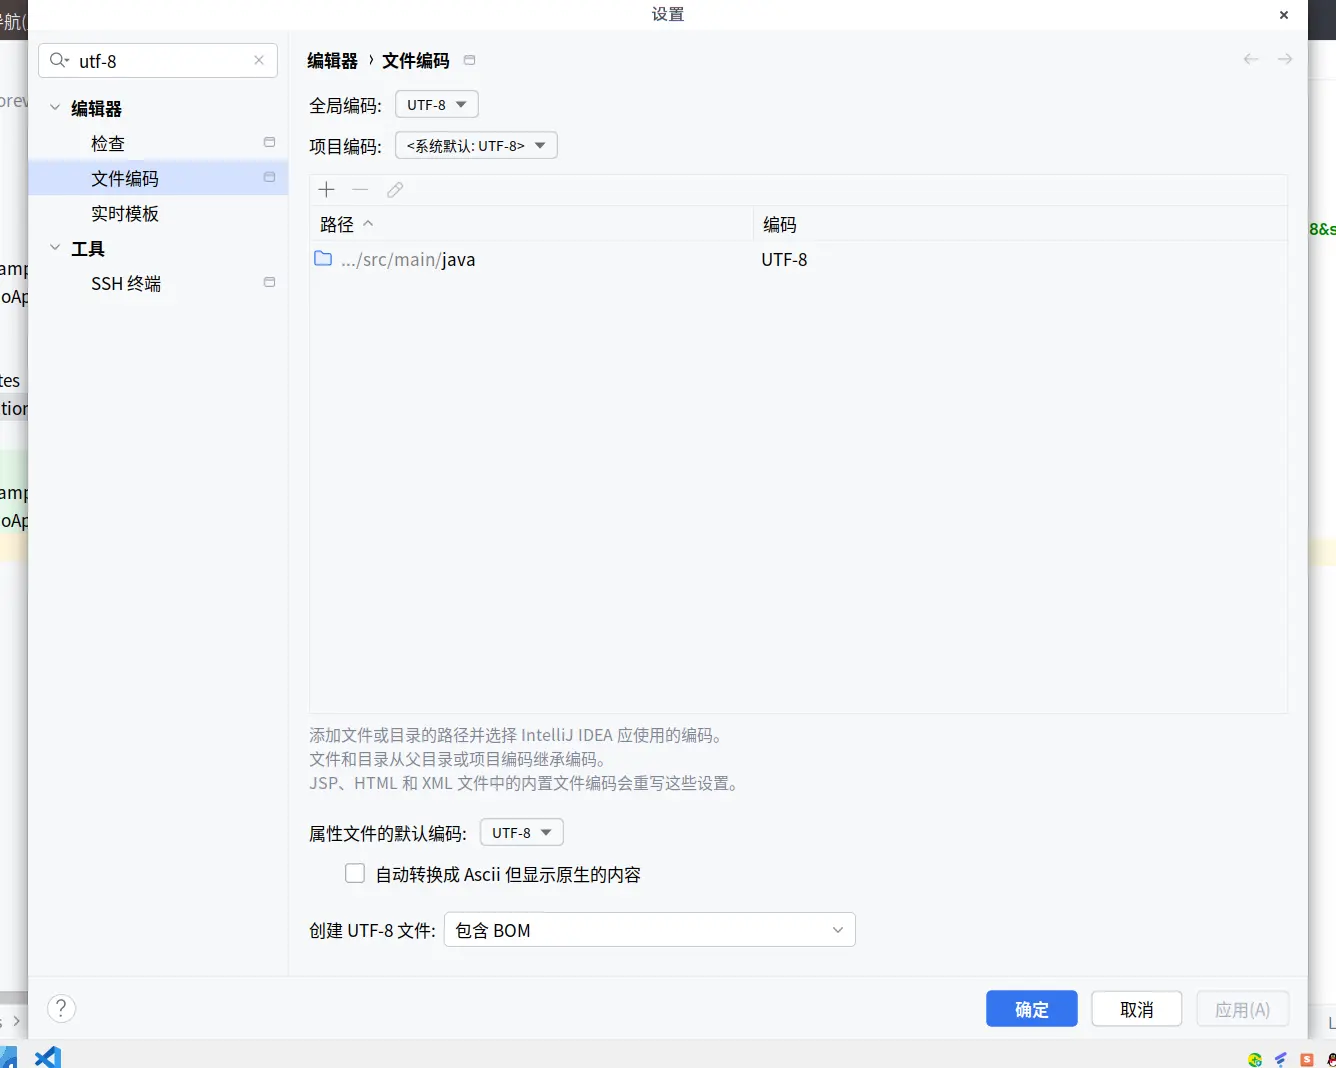 .
.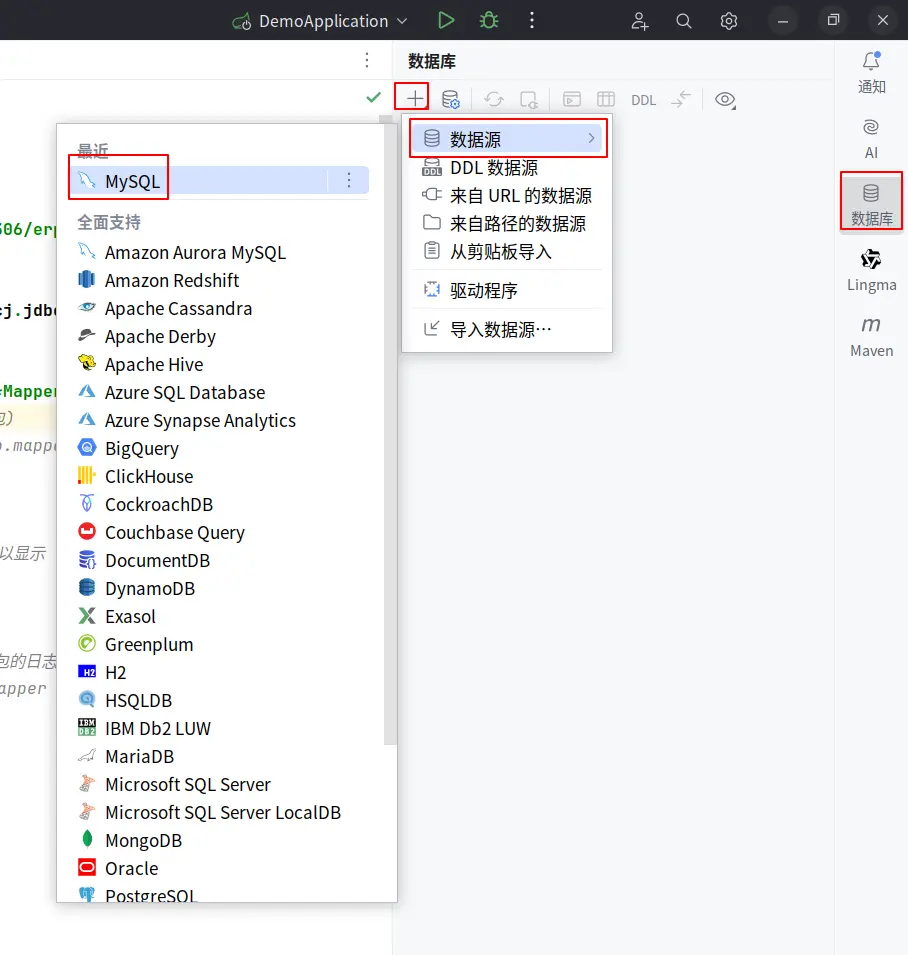 .
.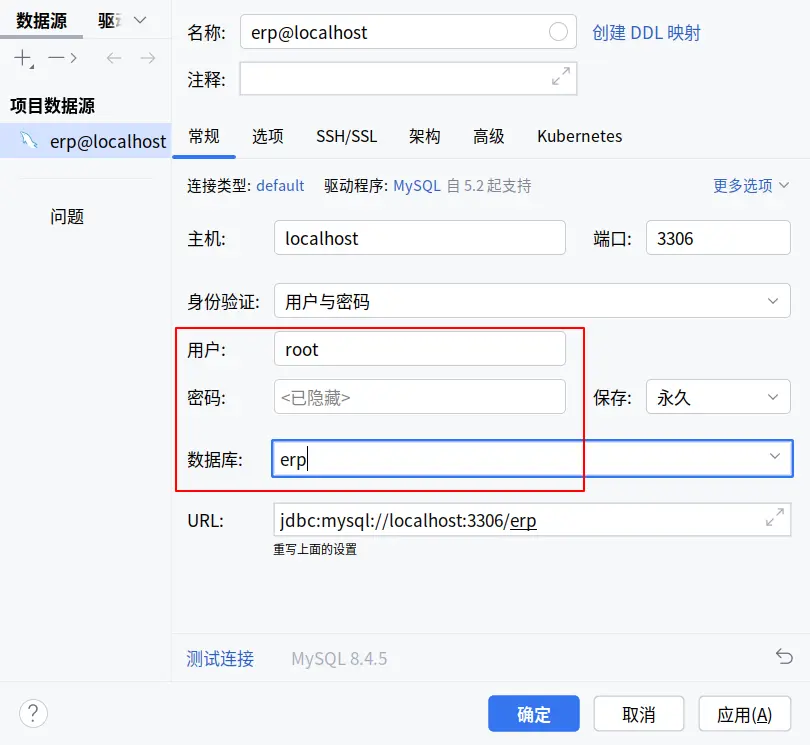 .
.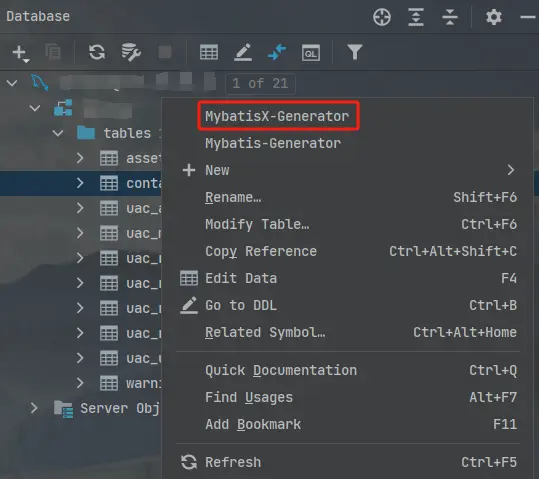 。
。 .
.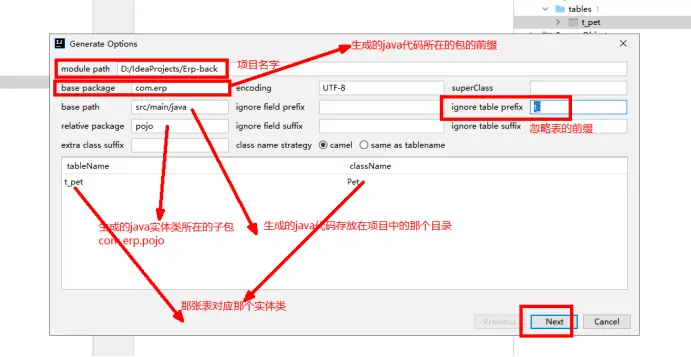 .
.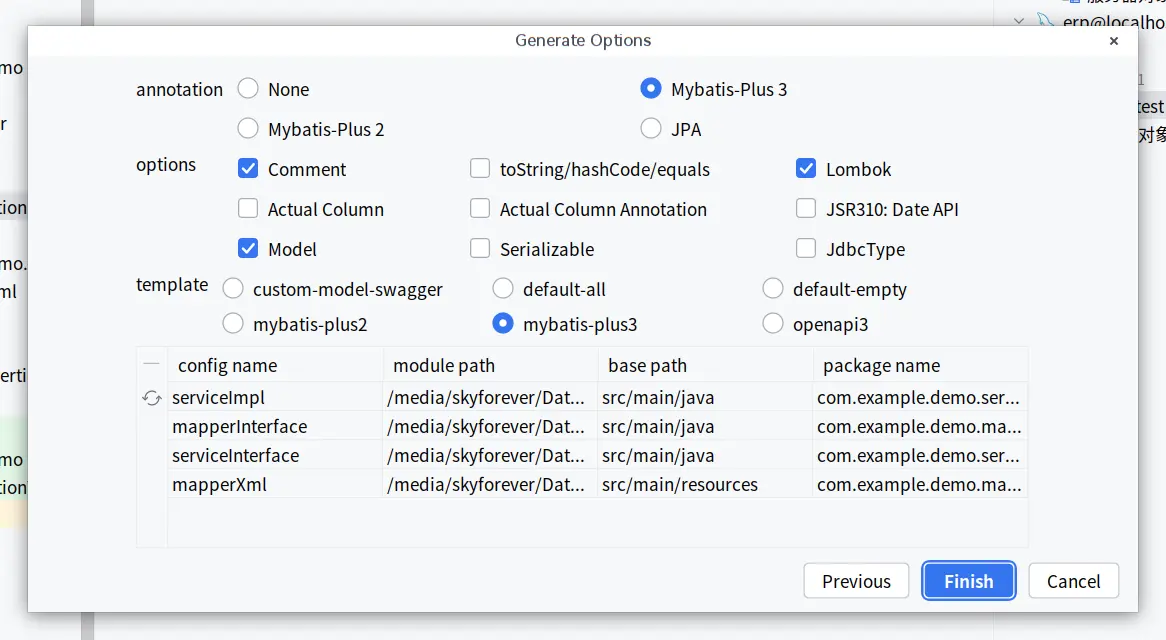 .
.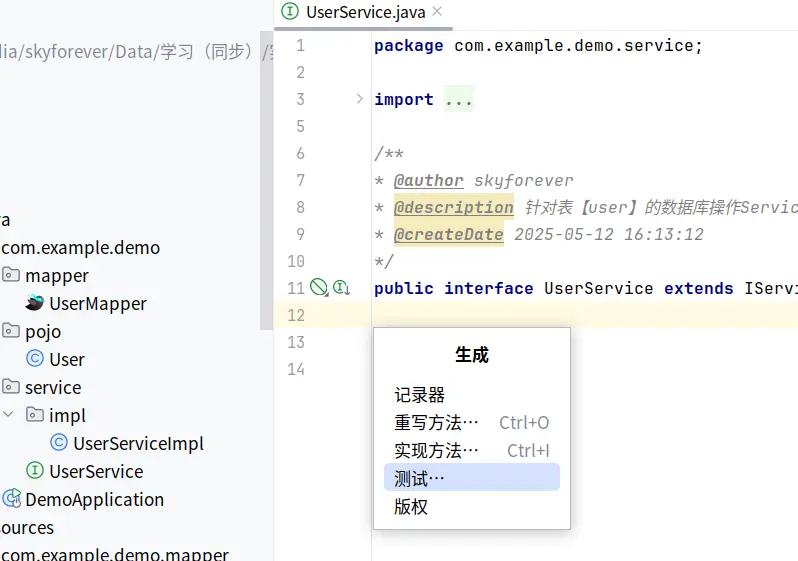 .
.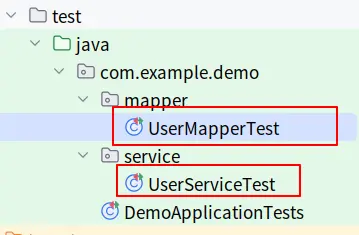 .
.
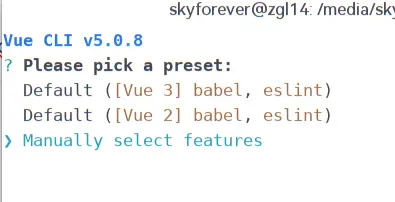
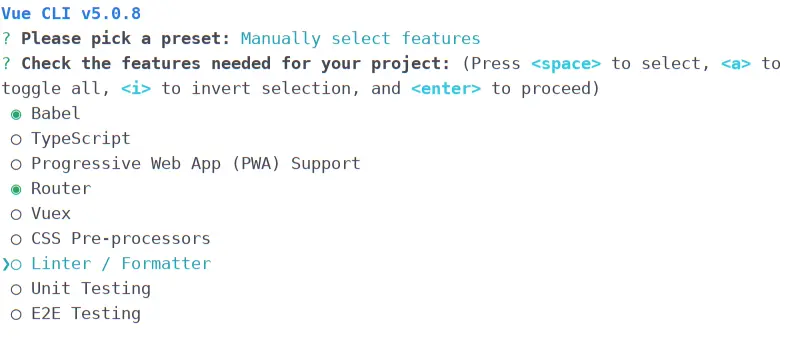
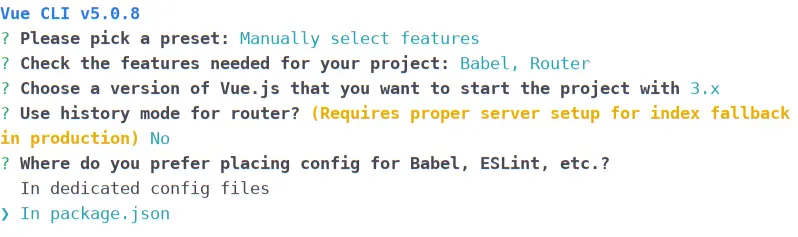
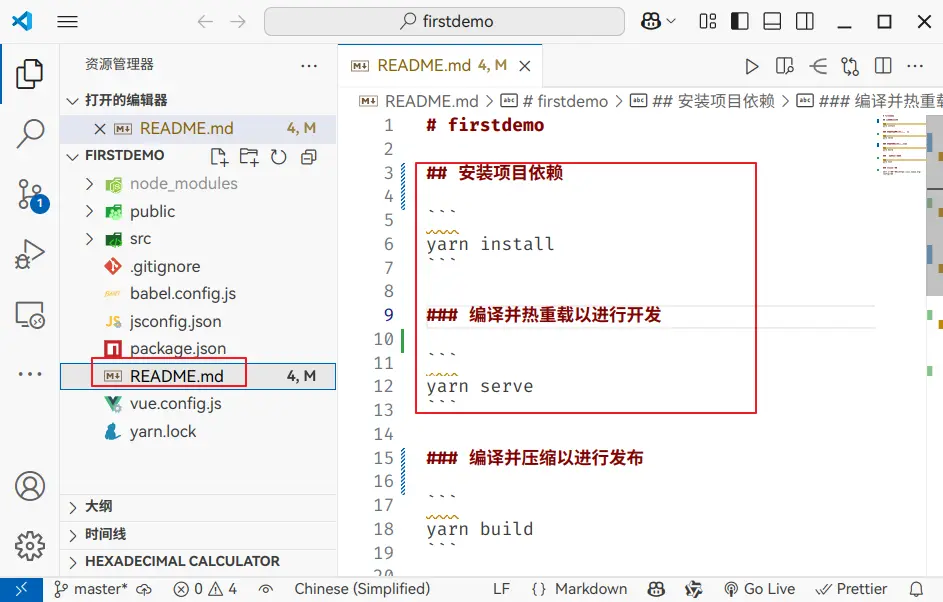 .
.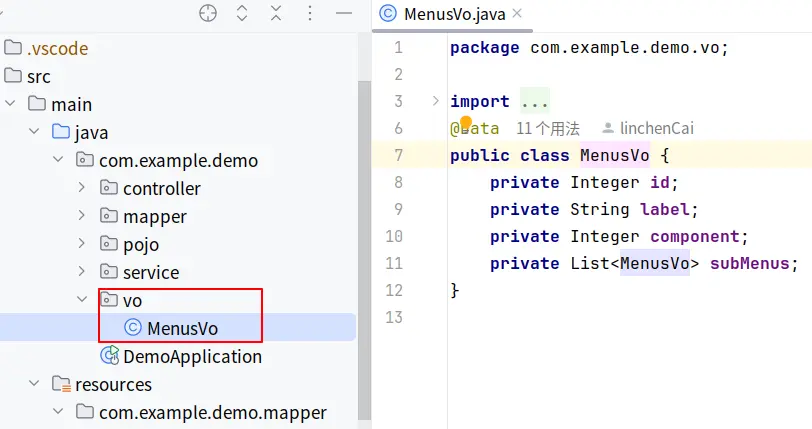 .
.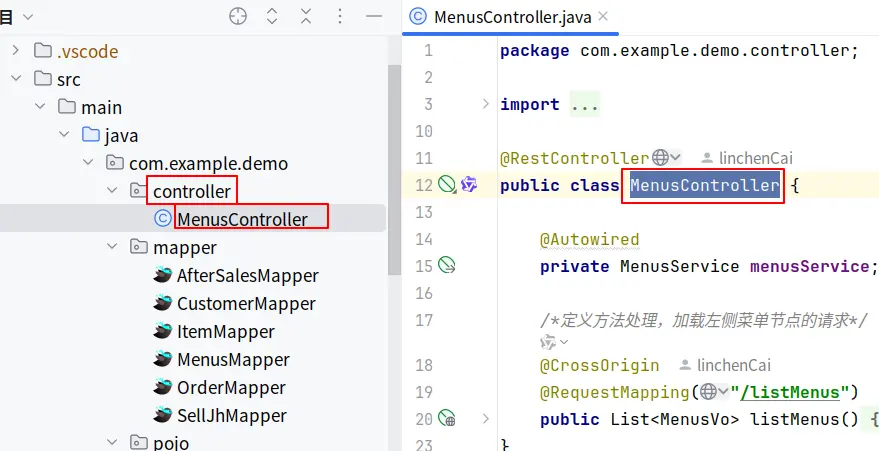 .
.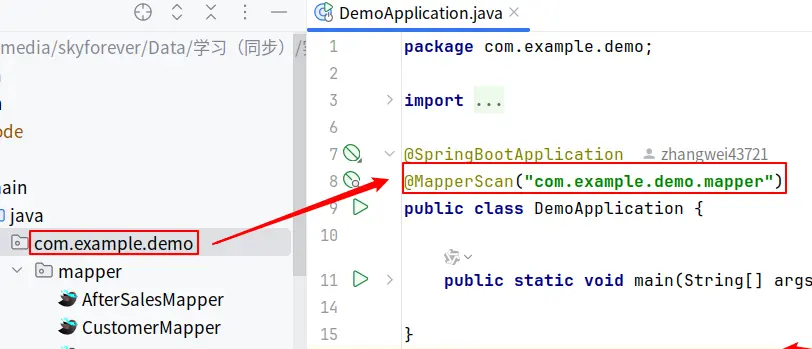 .
.